


Connie’s Component Shelf
This was a birthday present for my sister Connie. I’ve made her things before, but it had been awhile (they were all made before this blog was a thing, for instance) and I like to think my skills have been upgraded a bit since then.
Her requirements were very simple. It’s basically a bookcase, but it’s intended to hold A/V components rather than actual books or knicknacks.
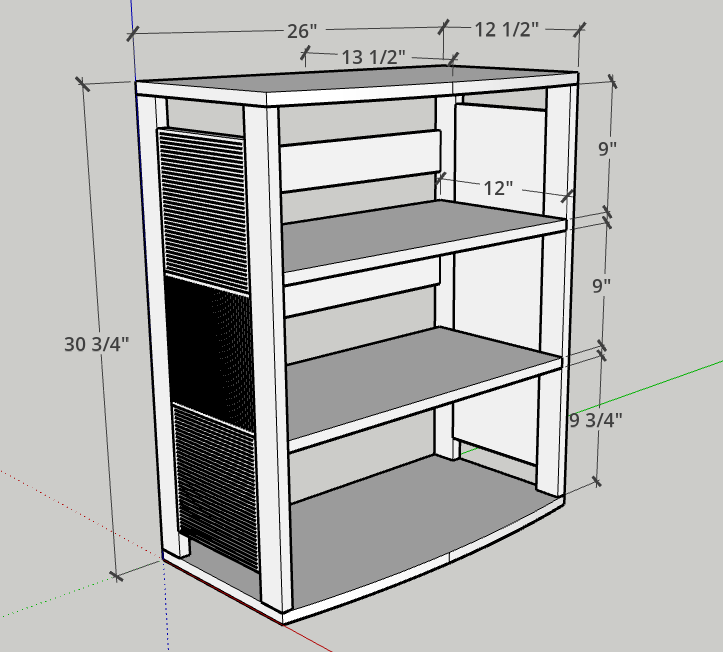
A lot of this design came from the simple requirements. The shelves are fixed in place. The height and width are enough to fit the largest component, and the open back (with 3 braces) provides both airflow and easy cord passage. The sides are my idea, and they are similar to a design she already has in the room, so this will seem like it belongs there.
For wood I used primarily Peruvian walnut, which I’d picked up from Woodworker’s Source. I also used some walnut plywood, which was left over from the bathroom vanity project in 2023, and some walnut veneer.
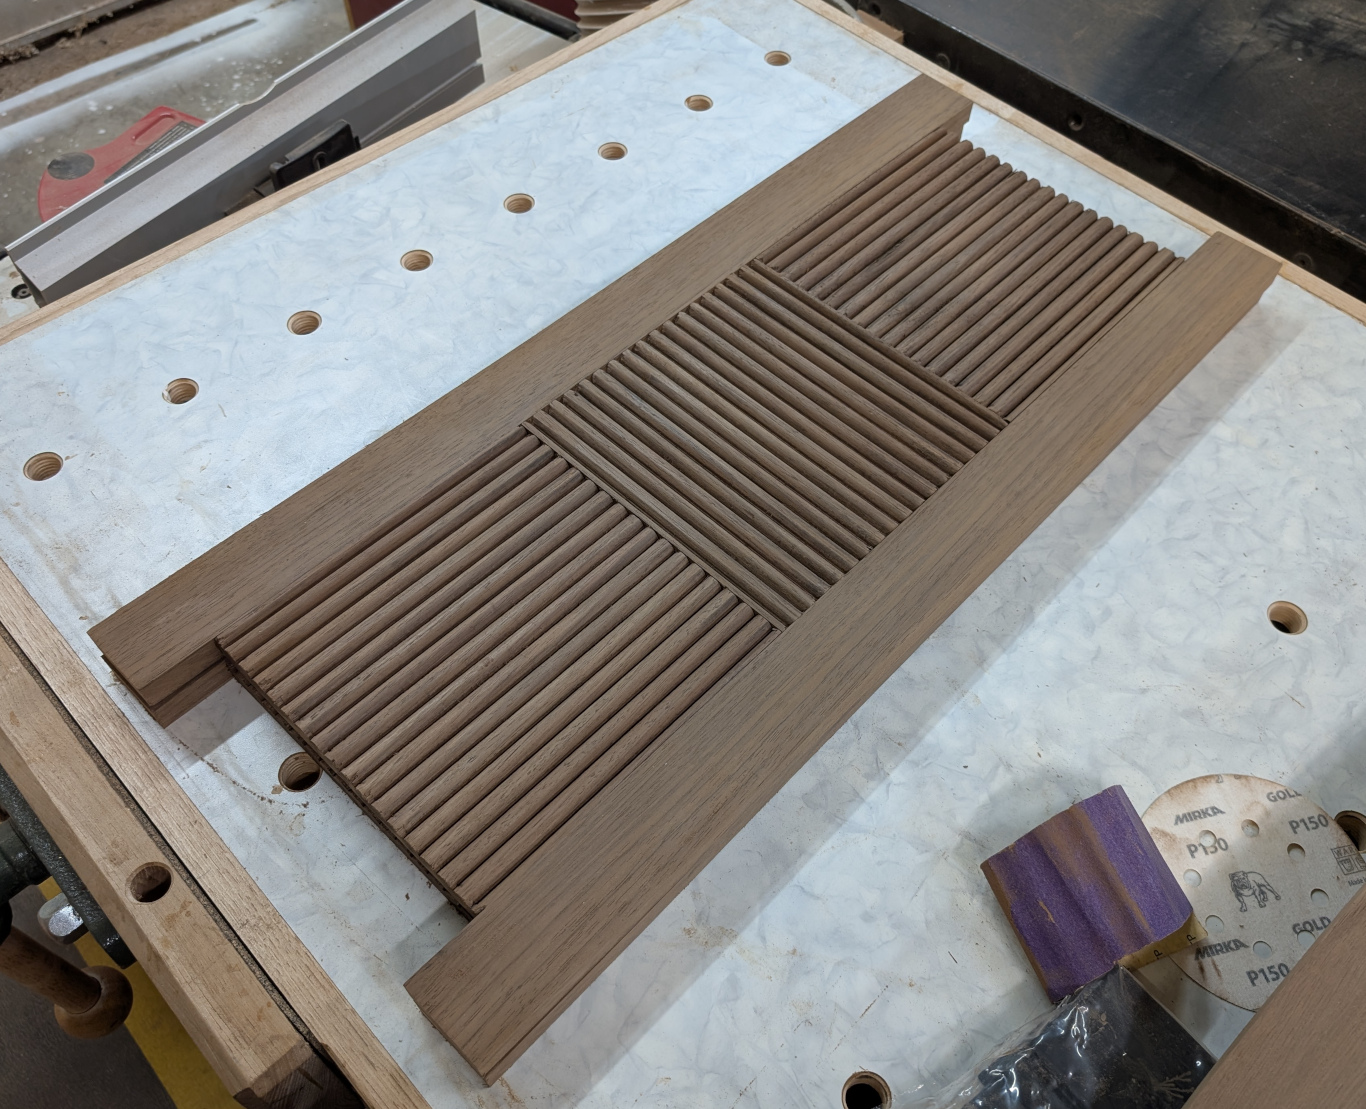
The most striking detail was the side panels, so I tackles those first. I used the CNC to make them and a point-cutting 1/2 inch beading bit (cuts two half beads in a single pass). I didn’t have that bit in my tool database, so I had to create it and play around a little to figure out acceptable feed and speed rates. I also learned very quickly that I had to cut all of the sections individually because going across the grain was not going to work, which made the assembly of these kinda of tricky.
The CNC worked fine, and soon I had my 6 panels cut out. They fit nicely between two straight uprights, but wood movement was going to make it a little odd to put together. The middle piece had to be rotated, which meant that it and also the piece above could not be glued into place — the middle would expand a little (maybe 1/4″) in the humid seasons, so the top part of the pattern also had to be able to move with it. That would work out in this case because the sides would be glued and tenoned into the top and bottom.
So, having solved that problem I moved on to cut the rest of the pieces. I made frames out of solid Peruvian walnut and cut panels out of walnut plywood so that they’d be stable. And I had some quilted maple veneer left over from Amy’s desk, so I used that in the top.
The top and bottom are mitered at the corners, and I made the front an inch wider to allow me to make that nice curve in the front faces. The shelves only have front and back strips because the sides are enclosed, so they won’t be seen. I went ahead and cut the curves on the front and back, and I had most of the pieces ready.
Something was bothering me, though. When sanding, I’d accidentally gone through the face veneer on the plywood in several places, and I know from prior experience that I would not be able to hide that with stain. And my frames were not absolutely even with the plywood, which was the reason I’d gone through the face veneer in the first place.
In the end, I decided to worry about flatness first. I planed the panels just until they were meeting absolutely smoothly, knowing that would cost me more face veneer but we needed to be flat above all. And then I used walnut veneer to cover both faces of those shelves.
The result was … okay. The shelves were flat, and the extra layer of veneer top and bottom made up for what I had to plane off to get them that way. But the color was way off. The (domestic) walnut veneer was several shades lighter than the (imported) Peruvian. It wasn’t really a surprise, but when I put the pieces next to the solid ones it was a very obvious difference.
What to do? I thought about various options, and decided to try the cheapest one first. I took a can of dark walnut stain and applied a coat to the two shelves. Once that dried and I sanded it back a little, it was a lot closer to the solid walnut in color. Time to dryfit.
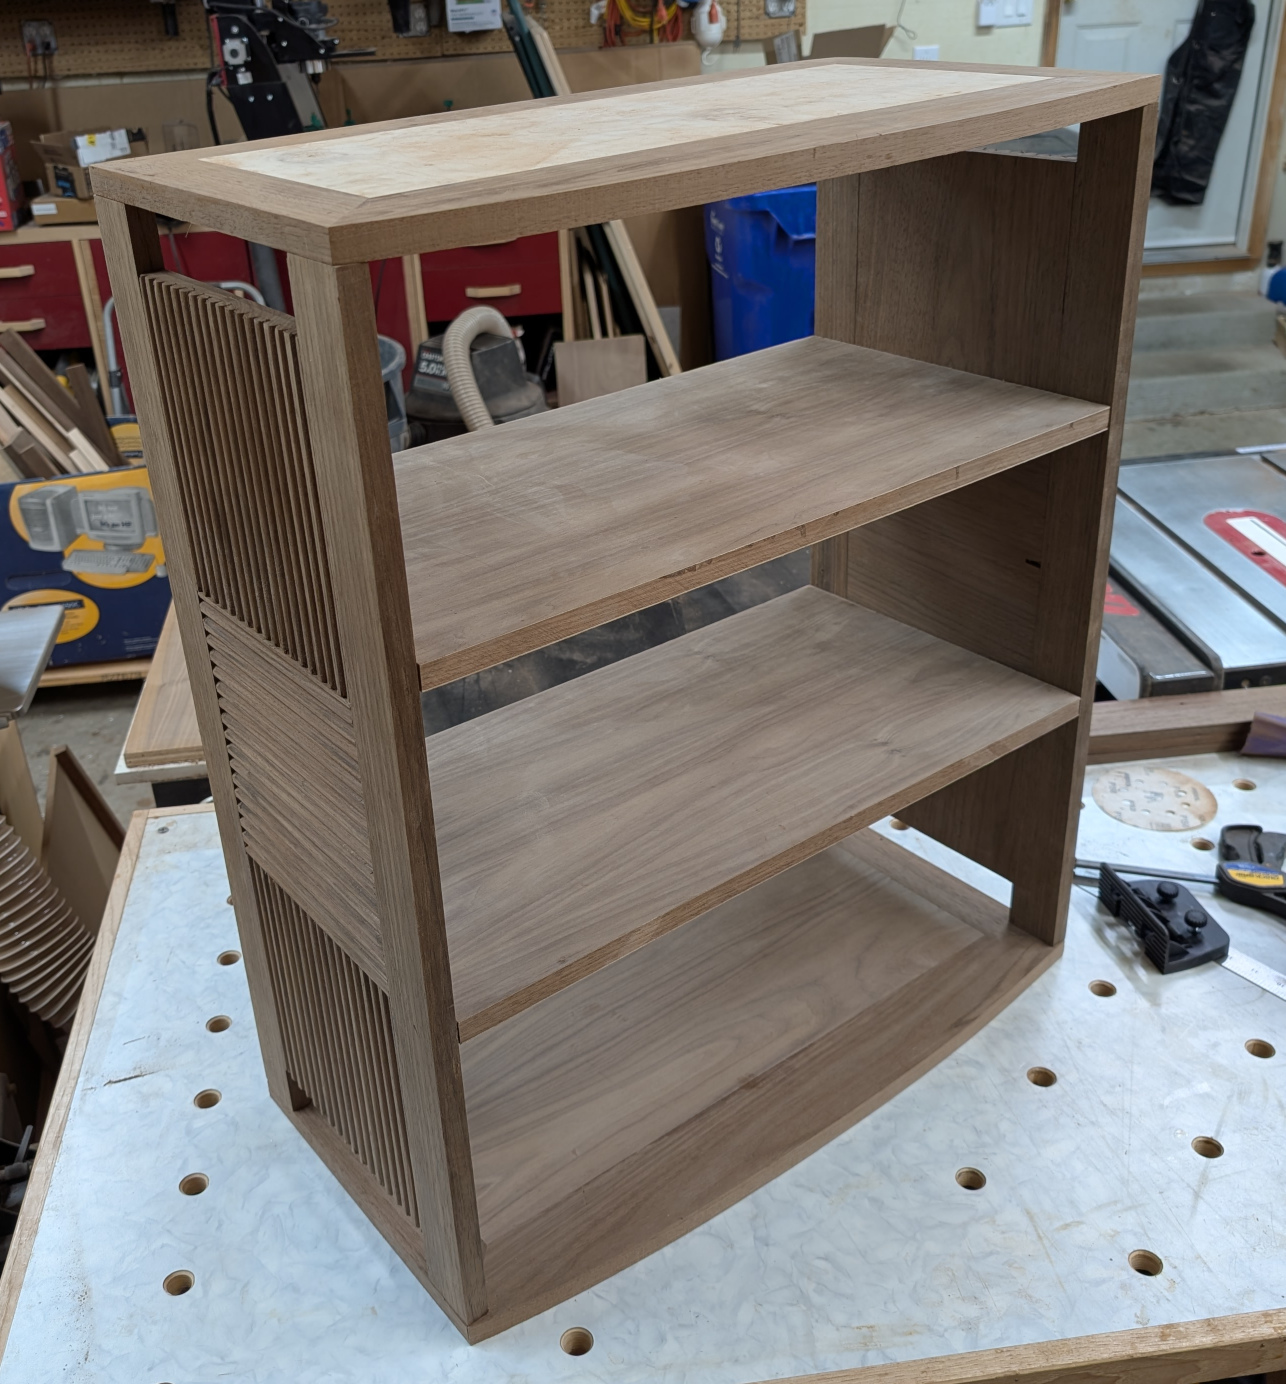
Okay, that would do. For reference, the panel in the bottom did not get stained, so you can see the original contrast level and you can compare the inner shelves with the solid sides and see that it’s much closer. I decided against staining the bottom because I didn’t want to get stain on the Peruvian and make it even darker, and since it was a penetrating oil stain I didn’t trust just applying tape as a barrier.
I still needed to make the slats for the back. I had a long piece of Peruvian leftover from the desk, so I used that and cut it into three pieces. It was 1-7/8″ wide, which would do fine for this. Basically I just needed the solid tie from side to side to make the whole structure more rigid.
I haven’t really said a lot about joinery yet. This was a simple project and I was under a deadline because Connie’s birthday had already passed. So one way I sped up the project was keeping the joinery very simple, and using the Domino for everything. It’s not the height of craftsmanship, but it did the job and was quick and accurate. Dowels would have worked just as well. For the sides, I glued the bottom square of each thoroughly, and laid a bead of glue on the butt joint between the bottom and middle sections. The middle and top got extra-wide mortises and no glue, so they could slide up and down freely but stay in place.
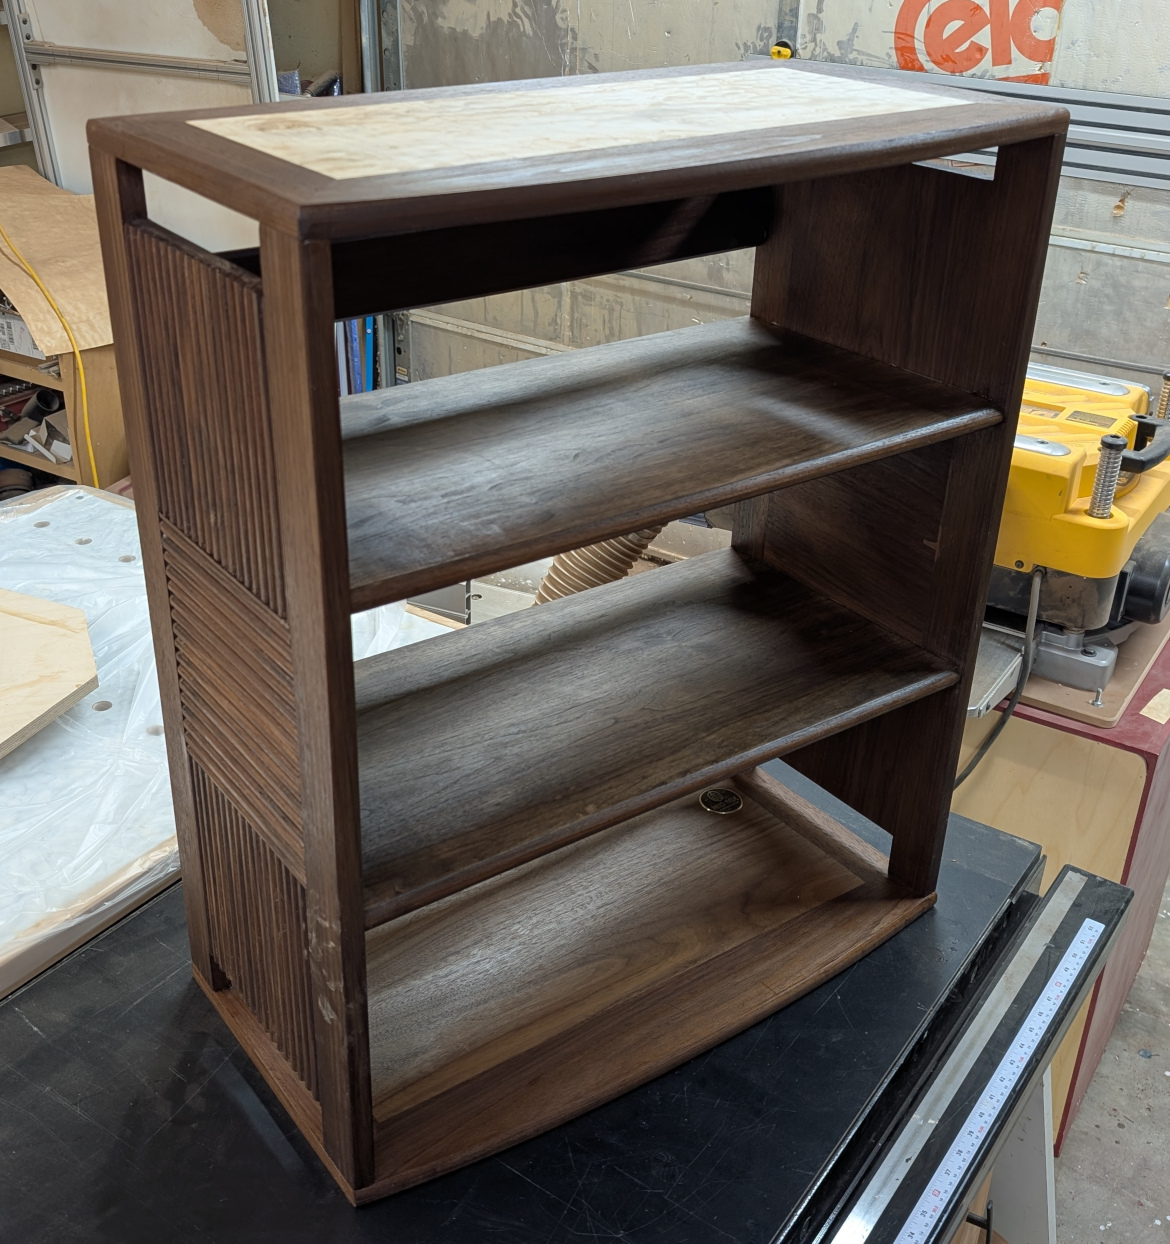
Everything got sanded (and yes, it was a PITA to sand all those beads) and it was time to consider edge treatments. I started by putting a bullnose profile on the edges of the fixed shelves with a block plane, so it had a handmade look and feel to it. The sides got a similar treatment but cheated toward the outside, which had more curve to meet and smooth out the transition from front to side. The top and bottom got a more pronounced bullnose, and the back slats got a heavy chamfer on the top and bottom.
Once fit together again, the pieces looked good. I glued it up and applied two coats of Gilboy’s hard wax oil, which looked great and you can barely tell the color different between the solid sides and the veneered and stained shelves. I was happy enough with this piece to put my maker’s medallion on it.
Leave a Reply