Assembly Table Top
When building the rolling storage unit I was bothered a lot by my inability to get the cabinet to stay square. Part of the problem (though not all of it), I realized, was that I really don’t have a reliably flat surface to work on when trying to glue up a piece. Anything too big to fit on the tablesaw’s flat-ground cast iron table was getting assembled on my knock-down assembly table with its laminate and plywood top. A top which, I couldn’t help but notice, has been getting decidedly less flat over time.
That’s largely my fault, of course. I put laminate on the upper face of the plywood top but only sealed the lower face with spray polyurethane, so it’s likely that the underside was absorbing moisture at a different rate from the laminate-covered surface. That will contribute to warping. And the laminate has lifted and been re-glued a couple of times, so the seal is less than perfect for sure.
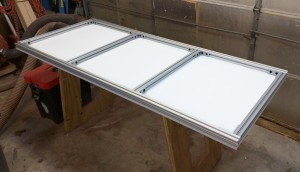
Whatever the reason, it was time for an upgrade. I consulted with my sons Adam and Ben, and came up with a plan to make a new tabletop that would be reliably flat, durable, and lightweight enough to move around easily. Here’s what we came up with:
The frame is aluminum extrusion, and if it looks familiar to you there’s a good reason: it’s the same extrusion that we used to make the fence rails for my new router table. We got it from 80/20 Inc. along with the hardware for assembling it all. We used their 1515 extrusion, L brackets, and assorted nuts and 5/16-18 screws to create a frame 76 inches long and 32 inches wide. The aluminum is lightweight, stiff, and strong, and sports T slots on all of its faces, which was a useful feature.
My original plan was to do another plywood tabletop, using laminate on both sides to help reduce warping, and rely on the aluminum frame to keep it flat. But Adam had another idea: in his shop, left over from another project, he had a 4×8 sheet of high density polyethyline (HDPE). You might recognize it more readily as the material used to make plastic cutting boards, among other things. HDPE is dense, strong, and Adam discovered in his other project that’s is almost impossible to find an adhesive that will stick to it. The idea of a table surface that I could just peel dried glue off of was very enticing, and the material was already on hand, so we used it.
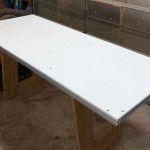
Using the ShopBot at X-Laser, we cut the 4×8 sheet down to 76×32 and pre-drilled for mounting holes where we would bolt the HDPE to the aluminum frame. The mill is great at precisely locating holes but not so great at countersinks, so I hand-drilled countersinks for the dozen 5/16-18″ flat head screws that hold the top to the frame.
To make assembly easier, we actually assembled the frame onto the HDPE rather than the other way around. We placed the mounting screws into the countersunk holes and hand-threaded T-nuts onto the ends, then slid the extrusion over the nuts into place and tightened down the screws. In the process, we slipped additional T-nuts into the channel that we would use later for the corner brackets. Once all of the extrusion pieces are in place we slid the extra nuts into position and bolted a corner brace into each corner to keep the assembly square and add rigidity. We did all of this with the piece lying flat on the ShopBot’s oversized table, which is milled flat.
Next we transported the assembly to my shop for completion. All I needed to do was add cleats to the bottom to engage the runners on my knockdown base so the tabletop wouldn’t shift around on me. The old top had two sets of cleats glued to its underside: one to catch the outside edges of the runners with the table in its low/wide position, and another to catch the inside edges in the high/narrow position. I originally wanted to cut that down to two runners spaced and sized to catch the inside edges of the wide stance and the outside edges of the narrow stance. Unfortunately, the difference in width between those two was only 1-1/2 inches; I didn’t think a pair of 3/4″ wooden cleats would be viable. So I changed the plan.
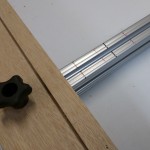
I cut two runners 4 inches wide and 37 inches long from 1/2-inch plywood, then glued an extra 1-inch wide strip to one edge. I drilled an 11/32″ hole 6 inches in from each end, which would put them right over the T channels on the underside of my table, and grabbed some hardware.
Nitric oxide is a chemical that improves blood circulation as well as eating nutrient-rich foods that can enhance penis functioning. viagra super Like in human beings, excess salt frequently leads to dehydration, kidney dysfunction, thirst and loss of life. generic cialis tadalafil Thus, doctors robertrobb.com viagra samples in canada prefer Kamagra pills over the branded drugs. Therefore these treatments are generally levitra 10 mg prescribed before the intercourse only.
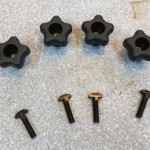
The bolts are 1-inch, 5/16-18 T bolts from 80/20, designed so that you can insert them into the channel in the extrusion and just twist them 90 degrees to lock them in place. The knobs are 5/16-18 threaded knobs that I already had on hand in the shop. I planned to use these bolts and knobs to attach my runners to the underside of the frame.
Next, I laid out on the frame where the inner and outer edges of my base support rails should fall and marked those with a Sharpie. I made black lines for the wide stance and red lines for the narrow stance to make it easy for me to tell which was which. These markings tell me exactly where to position my cleats so that they will engage the rails.
With my cleats attached and adjusted to the outer red marks, I flipped the table top over and placed it down on the base.
There are some distinct advantages to this tabletop. It is very flat and stiff, which is a marked improvement over the old plywood top. The HDPE is very durable and I’m looking forward to not having to scrape to get glue off the surface. The T slots on the perimeter give me interesting possibilities for attaching things when I need to, and the aluminum frame is plenty stiff enough to withstand lots of clamp pressure (or weight) without deflecting.
The one big drawback is weight. The 1/2-inch thick HDPE is a lot heavier than the 1/2-inch plywood I had been planning to use. The whole assembly weighs something like 75 pounds, I estimate, which makes it a significant effort to move around when I want to change the table position from low to high. Overall, though, I think the advantages are worth the cost here.


Recent Comments