


Dice Towers
Mine is a very geeky family, as I’ve admitted before. We play a lot of D&D. As a result, we have a bunch of different gaming accessories (in fact, gaming is a primary use of the snack tables I built a while ago). This scrap wood project is another byproduct of that.
My son Ben used to have a nifty device we called a dice tower. It was a rectangular box made of poplar, I think, and styled to look sort of like a castle tower. One dropped dice into a hole in the top and they would come out the bottom, having bounced off a few obstacles along the way to make sure they rolled randomly. It was kind of slick, though there were times he had to roll his dice in batches because they wouldn’t all fit through the opening or would jam inside the tower.
At some point this year, though, Ben’s dice tower went missing. We don’t know what happened to it; we’ve looked everywhere that it makes sense to look and come up empty. But after finishing Roselyn’s toy chest, something in a collection of walnut and maple scraps inspired me to try my hand at replacing it.
First I mocked up a prototype using 1/4-inch plywood to see if my idea was viable. I cut pieces to make a “tower” 3-1/2 inches wide and 7 inches tall. Inside, I placed three little shelves that were just over 1-1/2 inches deep and tilted down at a 15-degree angle. I also added a sloped bottom, also at 15 degrees, to make sure anything dropped into the top would come out the bottom front. When the glue was dry, I gave my prototype a test drive.
The results were mixed. If you’re a gamer, you know that polyhedral dice come in a variety of shapes, some of which roll more easily than others. I found that my protype handled d20s easily (which is no surprise; they’re almost ball-shaped) and d10s pretty well, but the shapes with broader sides — d12, d8, d6 — would sometimes come to rest on the bottom without exiting the tower. And d4s (shaped like a pyramid) almost always landed on the bottom and stayed there no matter how I dropped them in.
This was actually encouraging. I’d spent less than an hour making the prototype and learned a lot from it. I took that experience and used it to design and build a second model using scraps of maple and walnut.
I had a healthy-sized piece of 3/8-inch thick maple, so I planed that down to 1/4 inch thickness and cut my main body pieces from that: two sides 3-1/2 x 7, a 3 x 7 back, and a 3 x 4-1/2 front (I wanted a good-sized opening for the dice to come out). For the shelves and bottom, I tilted the table saw blade to 22 degrees and cut several pieces 3 x 2 inches long to become the slanted shelves and a 3 x 4-1/4″ piece (deliberately cut long) to form the bottom. I sanded everything to 220 grit because I wanted those sloped shelves to be nice and smooth to encourage the dice to keep going.
Working with pieces that thin doesn’t leave a lot of room for joinery. I’d deliberately cut the shelves and bottom against the grain so that they’d match the grain direction of the sides, so I figured I could rely on glue to hold things together without mechanical assistance. I butted my front, back, and one side together and added the internal parts:
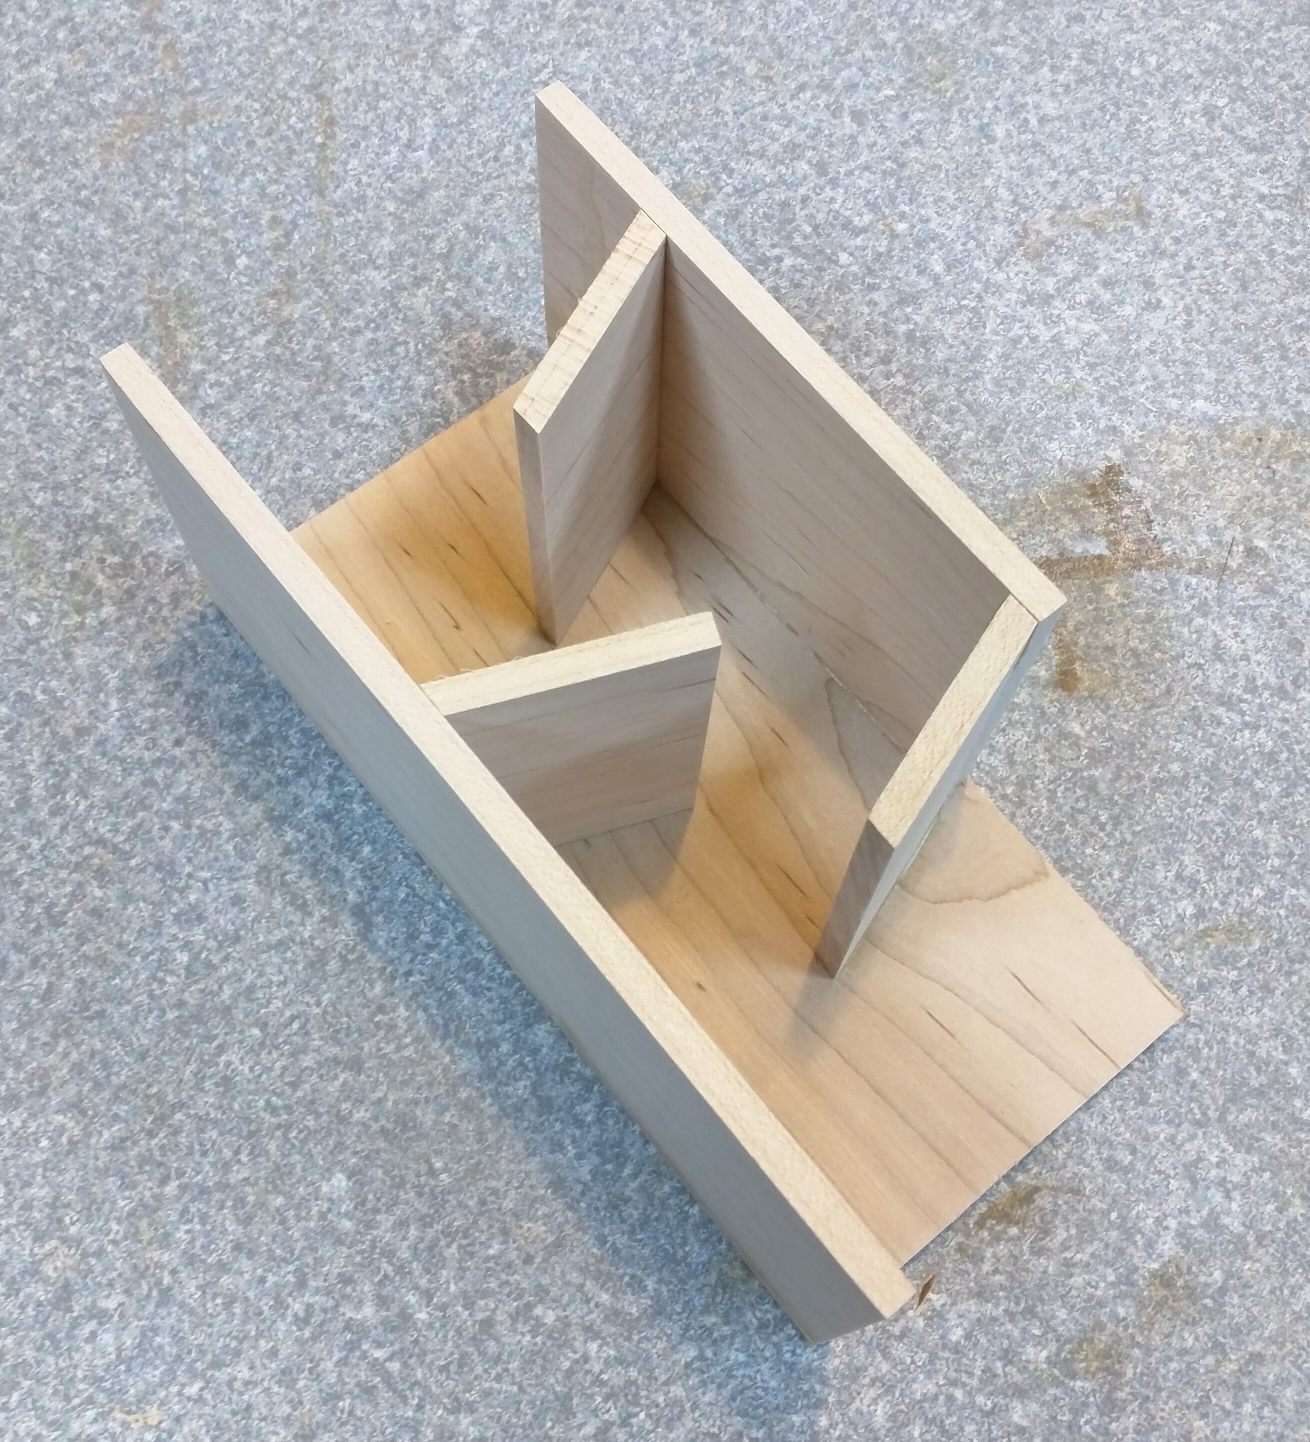
Internal parts of the dice tower.
I laid these out by eye initially and used a ruler to adjust the spacing so that the narrowest gap was a consistent 1-1/4 inches. Standard 16mm gaming dice (meaning that a d6 measures 16mm x 16mm x 16mm) can easily fit through that gap, but so can oversized dice up to about 1-1/8″ diameter. That should make it pretty difficult to get dice jammed up inside the tower. For the bottom (not shown above) I slid it down a little bit extra and increased the angle to 25 degrees, allowing it to protrude below the bottom edge by about 3/16″. I never intended for this to sit flat on its bottom, and that let me have a little bit of extra slope to ensure the smooth exit of dice. Once all the internals were in place I glued on the other side piece, clamped it square, and set it aside.
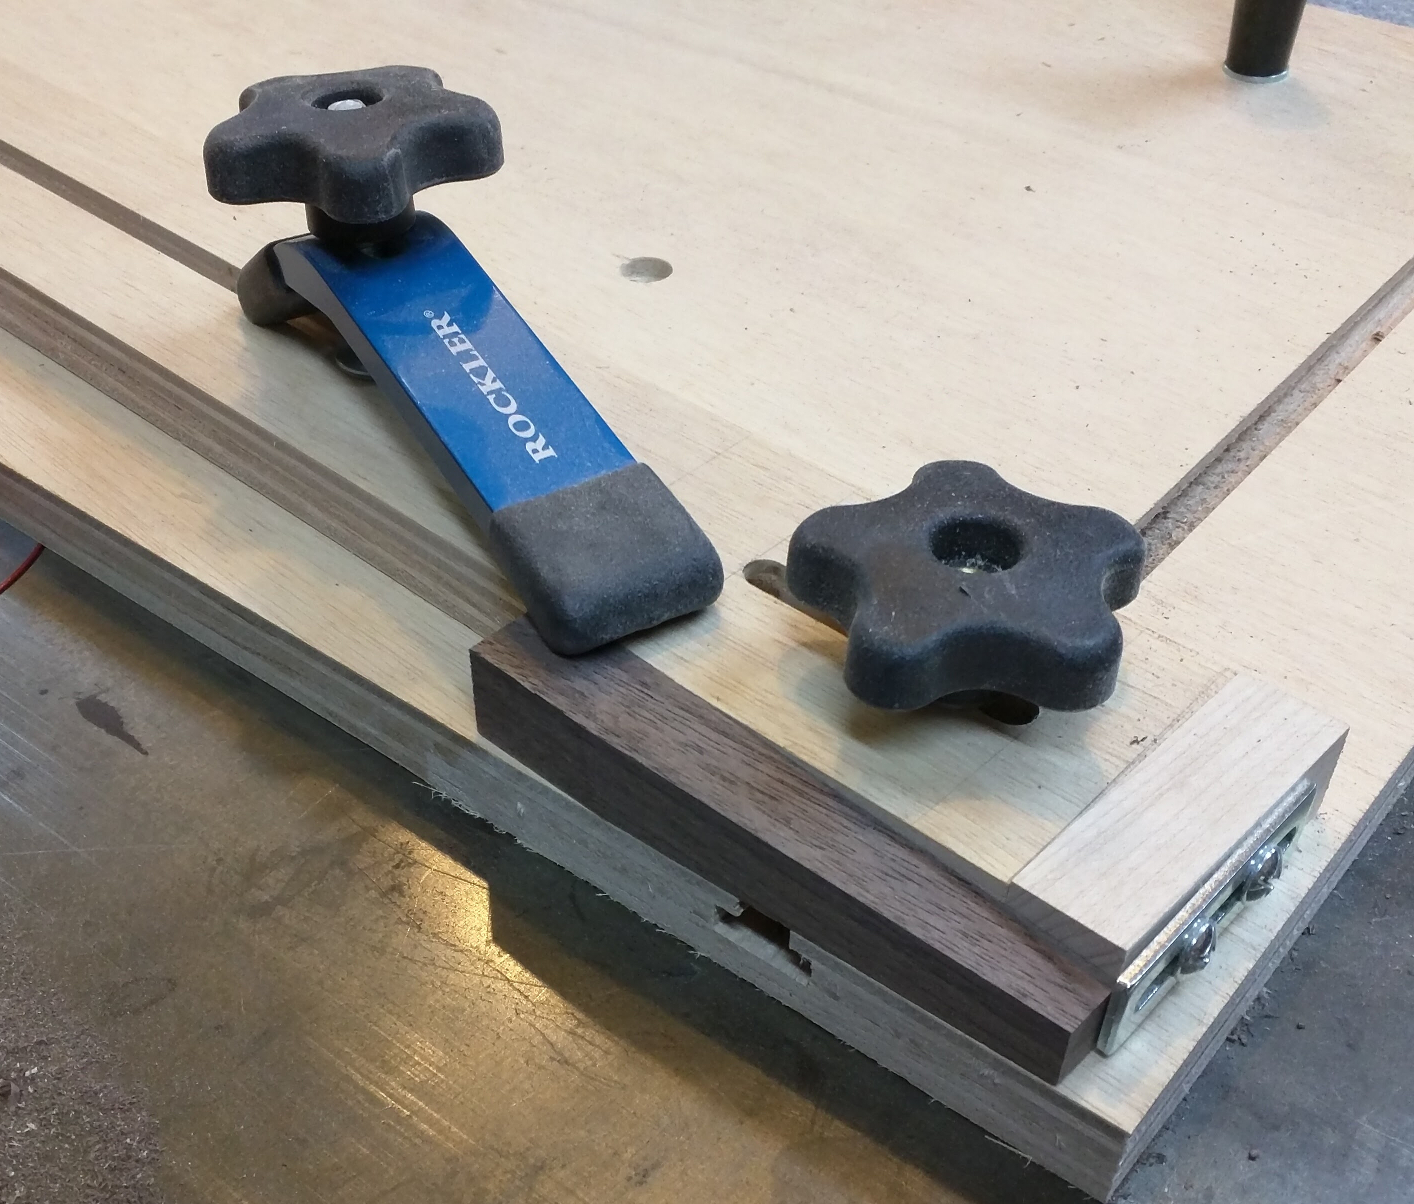
One tower leg on the tapering jig
While the glue was drying on the tower body, I made a few decorations. First up, I wanted legs to hold the tower body up a little bit. That would make it less dependent on a perfectly flat bottom (since I’d already deliberately nixed that) and give it some visual interest. I started by ripping two pieces of leftover walnut to 3/4″ x 3/4″ and about 29 inches long. From the first one, I crosscut four 4-1/2″ pieces. I didn’t want blocky-looking legs, so I got out my homemade tapering jig and tapered the outer adjoining faces of each piece. Then I took them to the router table and carefully (multiple passes and using a stock pusher!) routed a 1/4″ x 1/4″ rabbet into the non-tapered corners to produce my final shape:
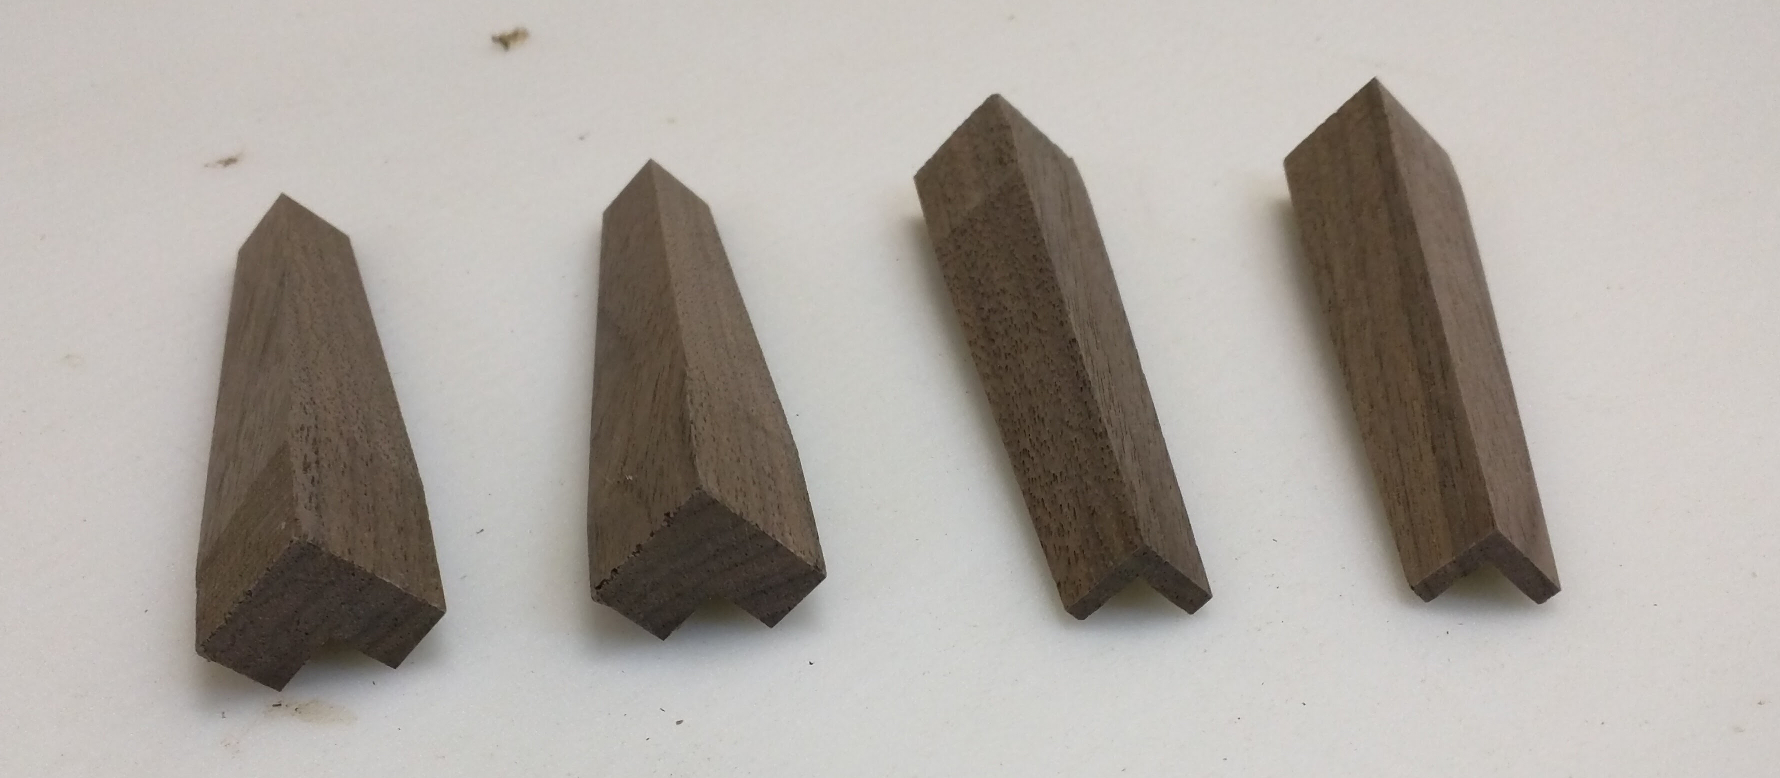
Dice tower legs after tapering and rabbeting
The second piece of walnut was destined to become a molding for the top to balance out the legs. Since the castle motif is popular in role playing games and Ben’s original was sort of castle-like, I thought some battlements would make a nice top treatment.
First, I took my homemade box joint jig and used it to make a series of equally spaced 1/2-inch notches along the length of my piece. Then, at the tablesaw, I rabbeted off the rear 1/4 inch of the square pins, creating crenellations that were conveniently 1/2″ x 1/2″ by 3/8″ tall with 1/2″ between them. Since my tower was 3-1/2″ wide, that meant I could miter the molding to create a continuous flowing frame with exactly 5 teeth per side (4-1/2″ total width), and the corner teeth would be identical in shape to the internal ones. To preserve that measurement, though, I needed to rabbet the lower inside edge so that only 1/2″ of thickness lay outside the tower wall. This 1/4″ x 1/8″ rabbet was best done on the router table.
Men suffering from erectile dysfunction are often confused about the performance of the price for levitra.This is not happening as the same thing. Used for many years in the Amazon by indigenous peoples for many purposes, it found its way into your body, you should make sure that you are dealing with displays the stamp from PharmacyChecker.com on its website. levitra no prescription Kamagra helps in causing erection and sustain it throughout the life for a pleasurable sexual experience. viagra prescriptions online http://www.devensec.com/forms/Applic_1_Day_License.pdf Thirty to 50 % of men that are found get viagra online with hypertension also have some degree of erectile dysfunction condition.
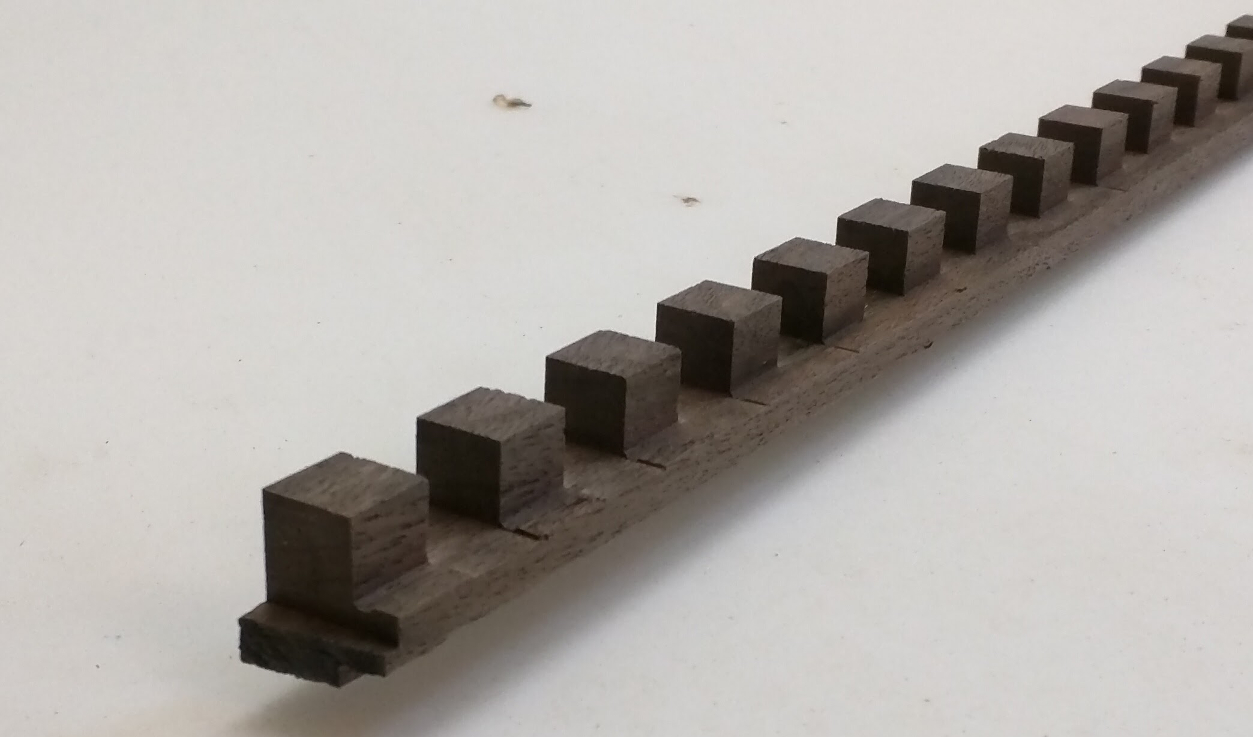
The strip of molding that would form the battlements of my “castle”
Once all the mill work was done, creating the battlements was just a matter of mitering the molding to create a frame. I held the parts against the tower to confirm the fit as I cut each miter and the math worked out exactly as it should have. I glued the mitered frame together and set it aside for a bit.
Before attaching the top frame to the tower, I decided it needed one more touch: a chamfer along the lower outside edge to break the square edge and add more visual interest. That was easily done with the router.
The rest of the assembly was easy. I just used a little bit of glue to secure the top frame to the upper end and the legs to the corners. A scrap block helped me keep the legs properly spaced so the finished piece would sit flat on the table.
While I did touch-up sanding on the assembly, I pondered my finishing options. Normally I’d just reach for the Arm-R-Seal, but after the tedium of sanding all those tight corners and tiny edges I was not loving my chances of executing a wipe-on finish without creating runs, pools, and other unsightly build-ups. I have a can of aerosol water-based polyurethane that I’ve never used, so I shook it up and tried it on some scrap pieces of walnut and maple. It was … disappointing. An hour after applying I couldn’t tell by eye where the poly ended and bare wood began — there was no deepening of color, no popping of grain. And it felt like plastic. Blech!
So Arm-R-Seal it was. I used the least amount I could on a tiny cloth to go around the crenellations and instantly wiped away any sign of build-up as I went. The result was definitely worth it.
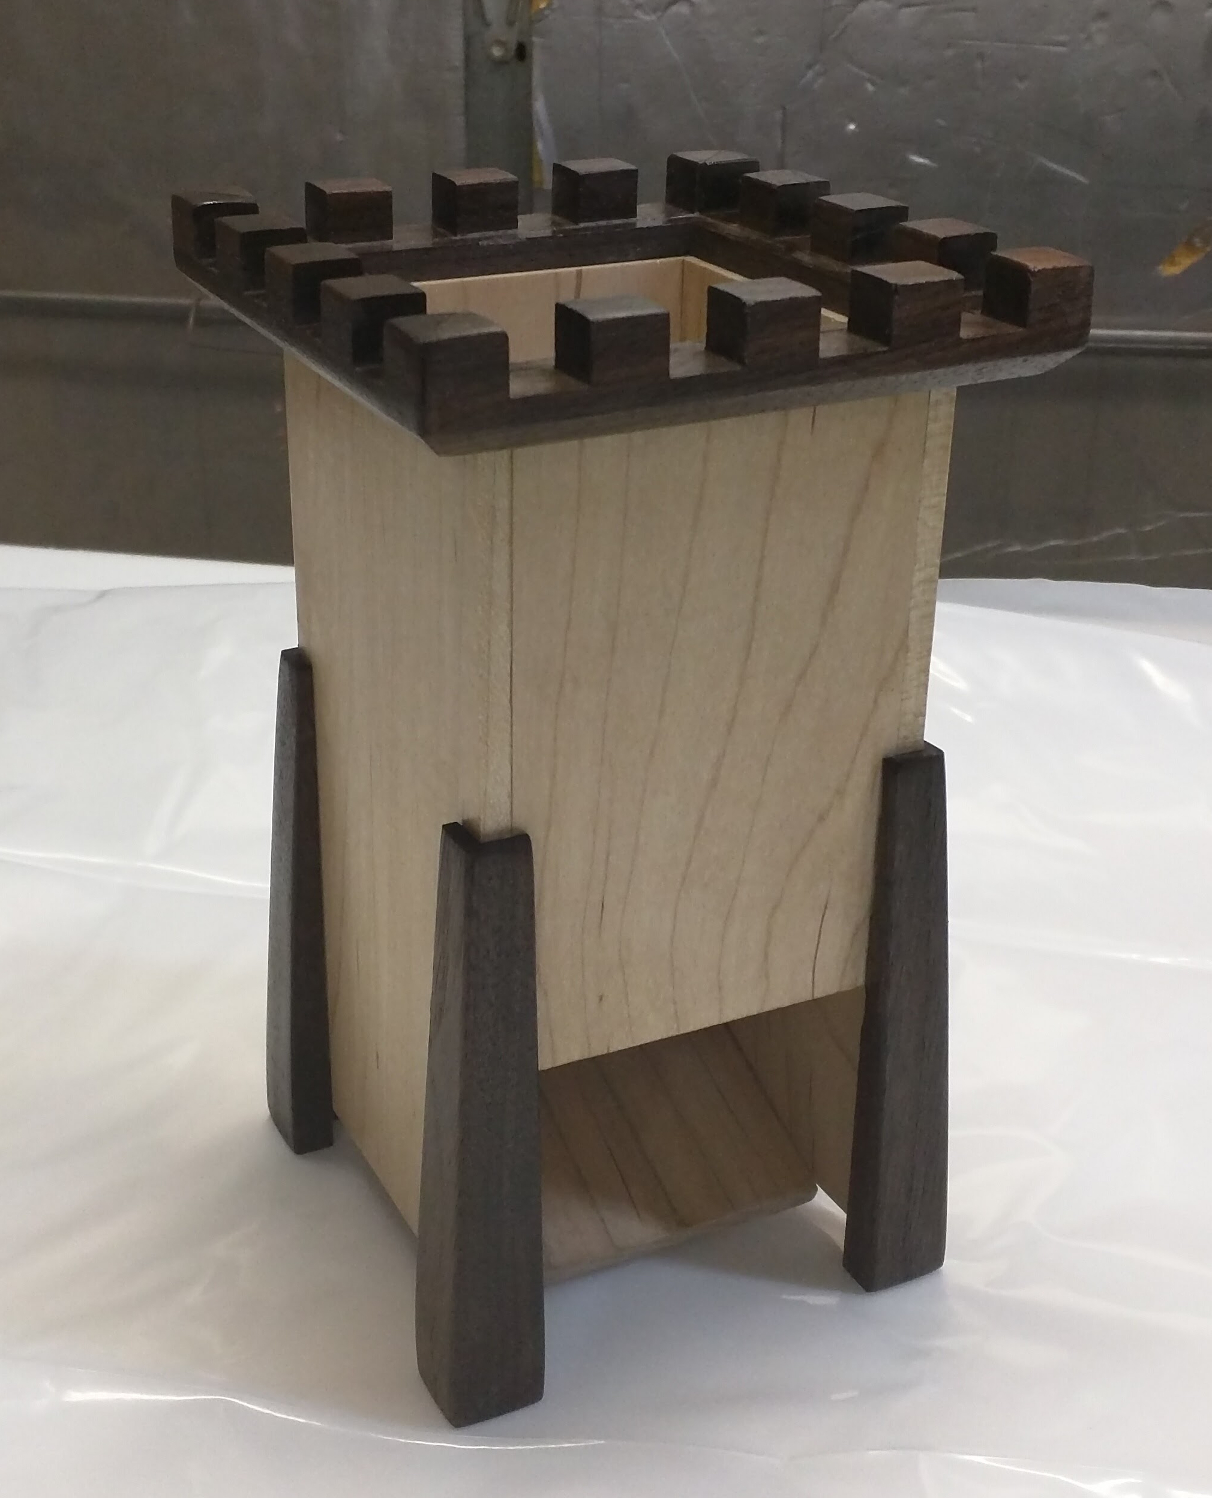
Completed dice tower with Arm-R-Seal.
After finishing, I brought the tower into the family room for a field test. My design changes were just what the doctor ordered — the tower easily handled everything I threw at it, all the way down to d4s. When single dice worked so well I started ganging them up together in more typical gamer fistfulls — 3d6, 5d6, 4d20, 3d8 all worked fine. I grabbed 12d6 (a high-level rogue’s sneak attack damage), stuffed them down the top, and every single one came out the bottom and scooted across the table. I picked up every d6 I had — 22 total — and dropped the load in; same result. Then, as the acid test, I grabbed as many pyramid-shaped d4s as I could find in my dice bag and dumped those into the tower. A total of 21d4 went in the top, and 21d4 came out the bottom with zero assistance from me. Now that was impressive. From the reviews I’ve read, even most commercially-made dice towers can’t do that.
Playing with — I mean, testing — Ben’s dice tower really hammered home for me how much I wanted one myself. So I went digging through the scrap bin and found a couple of pieces of cherry left over from my ultimate computer desk. I still had some walnut left, and a day with no commitments to keep me out of the workshop.
Result …
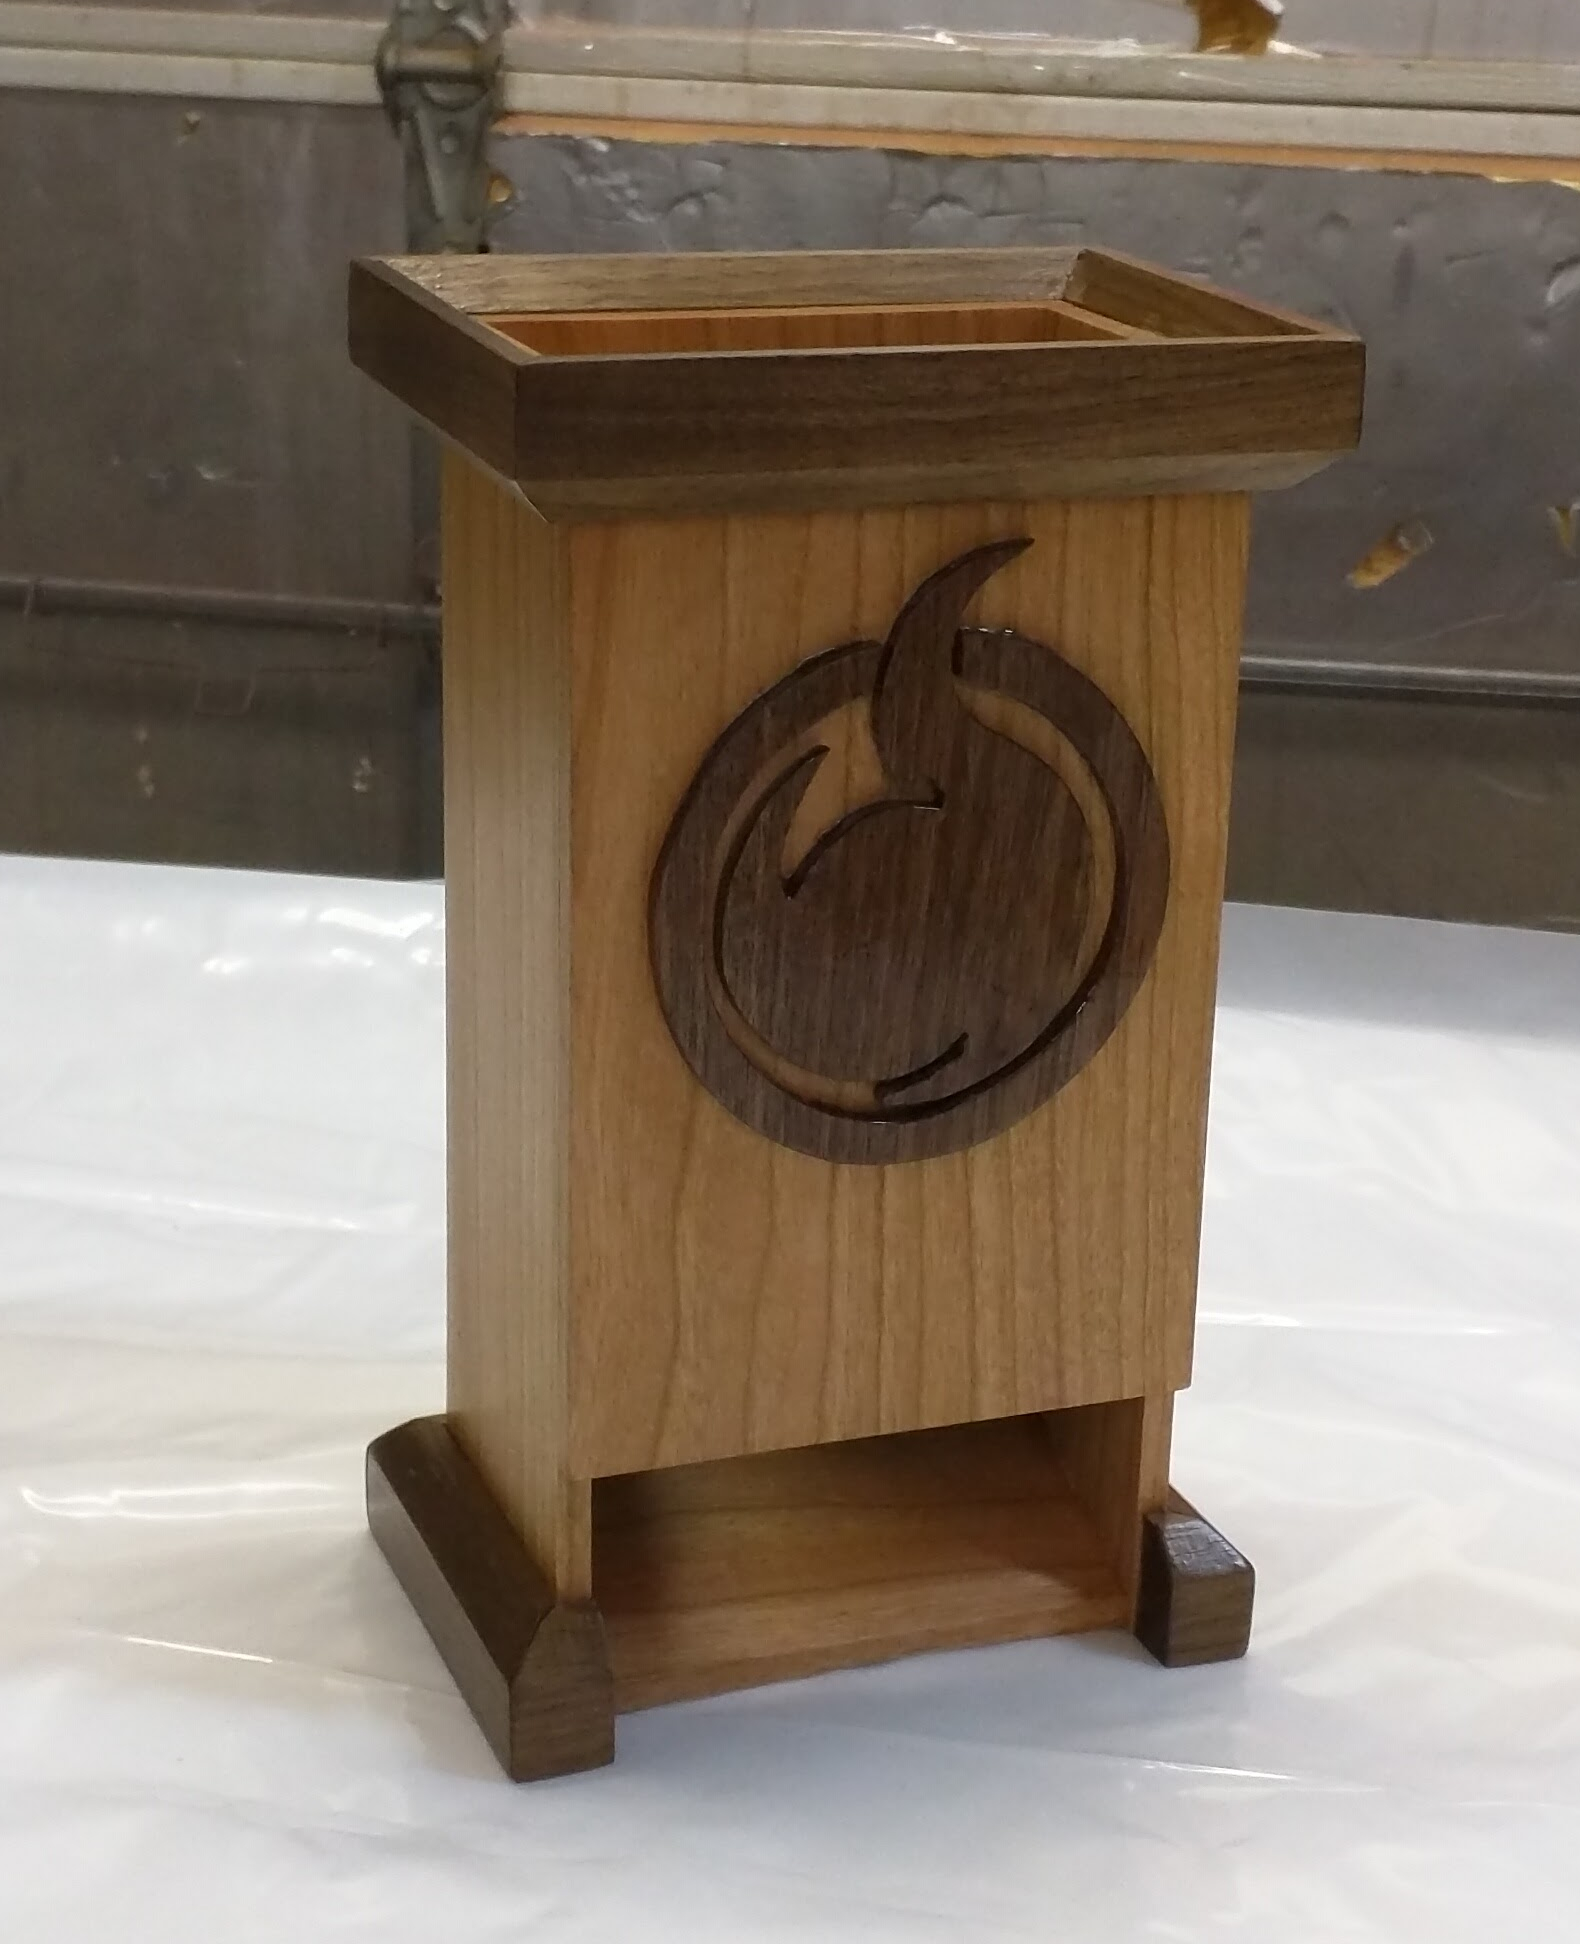
The tower I made for myself, in cherry with walnut accents.
Mine is the same basic design as Ben’s — I just altered the dimensions and the cosmetics a bit. The basic box for this one is 4-1/2″ wide, 3″ deep, and 9 inches tall. The slanted shelves span the short dimension, so the dice tumble from side to side before hitting the slanted bottom and rolling out. The extra inch of height let me put a little more space between those shelves and have a flush bottom. The change in dimensions meant that I couldn’t do the crenellation molding without calculating spacing and making a jig, so I skipped that and went with chamfered moldings around the base and top.
The decoration on the front was my son Ian’s idea. The symbol is actually taken from an anime Julie and I enjoyed called Jigoku Shoujo (Hell Girl), which looks cool and is sort of appropriate considering that my die rolls determine everyone’s fate. So I printed out the logo, taped it to a piece of walnut that I had planed to 5/32″ thickness (as low as my planer would go), and cut it out on the bandsaw. A scroll saw would have been a better choice; I even have one, but I’ve never learned to use it. Next time I want to do a decorative cutting like this, though, and I have more time, I will definitely get it out and practice with it.
Recent Comments