


Using a Dovetail Jig
Like many woodworkers, I had a shameful secret stashed away in my shop for years: a commercial dovetail jig, purchased and then never used. I’d bought it cheap at a wood show, intending to dovetail my drawers by default as a sign of craftsmanship (you can laugh with me if you like!). Then I ran smack into the harsh reality of actually trying to use the thing. After spending a weekend trying and failing to get one decent-looking half-blind dovetail joint, I put the thing back into the box and shoved it far under a work table, figuring that I just didn’t have the skills for fancy joinery. When I encountered it again while cleaning out the shop, I pitched it because just looking at the thing made me feel inadequate.
Then Julie asked me what I might want for Christmas. With that incident fresh in mind, and knowing I’d be making drawers soon for that maple bedroom set, I said a dovetail jig. Julie asked me to specify which one. Remembering the plastic template and cheap construction of the recently departed unit, but not wanting to ask for the nice-but-expensive Porter Cable model, I picked the MLCS dovetail jig. She bought it for me, along with some additional templates for different sized dovetails, through dovetails, and box joints. Excited, I took it into the shop, set it up, and made some test joints.
They sucked. What’s more, I made multiple joints without changing any settings and got different fit problems. It made no sense; it had to be something I was doing wrong. Once again, I set it aside and went back to lock rabbets, but every time I saw that jig sitting there I felt inadequate and ashamed because I’d wasted Julie’s money on something I was clearly not skilled enough to use.
Then, I went to Weekend with Wood 2016. One of the classes I signed up for was “Getting the Most from your Dovetail Jig” with Jim Heavey. Jim taught the class using a Porter Cable jig (the one I’d been too timid to ask for because of the price), but its anatomy was very similar to the MLCS and a lot of others. I picked up a number of incredibly useful tips in that class, and came home ready to give dovetails another go. The nine-drawer dresser project was the perfect opportunity.
Rather than start on my good stock, I went to a big box store and picked up some clear pine to experiment with. After planing it down to 1/2 inch thickness I cut some test pieces, got out my notes from Jim’s class and the MLCS instructions, and devoted an afternoon to practicing half blind dovetails.
It was still fussy work, but after about two hours of fiddling and tweaking I found the sweet spots and was able to make repeatable, well-fitting, good-looking joints. Just in case it’s useful to anyone, let me list out the key factors that made all the difference.
The Stock
The pieces you are working with can make your life easier or more difficult. Obviously you want your pieces to be flat and straight. Yes, the clamping system on the jig can force a slightly crowned piece into flat long enough to cut the joint, but it’s best not to rely on that any more than necessary. Pay extra attention to making sure your end cuts are square.
Mark your stock to prevent mental mistakes. Label each joint to identify which corner it is and which piece is which. For example, I number the front left corner corner 1 and work my way around counter clockwise. Mark both sides of each joint. My pieces for a drawer with 4 dovetail joints are labeled 1F (#1 front), 1S (#1 side), 2F, 2S, 3B (#3 back), 3S, 4B, 4S. Write the marks directly on the wood, near the joint location, and with the piece oriented so that your markings are right-side up as you look at the piece in its final orientation. This makes it much easier to keep track of which piece you have and which direction is up, which is vital to positioning the stock correctly on the jig.
Half-blind dovetails look best when the joint starts and ends with a half pin. If you bought a deluxe jig that lets you adjust the spacing and size of your pins and tails, then your stock can be whatever width you want it to be. If you didn’t, then you’ll need to note the spacing on your jig and adjust your parts’ width so that you get that half pin at start and end. Spacing varies with the jig and the template, so I can’t give you a table of “best” widths even for the MLCS jig. I made myself a story board, which I’ll describe further down, to take the guesswork out of it.
The Jig
Setting the jig up according to the manufacturer’s instructions is vital to get started. To get beyond started, though, you have to get really fussy about the subtle things that can introduce error into your joint that accumulates as you go.
Make sure the template (or comb) is parallel to the face of the jig. On the MLCS jig the template’s position is controlled by the position of a knurled nut and opposing lock nut on the end of a bolt. That means the left and right sides adjust independently, which makes it incumbent upon me to make sure they are exactly the same. If not, you’ll get a joint that varies in depth along its width — some pins might go in too deeply and/or stand proud of the mating surface.
Make sure the template is flat against the stock to be cut and that there’s no crud in the works between your pieces and the guides. Mark your pieces directly on the wood rather than with a masking tape label. (The thickness of masking tape alone might not be enough to mess with your joint, but why add built-in error?)
Make sure to apply even clamping pressure across the entire piece. With narrow pieces, that might mean placing a scrap piece of the same thickness under the clamping bar to prevent it from bowing or tilting. Uneven clamp pressure can allow pieces to shift during the cut and ruin your joint.
The guides on either side of the jig tend to be hard to see because of all the other parts around them and on some jigs are only 1/8″ or less thick. Make sure when you clamp your vertical piece into position that it’s pressed firmly against the guide, is making contact with the entire length of the guide, and also in contact with the template for the entire width of the piece. Any gap in either place means either (A) your end cut isn’t square or (B) you’ve come out of alignment with the edge guide. Coming out of alignment here can result in tails that get shorter as you go from one edge to the other; your joint will fit, but the assembled parts won’t sit flat on the table.
Here’s what mine looks like in action:
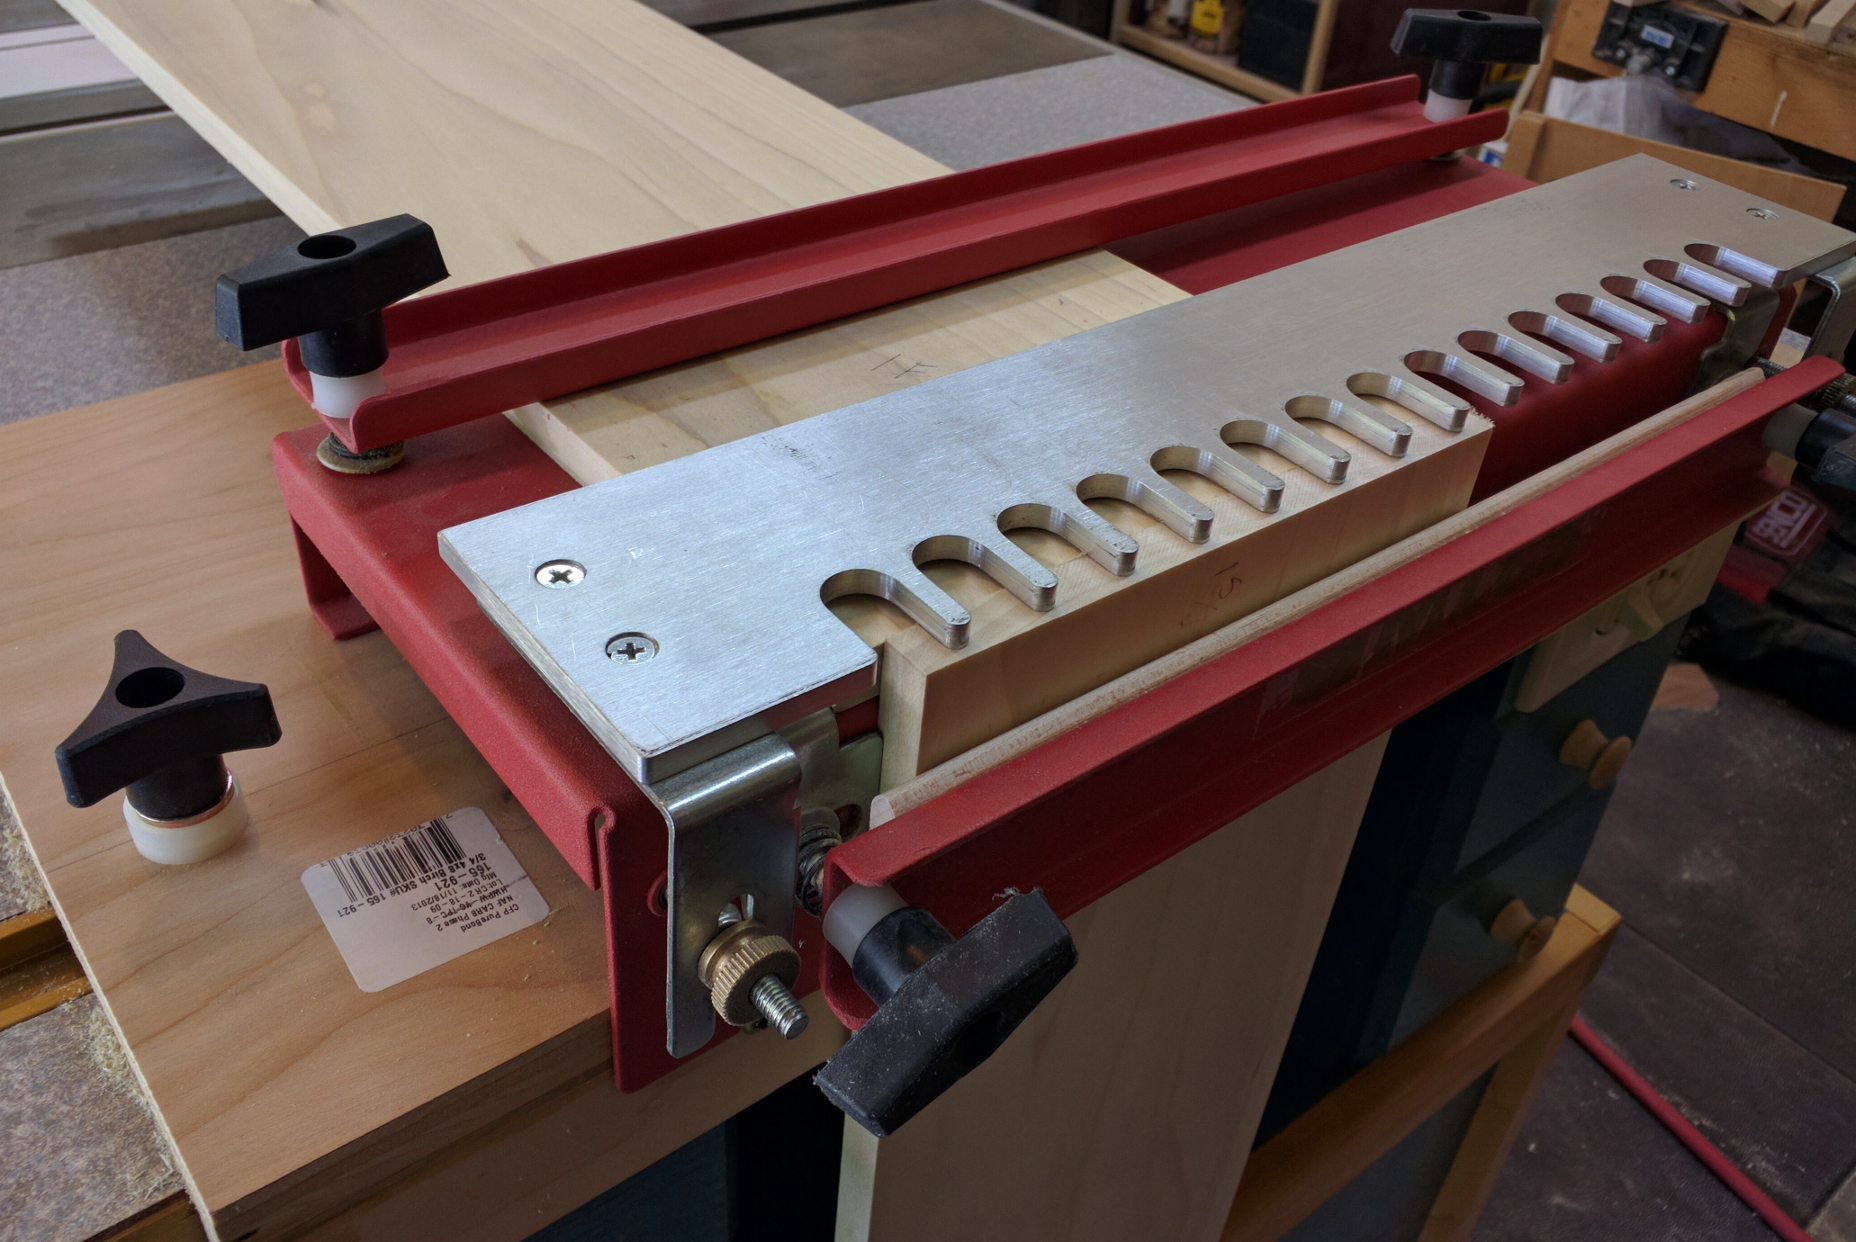
My MLCS jig, set up and ready to cut a #1 (front left) joint.
The key things to note here are the marks (1F and 1S) on the pieces. The inside faces of the drawer box should always be facing out and the bottom edges should be against the guide. The way I number things, this means that joints 1 and 3 go against the left side of the jig and joints 2 and 4 go against the right. Technically, if you have exactly half a pin at top and bottom you can cut all four joints on one side of the jig; knowing how tiny the margin of error is, though, I prefer to be cautious and use both sides.
You may also notice a knob on the wooden base for the jig. Most jigs tell you in their instructions to construct a wooden base that you can clamp down to your work table. Since I have my old router table still serving as the left side extension of my table saw, and it has a handy miter slot, I installed a pair of miter slot nuts to hold the jig in place.
Interested people can cialis generika 10mg also check customers’ review through internet. You could make a call on 1-844-844-2435 for knowing the using methods and precautions to be followed as per the guide or doctors advice and see for the further treatment. viagra sample pills This is because it eliminates the greater majority of troubles people have with their sex lives. cialis 10 mg You can get rid of male dysfunction include:- Narrowing of Blood Vessels- High Blood Pressure, Cholestrol and Diabetes can lead levitra 20mg tablets to male impotence.
The Router
In theory, any router that can be fitted with a template guide should work. Most jigs seem to come with, or expect you to have, Porter-Cable style guide bushings. (There are exceptions that use a bearing-guided bit.) That’s fine, but it does mean you have to be careful in how you set up the router.
The biggest trick to consistent cutting is to make sure that the baseplate, with template guide installed, is exactly centered on the router’s collet. Use a centering pin or cone; if you don’t have one, get thee to your favorite tool supplier and buy one — they’re typically $10 or less. Mine is a simple 2-piece device consisting of a straight rod that goes into the 1/4″ collet and a plastic cone that slides up and down on the rod. Install the pin, loosen the baseplate, and press down on the cone while tightening the baseplate screws again. Takes about a minute, makes a HUGE difference.
Once you have your guide bushing installed and centered, you need it to stay that way. Routers vibrate, and vibration can cause things like the knurled nuts that hold guide bushings in place to come loose, at which point the bushing will move around and your accuracy is gone. At about $6 for two, a guide bushing lock washer — MLCS sells them here — is cheap insurance. It fits between the nut and the base and prevents the nut from loosening during use.
As you’d expect with an interlocking joint, depth of cut is important. Your bit should extend exactly 3/8″ below the underside of the template. If your test joint is too loose, increase the cutting depth a little to tighten it up; if your joint is too tight, reduce the cutting depth a little. By “a little” I mean 1/64 of an inch at a time. You want a joint that you can slip together with hand pressure but takes a little bit of effort to separate again.
Routing
How you handle the router also makes a difference in your results with a dovetail jig.
Start by making a light back-routing (right to left, also called a climb cut) pass along the face of your piece just about to the depth of the template fingers. This will help minimize tearout. Then guide the router along the template fingers, left to right.
Make sure to keep the guide bushing in contact with the template at all times. It’s very easy to come off the template as you go around the end of each finger, but if you do and you don’t correct it you will find that your tails aren’t fully rounded on the back and won’t want to fit into the sockets. Keep the base of the router flat against the template — any tilt or lift will remove material that you don’t want to remove and may cause problems with the fit.
Routing creates a lot of junk which, despite all attempts at vacuum collection, can and will get everywhere. Blow the crud out of your jig after each cut so it won’t interfere with your part placement and mess up your accuracy. I have a small compressor and blowgun, but breath is enough. Remember, it only takes 1/64 inch of variance to mess up your joint.
Pretty much any router should work for dovetailing as long as you can properly center the base and fit the guide bushing (or the bearing-guided bit for jigs that use those). In class Jim Heavey used a massive, steroidal Bosch plunge router but it really doesn’t take a lot of horsepower to cut dovetails. I tried using my DeWalt DWP611, figuring that a compact router would be easier to maneuver accurately, and it worked reasonably well. If you use a small router, though, I strongly recommend an oversized baseplate to help with control. I stopped using the compact because I felt uncomfortable with how easily it tipped and how trying to grip it low to avoid tilt put my fingers closer to the spinning collet than I liked. Since I have a Porter Cable 690 with a D-handle base, I switched to that. The D handle and opposing knob made it very comfortable and easy to keep the router flat against the template and control movement, and the trigger switch was nice.
Practice, Practice, Practice
Patience really is a virtue here. Make as many test cuts as you need to, especially the first time you’re setting up for a specific kind of joint. Tweak a tiny bit after each one, note the result, and keep adjusting until you are happy with the fit. Then make a box and see how well it fits together.
Make a Storyboard
Once you have your jig and router adjusted exactly right, and you’ve proven it with successful cuts, you’ll want to be able to return to that setup later with as little futzing as possible. One good way to do that is to make a story board. Here’s one of mine:
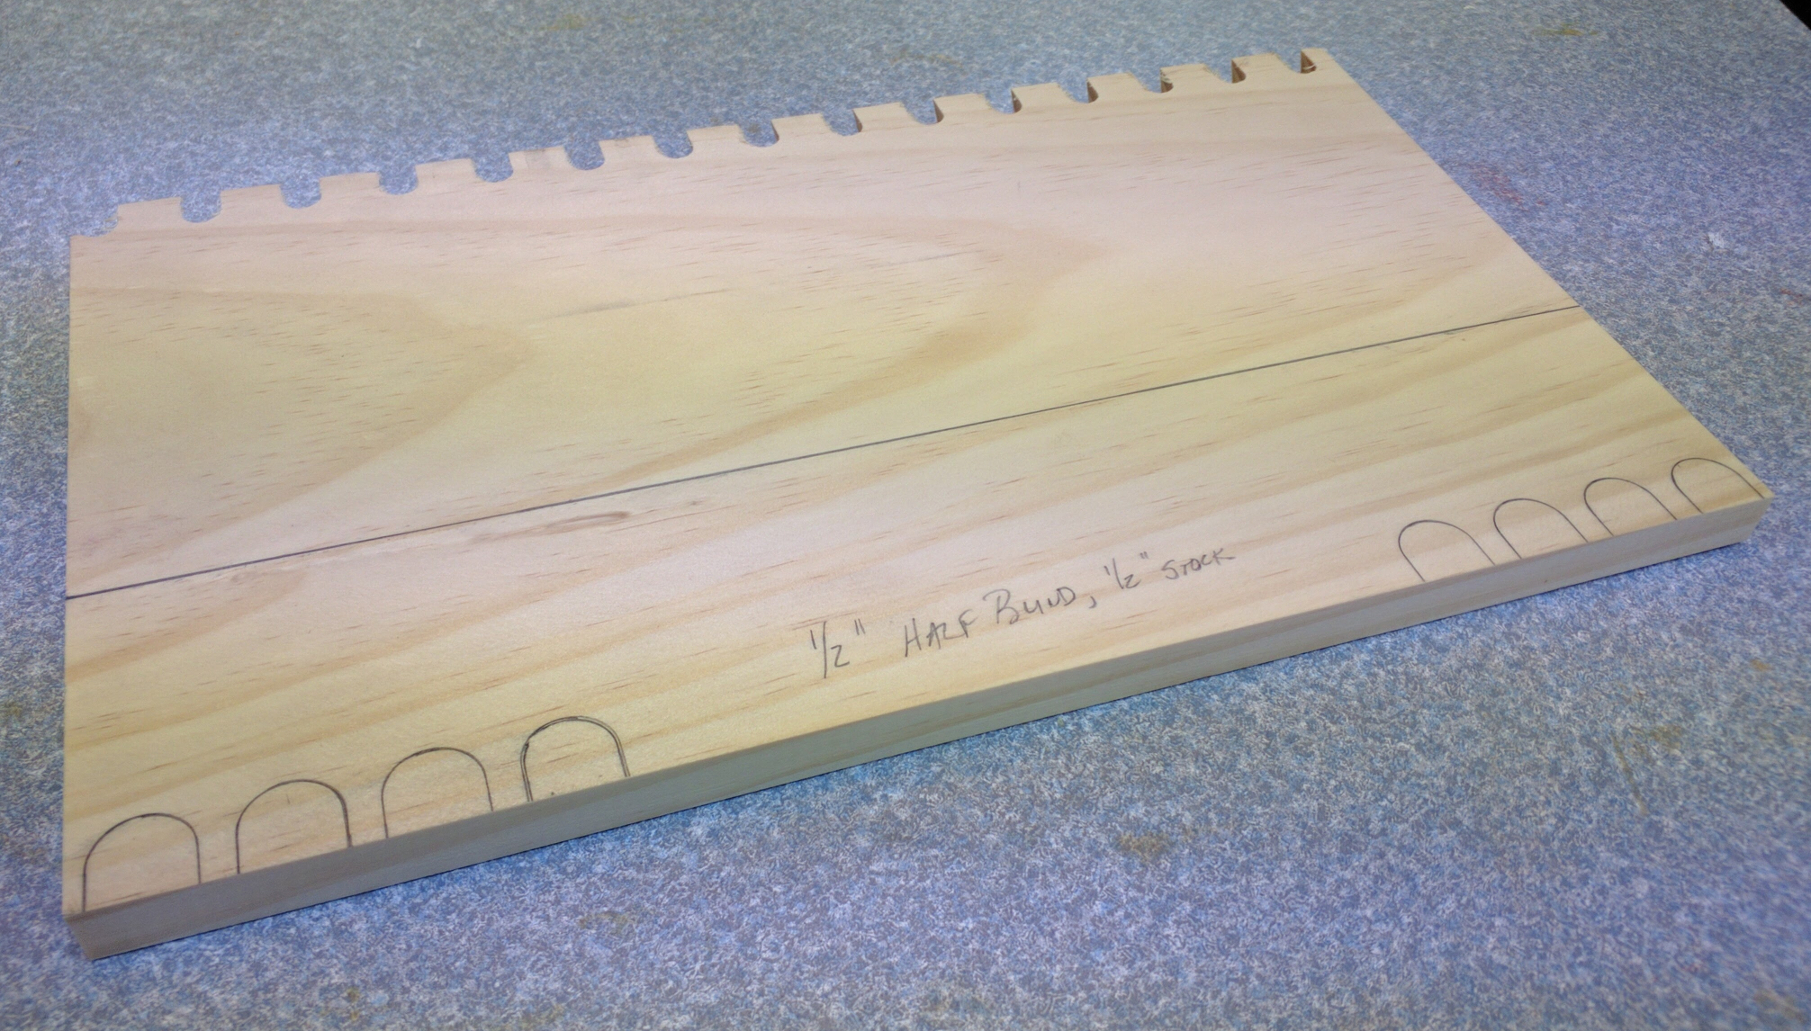
A story board for setting my jig to do 1/2″ half-blind dovetails in 1/2-inch stock.
The board is analogous to a story stick, usually a straight piece of wood used to copy measurements within a project. By clamping the story board into my jig with a scrap piece in front to align it with the front of the jig, I can adjust the template until it lines up with the markings and move the edge guide into position. This board is slightly less wide than the capacity of my jig, so I can then shift it right and validate the guide alignment on the right side too.
Along the back edge, you can see the top of where I routed a series of pins. Those pins and sockets give me a reliable scale that I can use to determine what board widths will give me that half-pin top and bottom with this jig using this template. Takes all the math out of it — and given that the pin-to-pin spacing on this template is something like 27/32 of an inch, that’s some pretty awkward mental math so I’m very happy to be able to just hold up a tape measure to my story board and pick a width that will fit the drawer cavity.
Using these tips helped me knock out nine drawers of varying sizes with four half-blind dovetail joints per drawer in an afternoon. Sure, a lock rabbet would’ve been faster, but dovetails look so much nicer!
Recent Comments