


Amy’s Desk part 1
I started this project in November, but had a couple of breaks so it’s just now getting posted. This one will be in a few parts because it’s more complex than I’ve been doing lately. Let’s start with a picture:
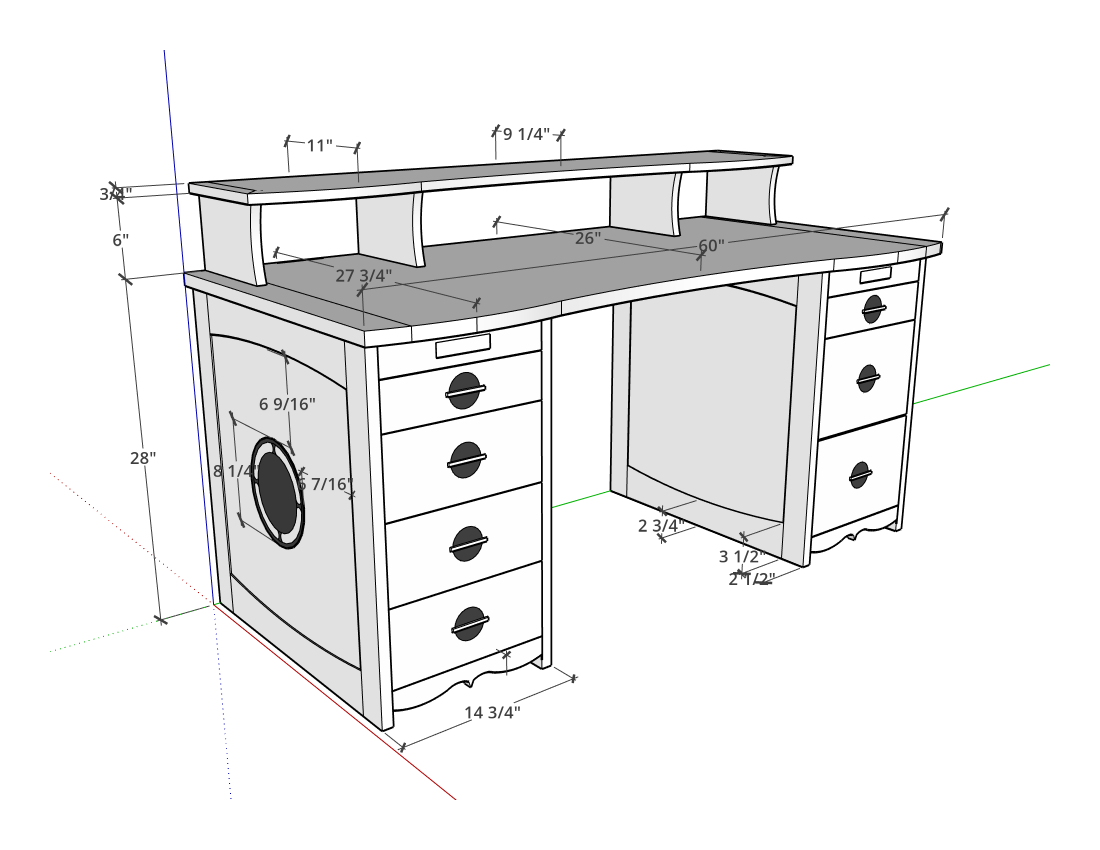
This is for Amy, a friend who just moved into a new home and needs a desk. I took inspiration from a couple of other pieces of furniture that will occupy the same room, like the large symbol on the side and the bird’s mouth at the bottom of the drawer sections. The main wood will be hard maple, and the accents, breadboards, and inlays Peruvian walnut.
There are several firsts on this project for me:
- The inlay on the side (which is actually repeated on both sides of both drawer units) will be the first time I’ve done that.
- The side panels will be faced with quilted maple veneer rather than just plain plywood. I bought a vacuum pump and bag to do it properly.
- The drawers will feature a walnut inlay and shop-made brass pulls.
- I will make much more extensive use of my CNC on this to do the curved cutouts and inlays.
The design was approved by Amy and Bill (her husband) and I bought about $1200 worth of materials for this. The labor is my gift — like I said, she’s a friend.
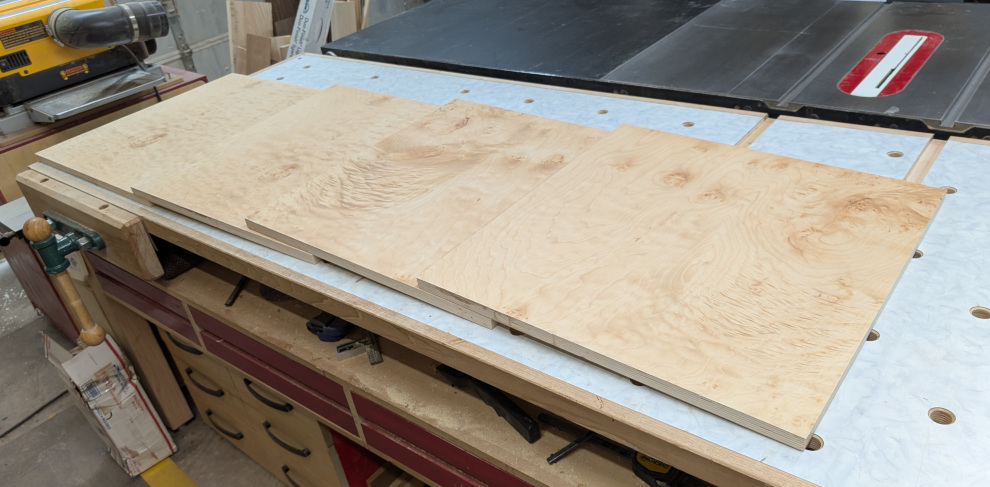
Milling stock is usually Job One but I’ve been paying attention to some new mentors lately, among them Erik Curtis, Fantin, Tiny Sean, Ray Fas and the crew over at Bourbon Moth’s Discord and one of the things I’ve picked up on is what I think of as “just in time milling”. The idea is that if you mill all the parts on a large project at the beginning, there is a much greater chance that wood movement will occur after milling and before you can work with the pieces. So better to rough mill at the onset, but leave everything a little long and wide and thick so that you can do the final milling right before you use the parts. And sticker the stock while it’s waiting.
Challenge #1: Veneering
Yes, I’ve done veneers before on small projects and I did one veneered table top, but that was with shop sawn veneers that were, by veneer standards, pretty thick — a quarter inch give or take. And I used glue and clamps because I had plenty of thickness, which added rigidity.
For this, though, I was using much thinner — like 1/30″ — veneers of beautiful quilted maple. They are quite nice, but they absolutely demand a vacuum press to get good adhesion, so I bit the bullet and bought one, along with a 24″x48″ vacuum bag and necessary accoutrements to do those side panels properly.
Each panel is 21 x 22 and there are four of them. For the substrate I used baltic birch plywood, and I got a cheap backing veneer to keep the panels balanced. I used cold-press veneer glue (about a half gallon total) and of course the veneer started to curl up into a potato chip the second it touched that glue. I was ready with painter’s tape to keep the veneer flat and hurried it into the vacuum bag, doing 2 panels at a time front and back.
Was that the best way? No, definitely not. I left the veneers hanging over the edges of my panels figuring I’d trim them, but on the top and bottom of each there are definitely places where the veneer split and on later handling chipped out. I had to do some repairs with CA glue or cutting small pieces and patching them in, and the back sides (which won’t be visible) look worse than the show faces. But it worked.
The upper and lower edges will be partly covered by the curved rails, so the ugliest parts will not be visible. I did all the trimming with a veneer saw rather than a router and that worked pretty well. Probably would have worked better if I’d realized that you have to sharpen the veneer saw before using it.
Which led directly to …
Challenge #2: side inlays
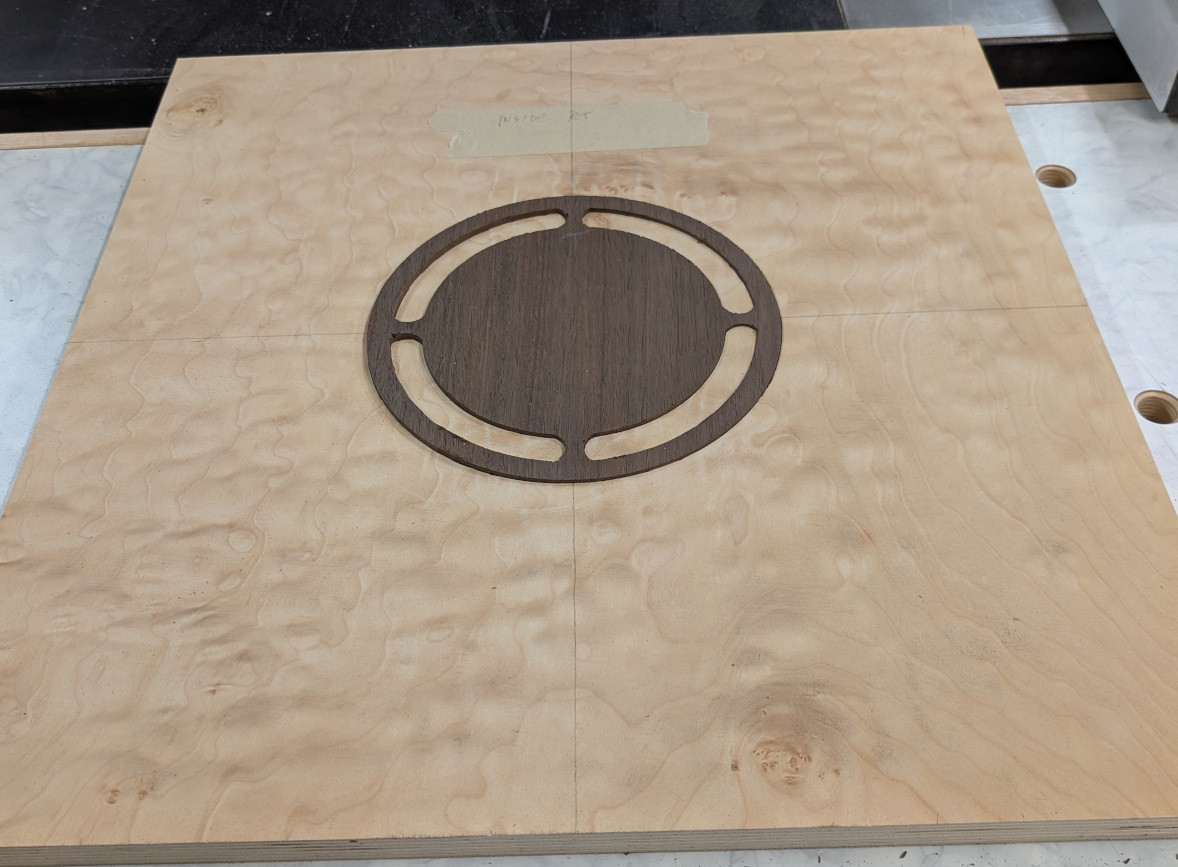
These were a particular challenge, because my CNC is a Next Wave Automation CNC Shark II, which only has a 13″x25″ working area, so I couldn’t fit my veneered panels onto the CNC to do inlays. I can tile on the Y axis, and I did do that later, but there is no getting around that 13″ limit on the X and I did not want to have obvious joints in the panels. I was going to have to cut the negative part of my inlays by hand.
The pattern for the inlays came from an antique display case in Bill and Amy’s home. The original had lots of lines going every which way, but the central focus was a big circle with a smaller outline, and that’s the part I intended to use for the inlay.
I couldn’t cut out the shape with the CNC, but I could and did cut it in a piece of plywood that would fit on the CNC. All I had to do (wow … that makes it sound much simpler than it was!) was draw the shape in Vectric (the only software NextWave supports) and make a toolpath that cut out the outline of it, resulting in a router template. The biggest trick was to bridge the gaps so that the “islands” would be covered, and the result was this:
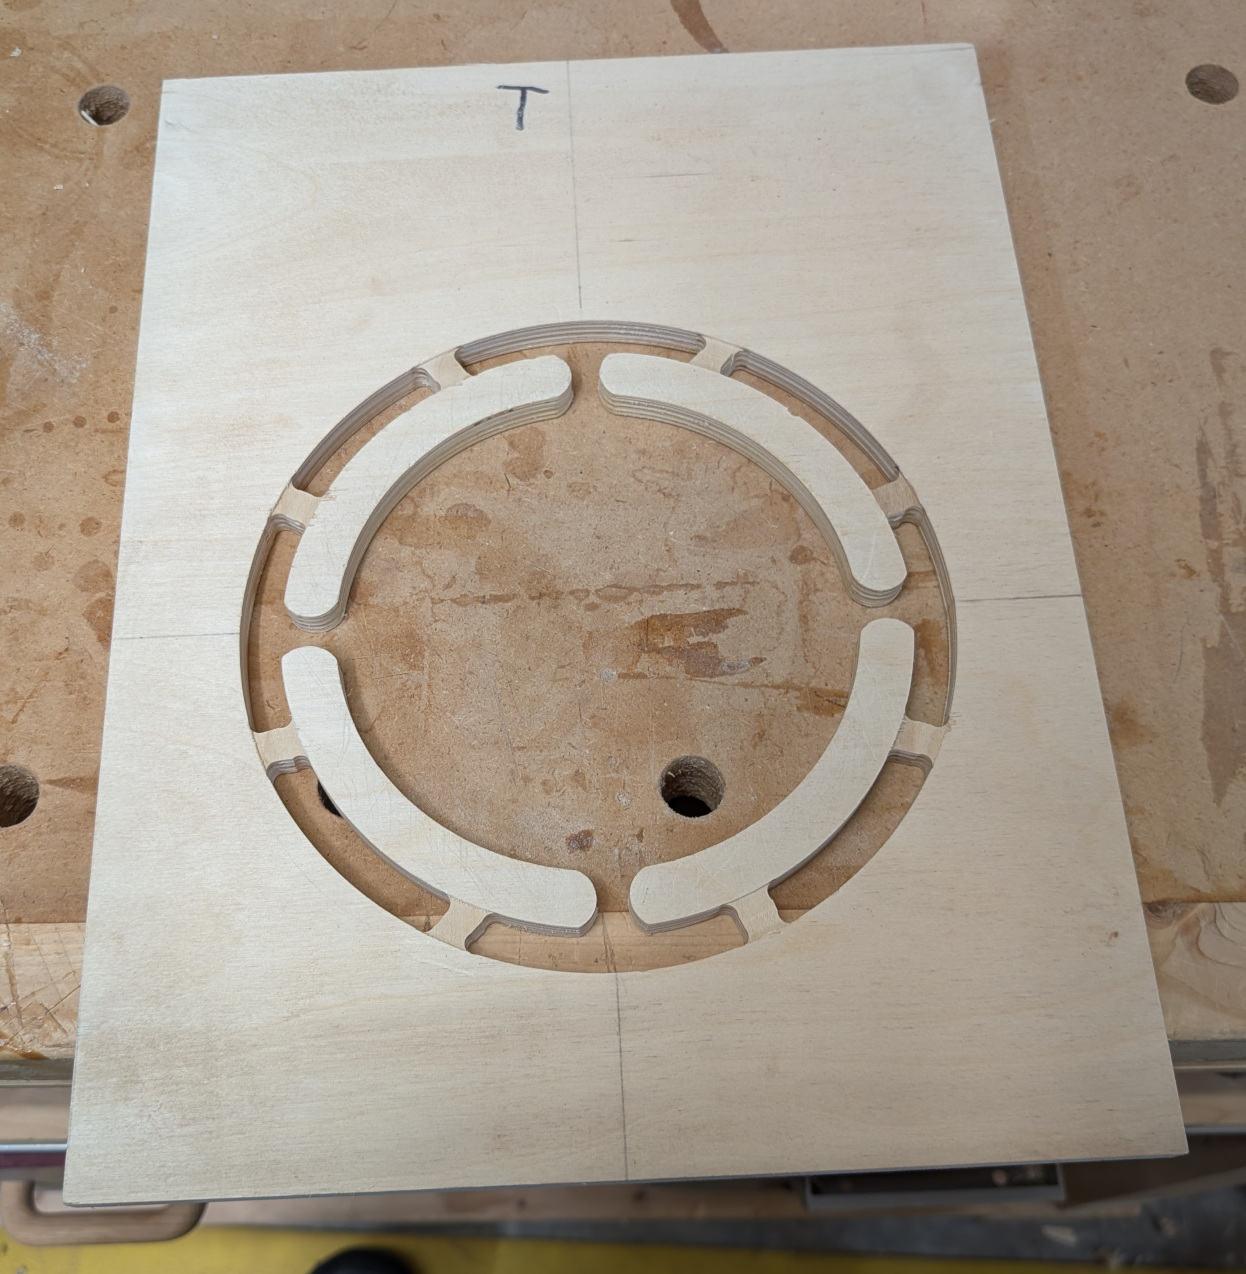
I had to use a 3/16″ pattern bit to fit the gaps, but I had one — otherwise I would have made the spaces between the islands a little bigger. Now because I had to put those bridges in there, and used two on each section to make them not flex, that meant I had to carefully reposition the template so I could route that negative space without hitting the parts I wanted to keep. I also ended up using two different routers — one with the 3/16″ bit and another with a larger 3/4″ bit set to the same cutting depth — to make a faster job of removing the stock in the center. I used the crosshairs on the pattern to match up with crosshairs I drew (very lightly) on the panels to make sure they were centered.
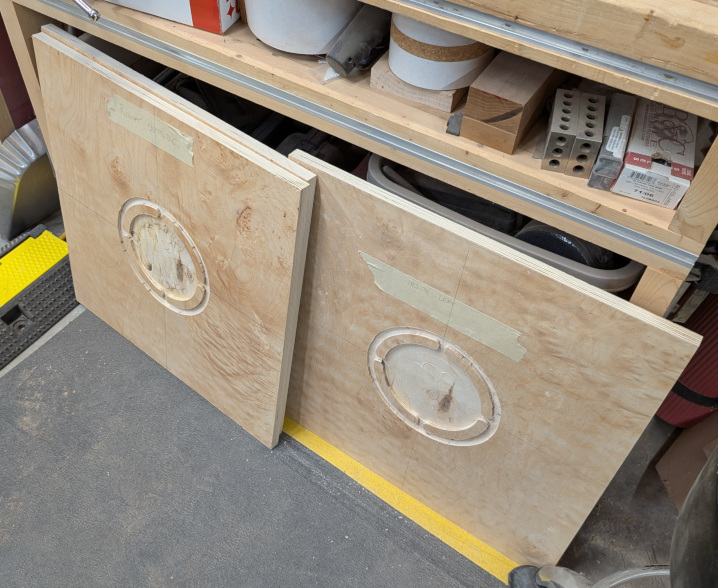
Now, I had to do the positive inlays. That would fit on the CNC bed, and I already had the drawing — I just needed a different toolpath. I made one that would cut out the inlay and experimented with a couple different bits to get it right. The one that worked best was done with an upcutting spiral bit and a 0.025 inch tolerance. I milled some walnut to 1/4″ thick, which was 1/16″ thicker than the depth of my negative and made a total of 6 inlays. I only needed four, but I wanted spares.
And I was smart to, because the dry fit proved that I needed to thin them out a little bit more. That meant putting them through the planer, and three of them broke getting them off the planer sled. But one was an easy break to glue together, so I had four that I could use and a bunch of tiny pieces of the other two. I glued them in one a time and weighed them down with a scrap of plywood and my hollow chisel mortiser to dry.
Then, I almost had a catastrophe. I was sanding them flush, and using Titebond dark to fill the tiny gaps, and of course (now, it’s obvious; then, it was a surprise) the dark glue stained the maple on the first panel. I tried to sand it off, but I was afraid of going through that extremely thin veneer.
As luck would have it, that night Erik Curtis was hosting a livestream on his Patreon. I sent him an email with photos and asked him for advice, and he came through. I couldn’t sand, but I could use a card scraper to get the tiny amount that I would need to remove. Great — all I had to do now was learn how to sharpen and use a card scraper! How hard could that be?
If you’ve tried it, you know that answer to that. No, it wasn’t the hardest thing I’ve ever done, but it did take me a couple of days to get the card sharpened correctly and my technique practiced enough to where I felt comfortable taking the scraper to my veneered panels. I must have watched a dozen different videos on card scrapers, and everyone seemed to have their own “secret” to doing it well. I settled on a method using the Accu-Burr, which I already had from previous attempts at learning card scraping. That is definitely the training-wheels-provided method, so I recommend it to anyone who is new to card scrapers.
Once I actually got to using it, the card scraper did a beautiful job of getting rid of the dark glue without going through the face veneer. It also worked better than sanding to level the other inlays. And for the other three panels I took Erik’s other suggestion and used the sawdust without glue — instead I packed the dust in the voids and then immediately applied a hard wax oil finish to lock it in. That worked like a charm.
Stay tuned for more. Next up will be the rest of the pedestal pieces.
Recent Comments