


Amy’s Desk part 3
With the pedestals made, I turned my attention to the desktop. This will be a fairly standard-issue desktop for me, except it is solid maple instead of plywood so I had to take some care with joinery to allow for wood movement. Hard maple moves a fair amount, so not doing that would guarantee me a short-lived desk and an unhappy client.
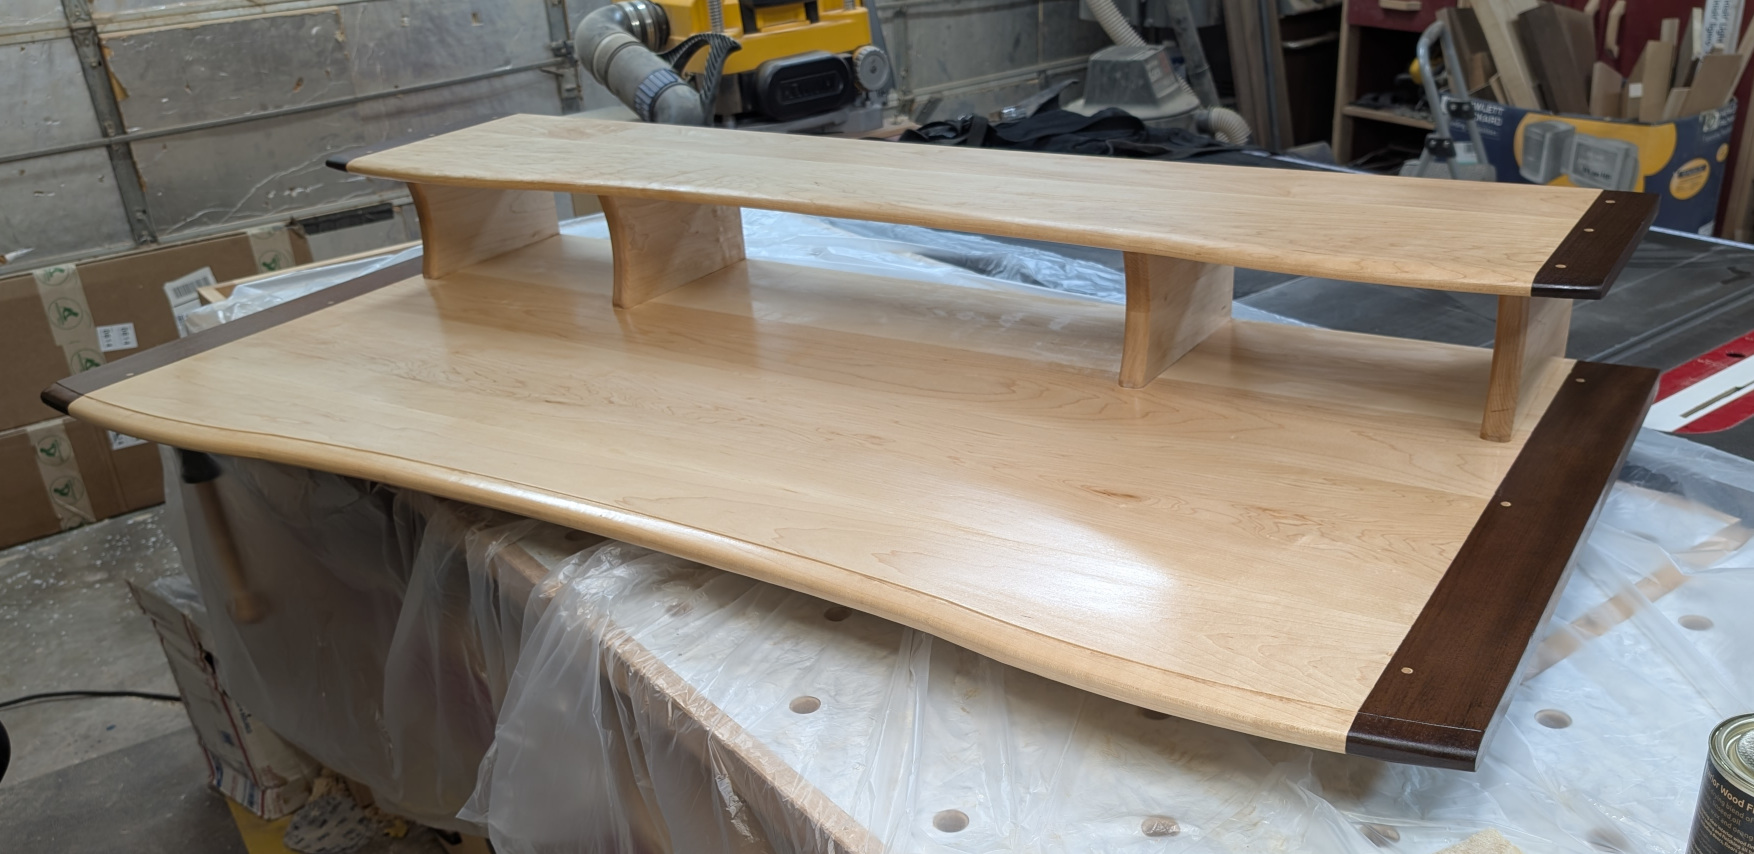
I started out selecting the location and placement of the boards. I was looking for good matching color and grain, and I didn’t have a lot of extra to work with. The desktop needed to be 60″ x 28″ in the rough, but I would add walnut breadboard ends to that so it could be a little shorter.
The top would also feature, as I often do, an upper shelf for monitors, speaker, etc. It would be supported by four shelf supports, which again would be a joinery challenge because this desktop will move up to 1/2″, where my usual plywood/laminate desktops don’t.
I started milling my pieces, a full inch thick for the main top and 3/4″ for the shelf. I cut 6″ x 9″ pieces for the shelf supports, and breadboard ends for the top and the shelf.
For the joints between boards, I didn’t use any reinforcement. The boards were pretty flat and didn’t need much persuasion to close the occasional odd gap. The shelf was the same. So once I got them both glued up I left them for a day or two and worked on some Christmas gifts.
After Christmas, it was time to start addressing the joinery. I trimmed the top to a final size of 54″ x 28″ with a 1-1/2″ tenon on either end for the breadboard to connect to. I trimmed that tenon back to 1/2″ except for a 2-inch section near the front, near the back, and in the middle. The shelf being much smaller (11 inches wide) I needed less, so I just cut the shelf straight at 56″x11″ and used dominos as the tabs.
I took the larger breadboards and made a 1/2″ x 3/8″ groove with the router in the center of the board’s width, leaving about 3/4″ at each end to conceal the mechanics. Then I made the mortise deeper to accommodate the long tabs where the breadboard would fasten to the desktop, and test fit that. It took me a few tries and some chisel work, but I got them to fit nicely. For the shelf it was just a matter of making wider mortise slots in the breadboard so there would be some movement room.
When it was time to assemble the breadboards, I added another thing to my list of firsts: I bought a dowel press and made my own maple dowels to pin the joints. It took a little getting used to, but worked pretty well. I pinned the front of each end with glue, and made slots in the middle and back so they could move freely and only glued the bottom of the dowels. Usually you pin the middle and leave both ends free, but I want this desk to move only towards the back — the front is going to have a delicate double-curve on it, so I wanted the front edge to stay fixed.
Next up was attaching the shelf to the desktop. Since the top was going to move to the rear, I wanted to glue the last inch or so and let the rest move with the desktop. Sliding dovetails seemed like the right choice for this. I deliberately cut them off just beyond the halfway mark to make them easier to install, and made the dovetail-shaped tenons in the shelf supports and the slots in the desk and shelf. The fit was good, so I was ready for sanding.
I did most of the sanding on the parts separately (other than the breadboards, which were already on). I held off on the final pass at 180-grit because there was one more shaping job to do. And this would be another first for me.
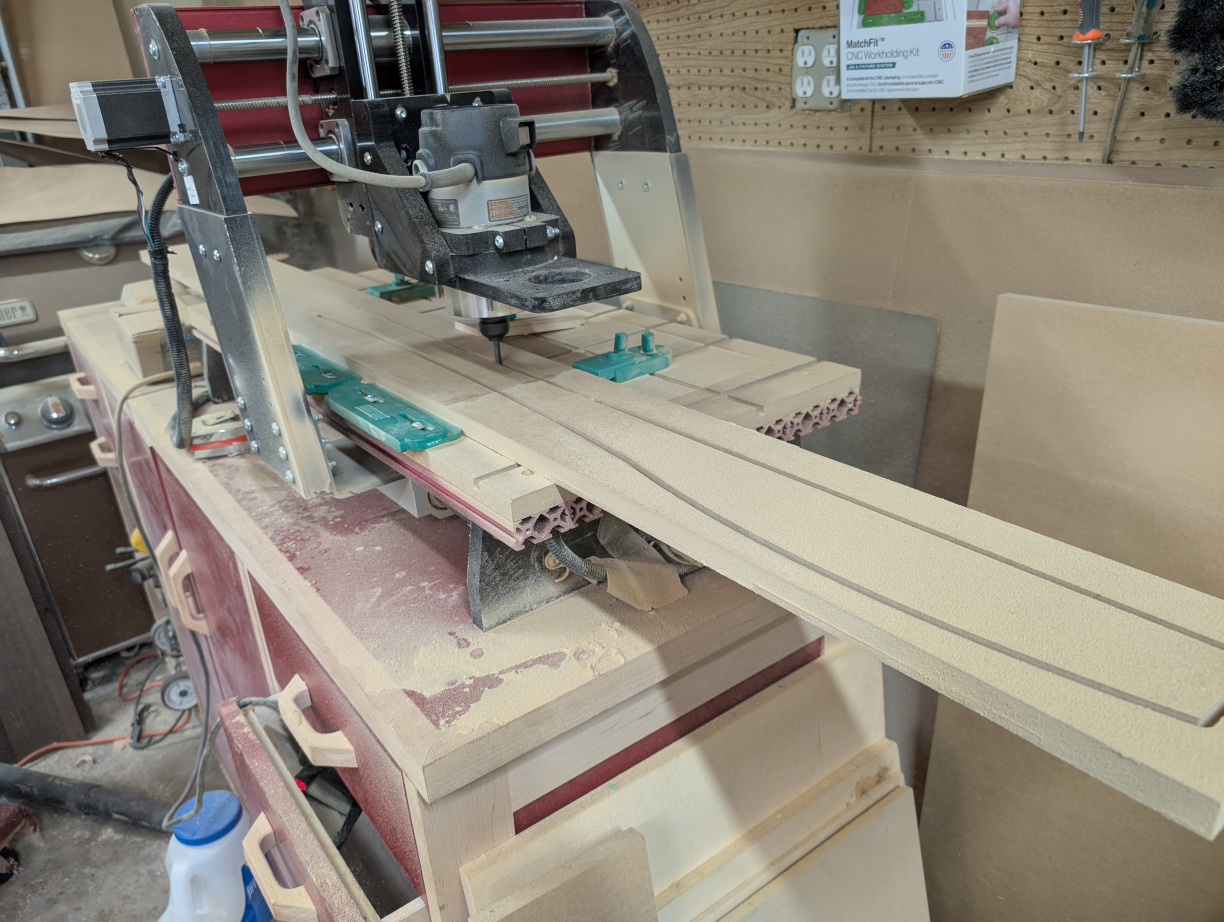
I needed a template 60 inches long, but my CNC bed has a maximum cut length (on the Y axis) of 25 inches. Fortunately, this CNC is designed such that you can exceed the Y axis limitation if you do something called tiling. Essentially, that means you can do the cut in sections and slide the workpiece along the length of the machine so that you end up with one long pattern. I’ve never done that before, but it was nowhere near as difficult as I thought. Other than MDF dust getting everywhere, of course.
That template only needed a little touch-up sanding to remove the bits of tab and leave a nice, clean curve. The top was way too big to handle on the bandsaw, of course, so I used my jigsaw to rough cut the curved profile and then the template with a flush trim bit to make it pretty. I used the same template on the shelf, just hanging off the ends by an inch each way.
Finally, I finished the curves with a long rounder bit designed for table edges. The top side gets the full treatment with a small fillet at the end; for the underside I took less of a cut to eliminate the fillet. That gave my thick top a nice edge and made it look less beefy.
Then all I had to do was that final sanding, assembly, and finish. I glued the last inch on the sliding dovetails and slid it all together. The fit was tight, and I did have to tap the shelf with a mallet but it wasn’t too bad. And it was tight enough that I didn’t need clamps.
A couple of coats of Gilboy’s hard wax oil, and the top was done.
Next time, I make drawers and a sliding shelf.
Recent Comments