


Amy’s Desk part 4
I got tripped up for a little bit on these drawers, I’ll confess right now. And here is where it bit me.
First up, let’s look at the drawing again:
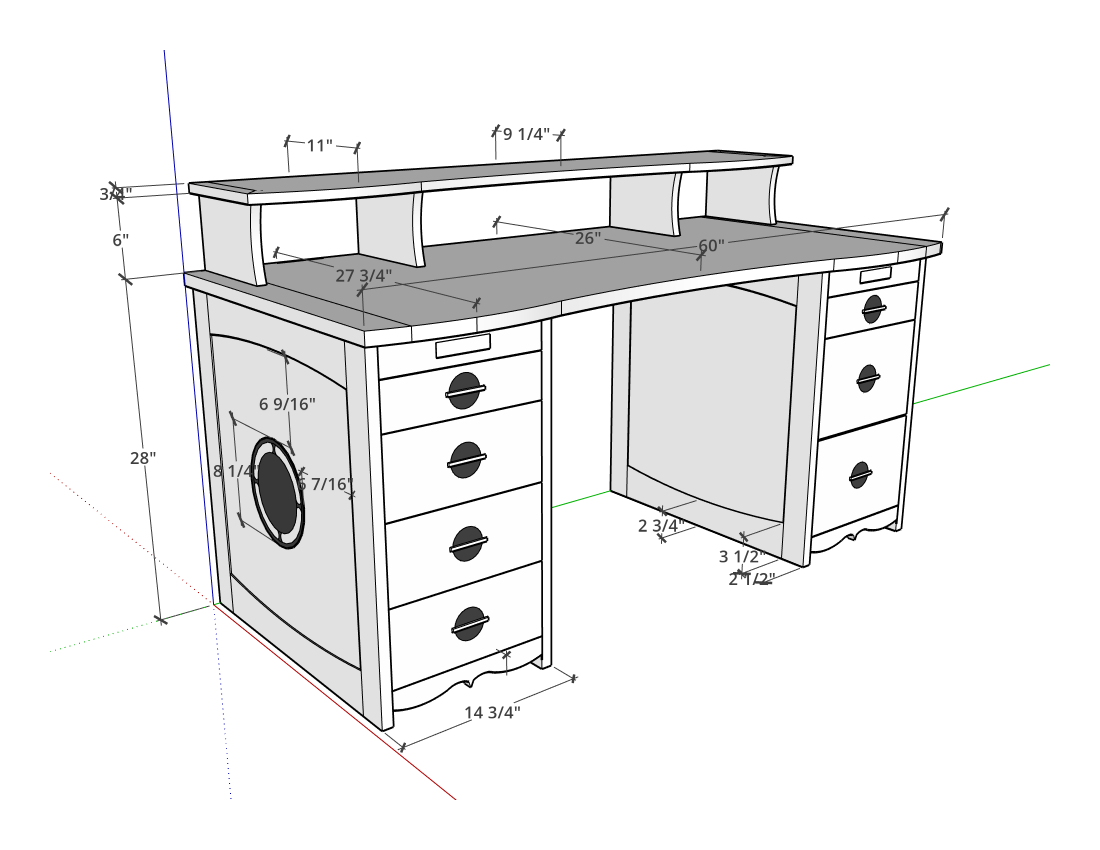
On the right side are supposed to be two file-size drawers and one small drawer — “small” meaning 4 inches, like to top drawer on the other side. But I screwed up on the measurements, because I only made the pedestals 15 inches wide. 15 inches – 2 (thickness of the sides) – 1 (for a pair of 1/2″ drawer slides) – 1 for the drawer sides leaves only 11 inches, where a hanging file folder is exactly 12 inches wide plus an extra 1/2″ for the tabs at the top. And to accommodate hanging folder, I needed them to be at least 9-3/4″ tall, where the ones in that plan are only 9″.
That meant a major shake-up in the drawers, but I talked to the clients and we settled on a solution that would only affect the right side. The drawers increased in height to 10″ each, and the remaining 1-3/4″ would be faced like a drawer but would actually be a pull-out shelf, providing extra desktop space when needed. In order to gain the extra inch in width, these drawers would be equipped with wooden slides instead of mechanical ones, so they could be just a hair over 12 inches wide internally and use the same 1/2 inch poplar as the other drawers.
Originally I wanted to dovetail these drawers. I haven’t done that in a very long time, and I still have my MLCS dovetail jig and a bunch of accessories for it, which I haven’t used since I made my own desk way back in 2014. But there were problems with that. One is that I couldn’t really flex the height of the drawer sides to make the dovetail pattern fit, so it would not have that even half-pin top and bottom. Another was that I hadn’t had any practice in 10 years, so I would need to do a few test joints first to remind myself how to work the jig. And frankly, the thought of machine-cutting dovetails didn’t thrill me — there wasn’t enough of a payoff to offset the PITA of cutting them.
I thought about bandsaw dovetails, which have been kind of a thing lately on YouTube. I made jigs and tried out a few test joints. The method worked, mostly, but the joints looked really bad. It was going to take a lot more practice before I could do them well enough for this project, and I didn’t really have that kind of time.
But, I did have the Katz-Moses box joint jig, which I’d used last year to do some bathroom stuff. I dug that out and located all the parts … except the vital one. The plastic baggie of varying sized keys was nowhere to be found. I tore the shop apart looking for them, and came up empty. Cobbling together shop-made substitute keys was an option, but in my search I also uncovered another box joint jig from Woodhaven. It was a bitch to set up, I recalled, but it would do the job and I wouldn’t have to make any parts for it. Okay, I decided to do that. And I ordered another set of keys from Katz-Moses so I could use that jig next time.
It took me about 5 test joints, but I got the Woodhaven jig dialed in and was ready to cut real joints. These are 1/2″ box joints, but to make sure I would have a full pin top and bottom I cut these as keyed box joints, which is something I’ve seen Jonathan Katz-Moses do. Basically, you cut towards but not over the middle line of your board, and then cut the exact same number of notches on the mating piece. There will be a center key on the original piece that is smaller than the rest — cut that off, by hand or on the bandsaw, and the larger key on the other piece will fit into its place, like so.
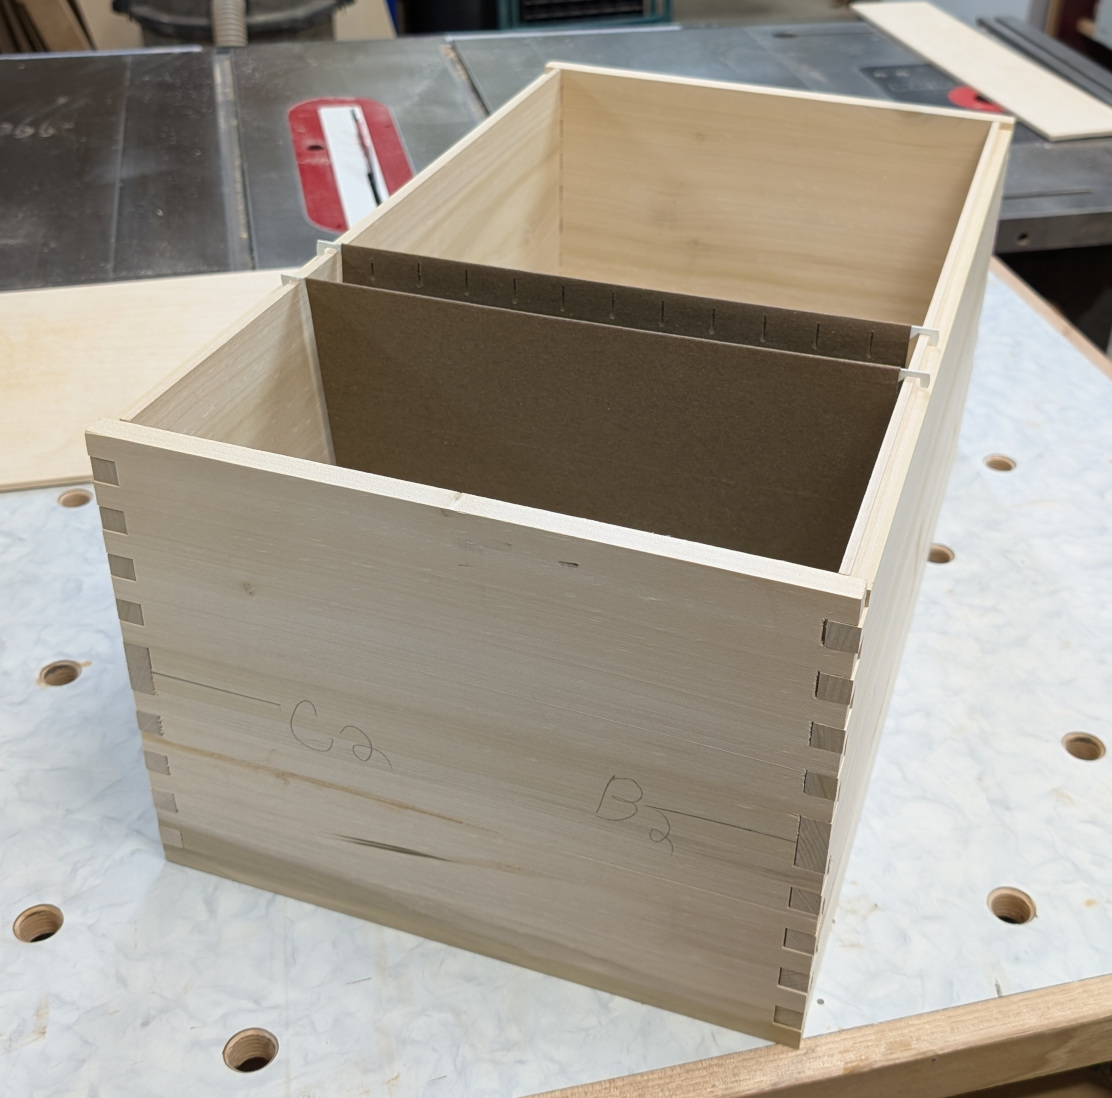
The size of the fat key in the middle varies depending on the size of your keys and the overall height of the drawer. It came in handy here, because it turned out that I was actually cutting 15/32″ box joints so if I’d gone straight across I would’ve had an odd length of pin on every box. So the keyed method saved me.
I got all the box joints cut, and put a 1/4″ groove for my plywood bottoms (which was, amazingly, actually 1/4″ in size). Then I added a rabbet slightly bigger than 1/4″ at the top of the two file drawers’ sides to make little hangers for the hanging folders to grab onto and glued them all together.
For the left side, I used mechanical side-mount slides and had sized the drawers appropriately. For the right I made slides from 1/4″ poplar and put a matching groove in the drawer boxes. Nothing new of exciting there.
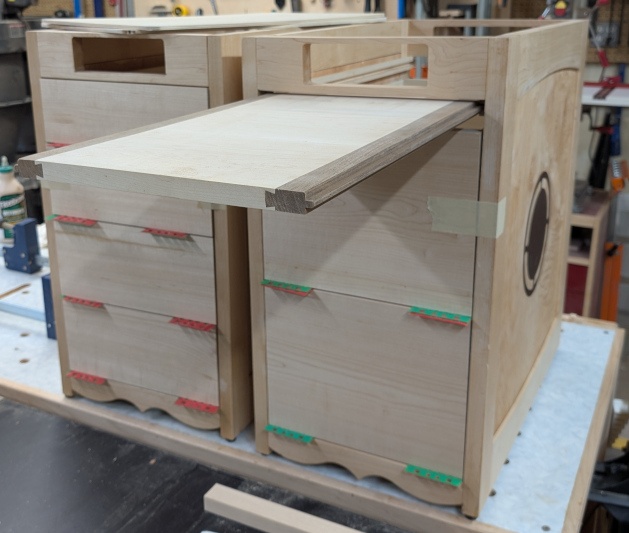
The real trick turned out to be the sliding shelf. I’d bought a slide for it, but it was way too tall to use — it needed a minimum of 2″ vertical clearance, and I only had a touch under 1-3/4″ (including the space above and below) to work with. I consulted the folks on Bourbon Moth’s discord, and made a wooden slide for that too — a piece of 1/2″ poplar on each side, grooved down the center, and accepting a tongue on the sliding shelf. That worked, and left room for a slim magnetic catch right underneath to keep the shelf from sliding too far and coming out. (And thanks again to Fantin for talking me off the ledge!)
The shelf itself was easy enough to build. I crosscut several pieces of 3/4″-thick maple and glued them back together so that the grain in the slide-out would go in the same direction as the grain on the desktop. That was done not just for looks (though it would have been really dopey-looking to have the grain NOT match) but so I could add walnut breadboard ends, which would also have that tongue on them. And like the desktop, I glued the breadboard ends only at the front inch or so, leaving the back to adjust for seasonal movement. And I used sliding dovetails to attach them instead of pins and tenons.
For the drawer fronts, I made two panels big enough to cover the front of each pedestal plus an inch or so, and then cut them to make the various sizes of drawer front. That gave me grain that runs visibly from right to left the whole way up. With the pedestals separated by 28″ it’s not immediately obvious, but it was worth doing.
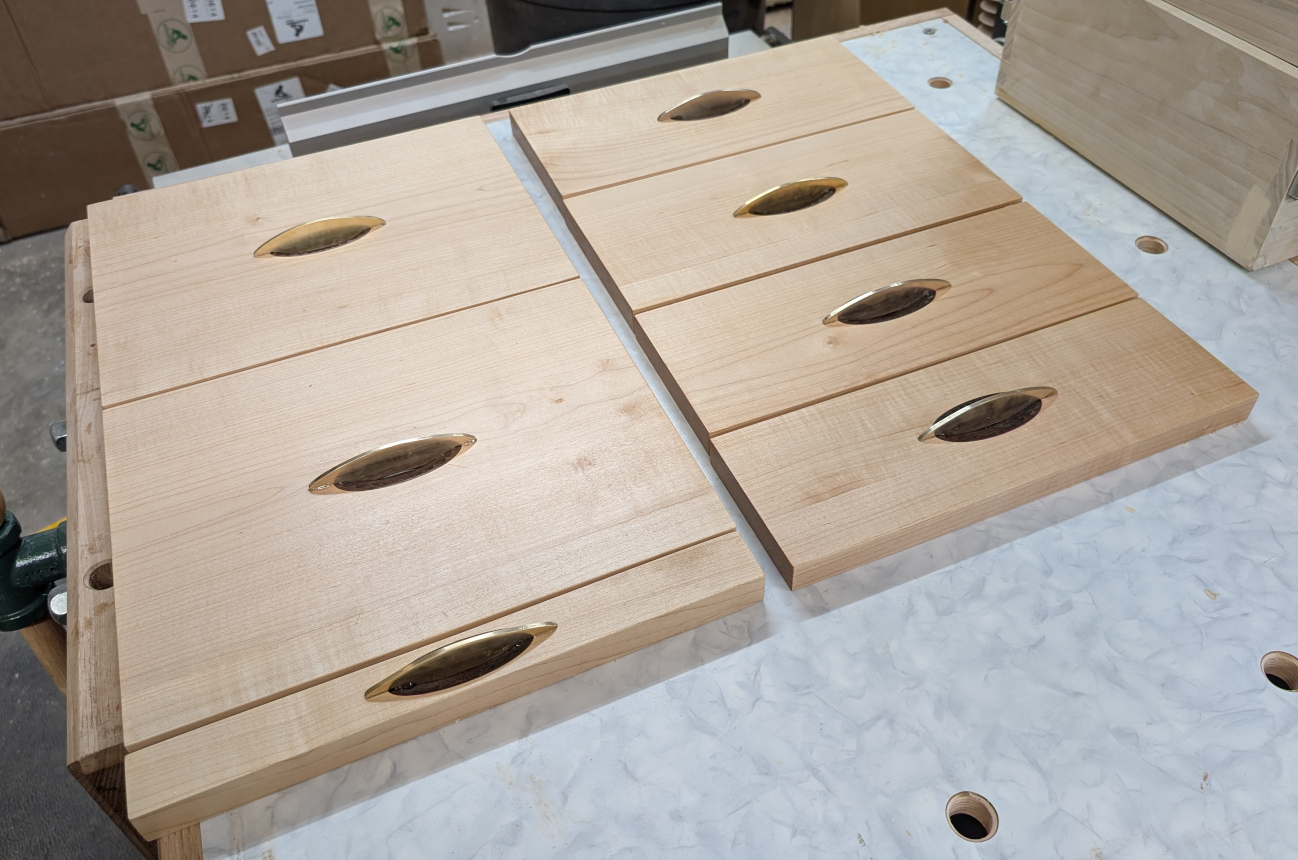
Now it was time for another flourish. I used the CNC again to cut an oval-shaped insert for each drawer:
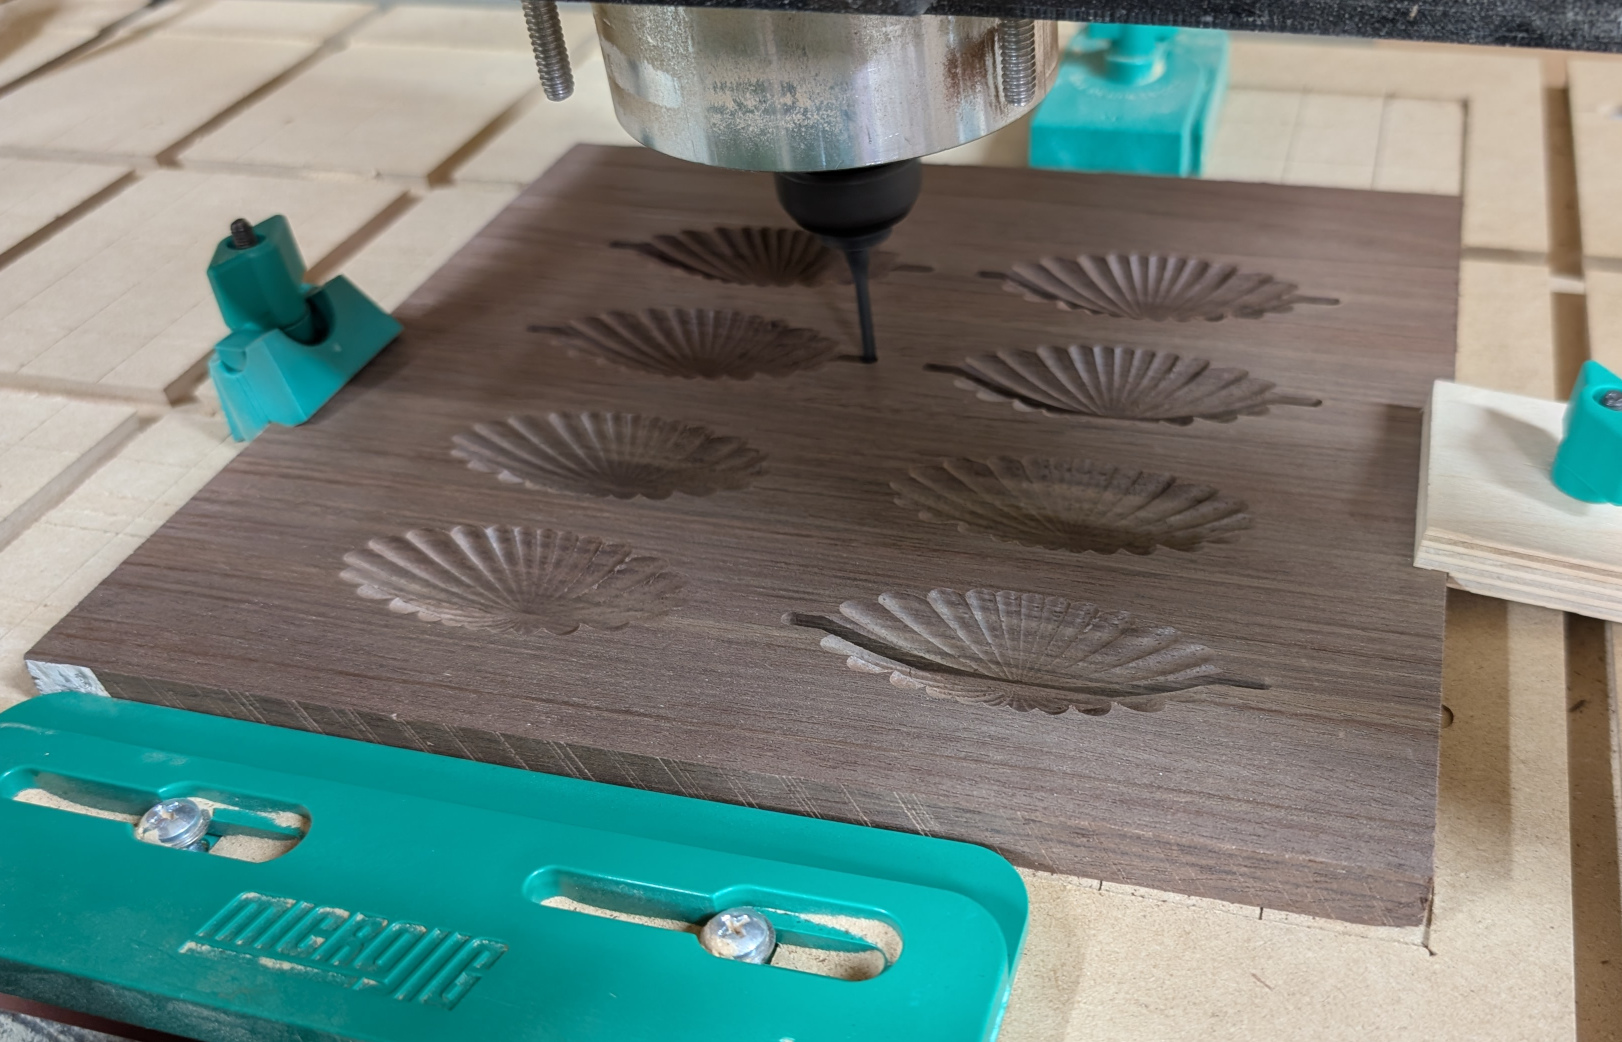
I was originally going to do a straight dish, but I discovered this pattern (it just uses fewer overlapping lines and a ball-nose bit) and really liked it. The slot in the middle is for a brass insert (another first-time thing for me) to act as the actual drawer pull.
To get those, I started with four 1″ by 12″ bar stock pieces from Amazon in 1/8″ thickness. I happened to have a carbide-tipped blade in my bandsaw, so I used that to cut the brass to shape. Polishing was way more work than I thought it would be, and I decided not to go for a mirror finish.
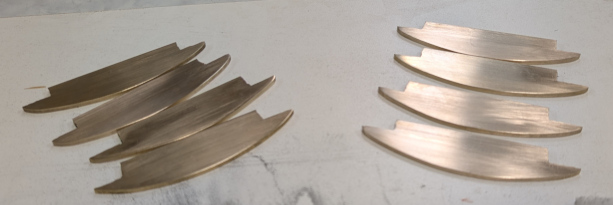
(Yes, I made one extra.) These got inserted into the slots and held with 5-minute epoxy.
Then I mounted the drawer fronts and screwed them in, except for the slide-out shelf. I hadn’t left any way to attach there, and I was damned if I’d stoop to pocket hole screws — call it a personal bias, I guess — so instead I glued that one directly to the shelf and clamped it until dry.
Next: pulling it all together
Recent Comments