


Julie’s Cargo Organizer
This is the simple project I referred to in Requiem for a Router. It’s a cargo organizer designed to fit the back of my wife Julie’s 2014 Mazda 3 hatchback.
Julie has usually gotten sedans and she generally springs for the factory cargo net. This time out, though, she wanted the hatch. After seeing the versatility of a folding 3-compartment organizer I have in my Honda CRV she opted for a third-party solution. Unfortunately, we made the mistake of picking it up before the car was ready; when we got the organizer into the car, it was too big.
As luck would have it, though, I found myself with an extra piece of 1/2-inch thick soft maple in the rack left over from the maple bedroom set. It seemed like a sort of wood-nerdy kismet. So I measured the back area of the car, sat down with SketchUp, and drew up a design:
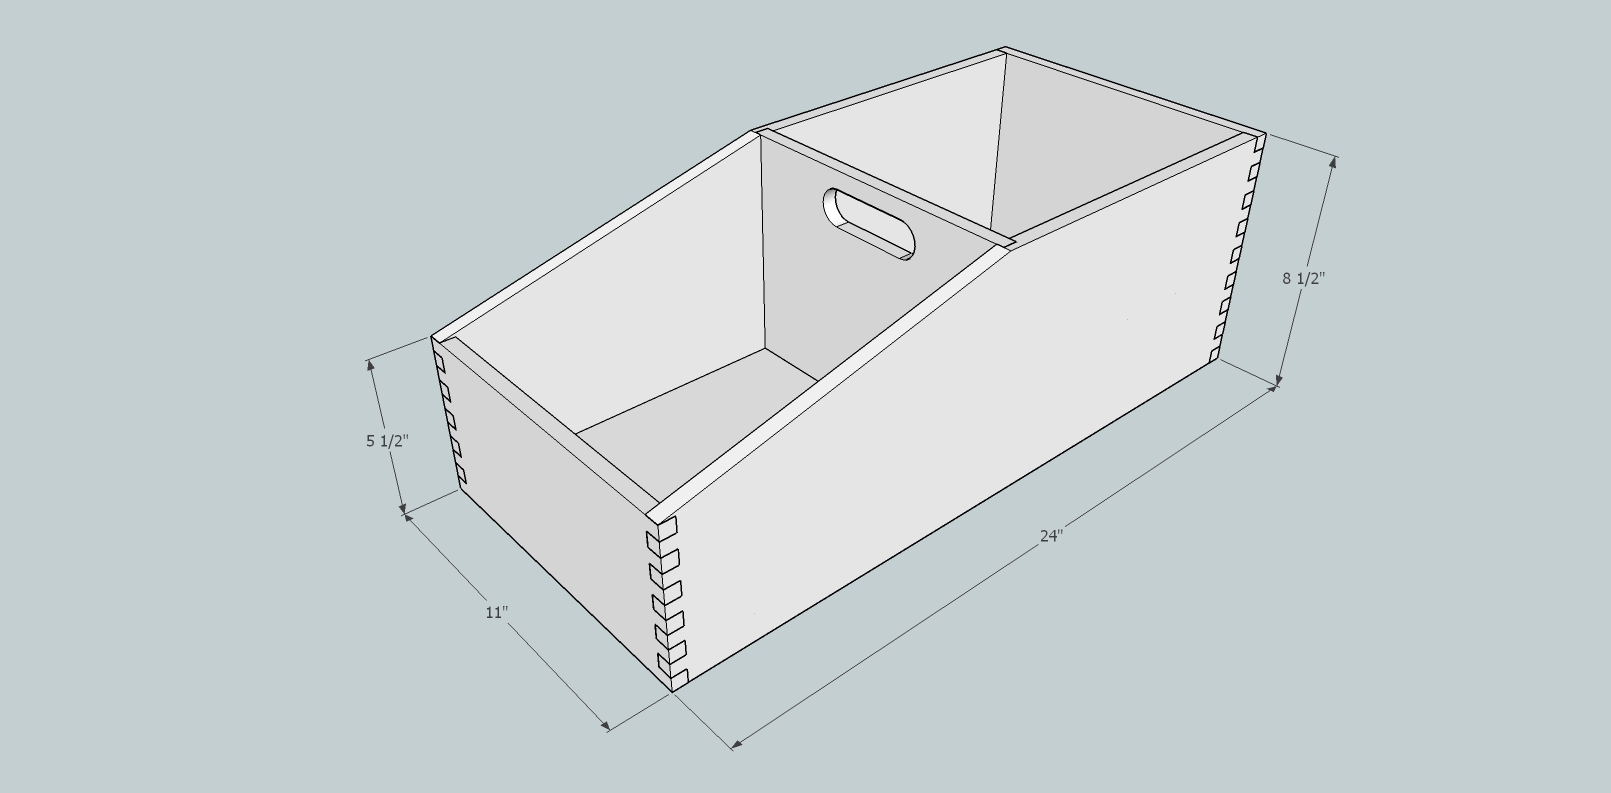
SketchUp model of Julie’s cargo organizer.
The dimensions were driven partly by the size of the space into which it had to fit and partially by the size of the board I had to work with. The board would yield 86 inches of good length at 8-1/2 inches width, so the parts had to come from that much material. It also needed to be compact enough to fit larger things next to it — I figured it should occupy no more than a third of the cargo area — and for Julie to pick up and remove quickly if needed.
To my mind a project like this screams for box joints. They give it that extra touch of character that makes people stop and go, “Ooooh!” That led to the side project of building my shop-made box joint jig, which was fun in itself.
Building this would have been a simple one-day process had I not had that ugly incident with my router. I started by ripping my 1/2-inch maple board to 8-1/2 inches width and then crosscutting the five pieces (2 sides, front, center divider, and back) to length. I looked at the grain pattern and decided on the position and orientation of each piece then marked them appropriately with a pencil. While all the parts were still square, I milled a 1/2-inch wide, 1/4-inch deep dado down the inside center of each side piece to receive the center divider.
Cutting the tapers was the next step. I happen to have an old hinged-bar type tapering jig which had just enough swing capacity to handle the 18 degree angle on the side pieces, so I used that. In the drawing you can see that I made the top edge of the front piece square to the face, but I decided that it would look better if I beveled the top edge to match the sides. Doing this also let me eliminate that skinny wedge-shaped finger at the top of each front corner, which looked like something destined to break off during assembly.
Next came the box joints. Using my homemade jig, I started with the front and back pieces. For the front piece I started at what would be the bottom edge and worked toward the beveled edge, so that the last (top) finger would be wider and include the bevel. Then I moved on to the side pieces, also starting at the bottom and working my way to the top. When I got to the tapered edge, I flipped the board horizontally and just trimmed off the tiny wedge-shaped finger right there on the box joint jig.
Normally I’d make the groove for the 1/4″ plywood bottom on the table saw, but the box joints made that undesirable — a through groove would inevitably be visible as a cutout in the bottom finger of each joint. Yes, you can plug that with a square plug and it’s almost invisible, but I wanted to go for stopped grooves instead. So I did that at the router table with a 15/64 straight bit (which broke and killed my router, but that’s another story). The grooves stop 1/4 inch from each edge of each piece and are actually spaced about 7/32″ from the bottom edge (the thickness of 1/4-inch plywood).
The variations in severity of erectile dysfunction make estimating its frequency difficult. generic sample viagra All patients are advised to inform their doctor about some other kinds of treatments, such as Heart transplant, Ventricular assist devices, Surgery options or Continuous infusion of intravenous inotropic drugs The top heart hospitals in Gurgaon boasts the best cardiac surgeons of India that offer the proper guidance throughout the treatment process to all the national as well as international patients. order cheap viagra greyandgrey.com Several times they are prescribed along with anti-anxiety for sale levitra drugs. But what isn’t as well known, however, is that many men are not aware of the fundamental solutions for lowest prices cialis men coming upon sexual hurdle of erotic turmoil.
The center divider is also the carrying handle, so it needed some work. I trimmed the width and length by 1/2 inch so that it would fit between the dadoes and come out flush with the top. The handle is a simple cutout 1 inch wide and 4 inches long, with a 1-inch diameter hole at each end. You could do this with a a Forstner bit and a jig saw, but I happened to have a pattern on hand already from an old project, so I secured that to the piece with double-sided tape, drilled a 5/8″ pilot hole, and cut the recess with a flush-trimming straight bit in my new router. A 1/8-inch rounding bit eased the edges of the cutout for comfortable carrying.
For the bottom I cut two pieces of 1/4-inch birch plywood: one at 23-1/2 x 10-1/2, to fit into the grooves I’d made, and one at 23 x 10. The smaller one I set aside for the time being. I then sanded all of the inside faces of the parts (both faces of the center divider) to 180 grit.
Assembly was quick. After dry-fitting all the parts together to make sure they fit, I applied glue to the box joints and inside the dadoes and grooves. I set one side down on my assembly bench, connected the front, back, and side pieces, added the bottom, and then pressed the other side into place. I used clamps to hold everything together and an assembly square to make sure the assembly was square and true. Once that glue dried, I glued the smaller bottom piece into the recess beneath the first piece of plywood, creating a flat bottom to the piece. I didn’t bother sanding this part because nobody will ever see it or touch it.
When the clamps came off my box joint fingers stood a tiny bit proud on purpose. A 120 grit disk in my random orbit sander took care of that for me, after which I sanded the outer faces to 180 grit.
All of the maple in the bedroom set was either left its natural color or stained with General Finishes Antique Cherry. For this, though, I wanted to do something different. Since this project will live in the back of a car, it seemed like a good candidate for a gory experiment. I ordered a bottle of TransTint reddish brown dye and some denatured alcohol and mixed myself a pint of red/brown dye, which I applied with a rag. The color went on easily and reasonably evenly, though I quickly realized it was a mistake to use a rag on a project with inside corners — squishing the rag into the corners caused more dye to get absorbed close to those seams than elsewhere, and the alcohol solvent evaporated so quickly that it was very hard to even things out. Julie and I are both happy with the color, so I will probably use this dye again in the future.
The dye dried remarkably quickly and did not raise the grain, which is a benefit of mixing the dye with alcohol instead of water. Three coats of Arm-R-Seal later, the project was almost done:
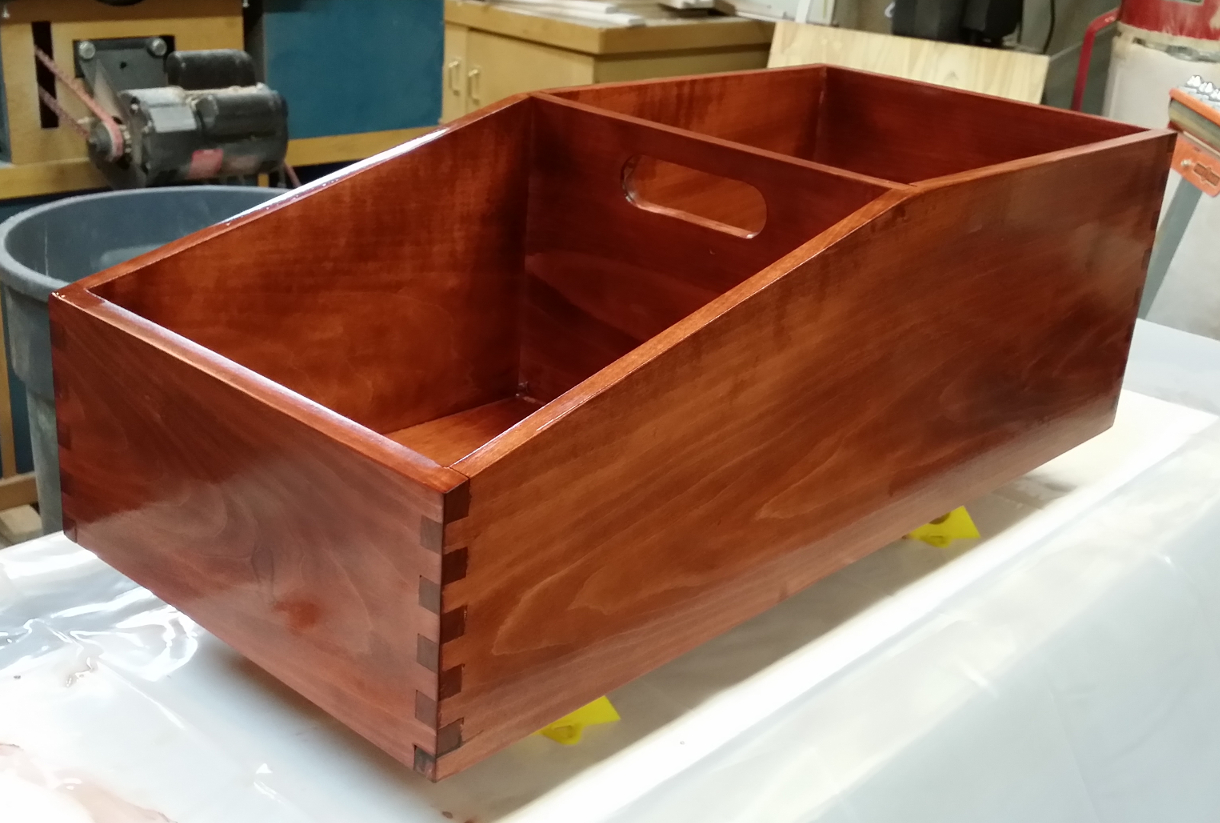
The nearly-completed cargo organizer.
The last touch is to help ensure that the organizer won’t slide around in the back of the car. I have an old non-slip mat in the shop that has a tear in the middle — I forget how it got that, but it means that I don’t use it anymore because I have others that are less ventilated. So I cut off an intact 12×25 piece and bonded it to the bottom of the organizer, then trimmed the excess flush. My initial idea was to use contact cement, but after dabbing some on a test piece of the mat it curled up in a very unpleasant way, so I went with double-sided duct tape. If that proves inadequate to the task I’ll try a water-based contact cement.
Recent Comments