Part 4: A Unique Display Case
This last part in the series was the most challenging, and the most interesting. They wanted a display case large enough for a human to enter and turn around and be visible from 3 sides. Sometimes that person would be standing on a base that rotated and was 24 inches wide, but not always.
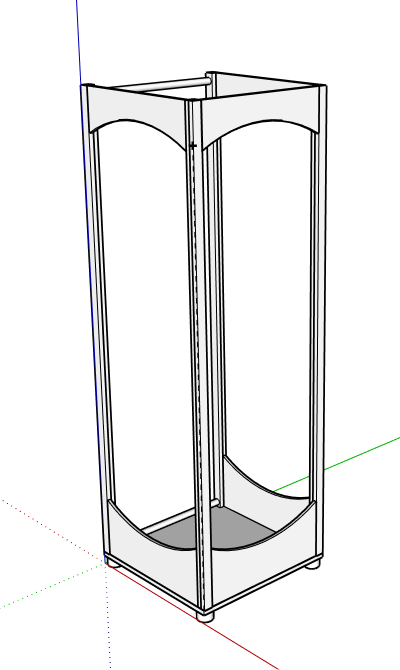
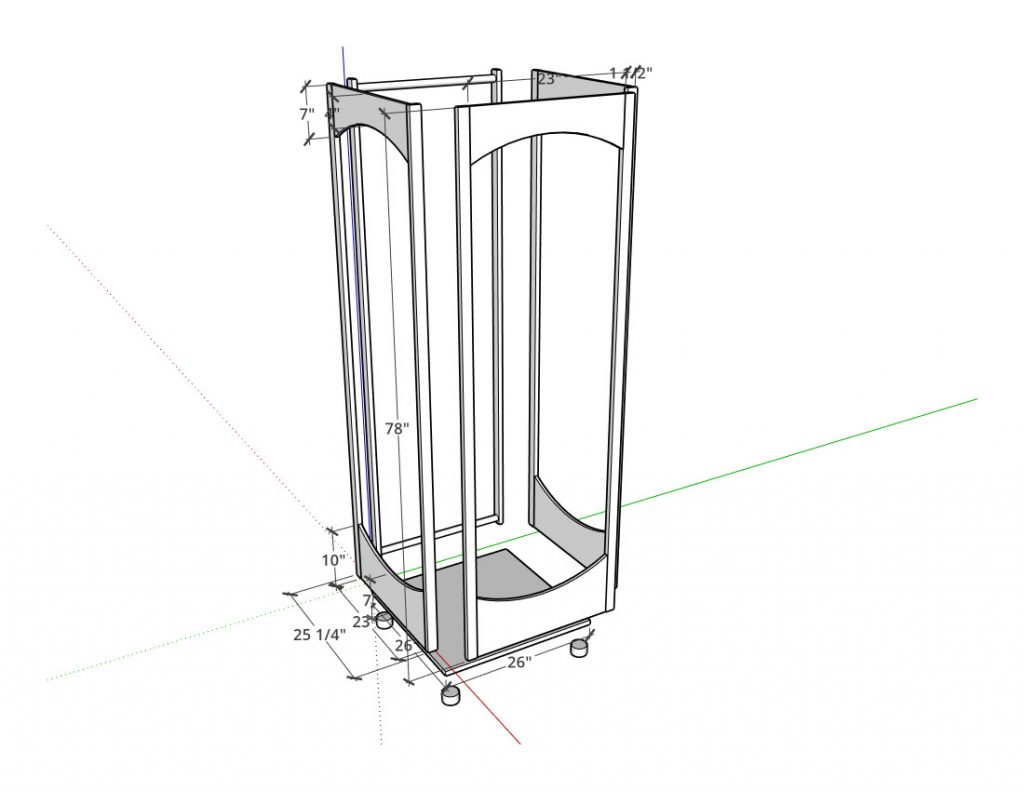
With a little head-scratching, I came up with this:

It would change a little as I went, but it stayed pretty faithful to that initial premise. My first issue was that, like all the other dungeon projects, it had to collapse or come apart for easy storage and transport.
I asked some friends on the Bourbon Moth Discord for advice on knock-down fasteners, and they came up with Striplox joiners — a brilliant idea that worked out quite well. (That link goes to the actual ones I used.) I ordered a few to try out, and they were perfect so I ordered enough to do the project with. They are reasonable in cost and available from Rockler, Amazon, and a bunch more of the usual suspects.
With that mystery solved, the rest seemed pretty straightforward. I got some soft maple, knowing that this would have a painted finish, and some baltic birch ply in 12mm and 18mm, and I ordered three 24×72 sheets of 1/8″ plexiglass, which of course is really plastic. Actual glass would have been both too heavy and too fragile.
I started by cutting the maple down to 3/4 x 1-3/4″ pieces, and the 12mm ply into 23-1/2″ wide pieces, with three being 7 inches wide and 3 being 10 inches wide. I shaped the plywood with a nice curve and then made a 1/2″ rabbet 1/4″ deep along those curved faces.
The uprights would encase the plywood, and they got 1/8″ grooves 1/4″ down each inside edge — but figuring it out took me a minute, because “inside” varied depending on where that piece would go. The front was simple, because the pieces are edge-on to the plexi, but for the left and right sides the broad face was against the plexi on the front end but the edge was against it at the rear. Perhaps an exploded diagram would make more sense here.

By this time, I received the Striplox connectors in the mail and … well I had miscalculated a little. By the time I mortised for the connectors, there wouldn’t be enough material left in a 3/4″ wide board to screw them into place. So I cut another set of 4 strips, also 3/4″ wide (because I didn’t have enough maple to cut four new pieces at 1-1/2″ width) and laminated them to the front of each side and both sides of the back. That gave me the thickness I needed, and only added 1-1/2 inches to the overall dimensions in both directions. Fortunately I hadn’t cut the bottom yet, so there was no serious consequence.
To make the recesses for the Striplox connectors, I made a jig from plywood the exact size of the connectors plus 3/4 of an inch. I slipped the female side of the Striplox into that and marked the center of the connector (it’s easy, they mark it for you) on the jig with the extra 3/4″ on the top side — you need that to slide the male part home. I set the plunge router using the female connector so it inserts exactly even with the wood. Then I reset the plunge depth for the male end, which only has to go in about 1/16″, and plugged the extra 3/4″ because it’s not needed on this side. To join the parts together you just position the male pieces about 3/4″ above the female pieces and slide them down, tapping with a dead blow mallet to seat them all the way.
Oh — and if you ever want them to come apart again, you MUST remove the little locking tab on the male piece! Otherwise that tab will lock into the female part and you will not get it off again without destroying at least the connector, if not the part itself. I took the precaution of de-tabbing all of the ones I’d bought so I wouldn’t be able to make that mistake.
I joined the sides to the plywood parts with biscuits because 12mm plywood is a little thin for Dominos. The sides were still a bit wobbly, especially the front panel, but when all 4 sides were glued together they became very strong and stable.
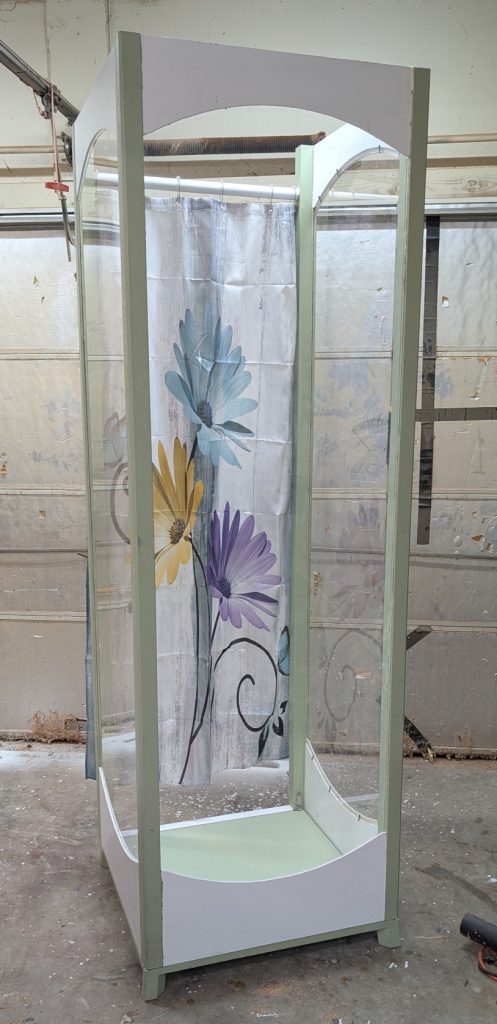
Next came the back. I originally put two dowels back there and figured I’d get someone to sew a curtain through which people would enter and leave the box. Then I realized that my box, which was 27 x 27 x 81 assembled, was almost exactly the size of a shower stall — instead of custom sewing, I bought a $14 shower curtain from Amazon and used one dowel and one wooden transom to hold the back together.
Now that I had all 4 sides assembled, I could fit the bottom. I cut that out of 18mm plywood to exactly match the perimeter of the box, and then I cut another piece of 12mm ply to fit the inside of the box. They got glued together to make a nice, solid floor that people can stand on and feel secure.
For feet, I felt the need to go a little further than the simple cylinders on the drawing. I took a chunk of maple and cut it to 3″ width and about 15″ long, then tipped my blade to 45 degrees and made a right angle on one side. I cut that, with the blade readjusted to 10 degrees, so that I had four 5-sided pieces that canted outward just a little bit, and then I cut a straight piece to be a fifth leg in the very center. These got glued onto the bottom and made it nice and secure and about 2-1/4 inches off the floor.
Now came the hardest part for me, painting! I hate painting, largely because I suck at it. And I made my life more difficult by putting the plexiglass in the sides, still protected by the paper covering, thinking I could just peel it off afterwards.
They wanted it painted in neutral colors — no pink or blue, nothing too gaudy. So I grabbed some paint I had in the house already and made the uprights and bottom a nice sage green and the panels white. And then I tried peeling the paper off the plexiglass.
It was hard. I actually ended up taking the plexi out of the panels and I needed both hands to get the paper off. And of course I messed up the paint putting the panels back in, so I had to repaint a lot. Grrr!
But ultimately, I did get the paper off and the damage repainted. I just used some picture frame hardware to hold the plexi to the top and bottom panels (it is recessed in grooves in the sides); it has enough flex without those to bend and get it out, but not easily. I also added four clasps to connect the sides to the bottom, so that the unit can be dragged or lifted and carried a short distance after assembly. And that was it.

I am rather proud of this apart from the paint job, which is adequate but not brilliant. But it knocks down quickly and easily and carries and stores in a few inches leaning up against a wall. (And it kinda reminds me of a TARDIS … maybe that’ll be a future project. A TARDIS-shaped wardrobe?)


Recent Comments