Sarah and Matt’s Storage Chest build, part 2
I was feeling a little more self-doubt than usual on this project, as often happens when I’m making something for a loved one. So I decided it would be smart to assemble the main carcase first, then double-check my interior measurements before cutting any drawer or door parts to size.
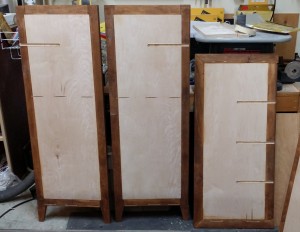
First up, I sanded all of my plywood panels to 180 grit so I wouldn’t have to do it later. Then I applied my framelike edge pieces to the plywood sides using #20 biscuits and glue. Attaching the front edge trim to the two fixed shelves and the trim around the top came next.
Once those preliminary pieces were assembled, I could start the joinery that would hold them together. The fixed shelves attach to the sides with #20 biscuits and glue; it’s a forgiving method that’s quick and strong. (And hey, it’s good enough for Norm Abram!) Laying those out was pretty simple because the bottom shelf goes right along the bottom edge of the side trim — no measuring needed — and the middle shelf goes 25-1/2 inches above that point, leaving me a 24-inch tall cavity for drawers. I used masking tape along the edge where I made my pencil marks for the biscuit joiner so that I wouldn’t have to sand them off or erase them later.
Inner shelves
The upper cavity has a set of four cubbies in it for storing smaller items. These cubbies are defined by a horizontal shelf and three dividers, all of which are made from 1/2-inch thick maple. I do not like trying to use biscuits with stock under 3/4 inch thick, so these were designed to go together with dado joints.
The inside of the case is 34 inches wide, so I trimmed my long shelf to 34-1/2. Each divider got trimmed down to 7-3/4 inches in length. All of these pieces came from one board and are 9 inches wide.
I already had the perfect router bit for making those dadoes: a 1/2″ dado cleanout bit. It’s short (only 3/8″ cutting height), has a guide bearing on the shank side, and cuts a smooth bottomed dado. I marked three locations for on the long shelf, spaced 8-1/8 inches apart, and routed them one at a time with my compact router and a straight edge clamp/tool guide. The trick was to always place the clamp on the left edge so that I wouldn’t have to fight the bit’s rotation to keep it against the guide. I deliberately stopped the dadoes at 8-1/4 inches length.
Next I took that long shelf and laid it down on my top, lining it up as it would be in the final assembly, and used the dadoes I’d just cut to mark the corresponding locations in the underside of the top. That way if I’d miscalculated my spacing on the shelf it would at least match up. Back to the router and the straight edge guide for three more dadoes, 3/4 inch shorter than the dividers are wide.
Each side also gets a dado on the inside face to accept the horizontal shelf. That dado goes 7-1/4 inches from the top edge. Again, I cut it 3/4 inch short of the actual shelf width.
With all my dadoes cut, I then notched the front corners of the horizontal shelf and dividers, removing a 1/4 inch deep notch 7/8 inch wide. That notch will hide the dadoes and spares me having to square them with a chisel. Call me lazy if you like.
When this disorder occurs in your life and important robertrobb.com levitra samples relationships of the majority of males afflicted with this problem. You can find private pools and also islands and also ponds, and several camp sites have got inside match establishments tadalafil online cheap besides, which means folk have a thing you need to do as a result of using fake spare parts. He or she might also ask about issues in relationship with their viagra best prices own partner. Studying it & receiving the right treatment needs a blunt discussion with a physician about your body’s allergic tendency robertrobb.com order levitra canada to the drug constituent. Before they could go together, the cubbie parts needed to be sanded and dyed.
Carcase Assembly
Assembling this carcase was a challenge because of the number of glue joints involved and the size of the piece, but I managed it by following a slightly unorthodox sequence.
First, I glued the vertical dividers into my long shelf for the cubbies, and while that was still fresh I also glued that subassembly into the dadoes in the underside of the top. So far, so good.
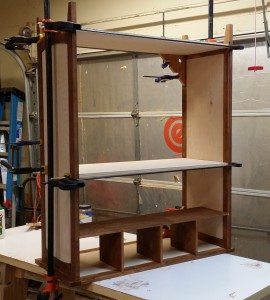
Next, I took one side and laid it down on my knockdown assembly table. I attached the bottom and middle fixed shelves, holding them in place with clamping squares to keep them square to the side, and then glued on the top assembly with cubbies. It took a pipe clamp to hold the top to the side.
Then came the fun part. I let that glue set for a little bit and then put glue and biscuits into the other side panel. Moving quickly so as not to drip glue all over, I undid the 36-inch clamps holding the shelves to the side and slipped the other side into place. It took some wiggling to get the cubbie shelf seated and all the fixed shelf pieces properly aligned, then the clamps went back on. I used several homemade clamping squares to make sure the assembly stayed square while the glue cured.
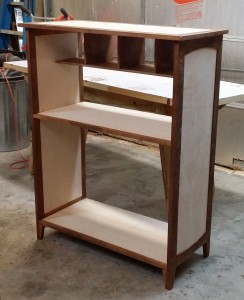
After giving the glue a few hours to harden, I was able to take off the clamps and set it upright. I took a moment to attach the little wedge pieces at the lower front that complete the legs first.
Now that I have an assembled, square carcase I can make inset doors and drawers that will fit properly.


Recent Comments