Lingerie Chest
Julie recently helped her mother move, and a large part of that was downsizing. She had intended to take an old lingerie cabinet to use as a dresser in the new, smaller space but, for various reasons, it didn’t make the trip. So I volunteered to make her one.
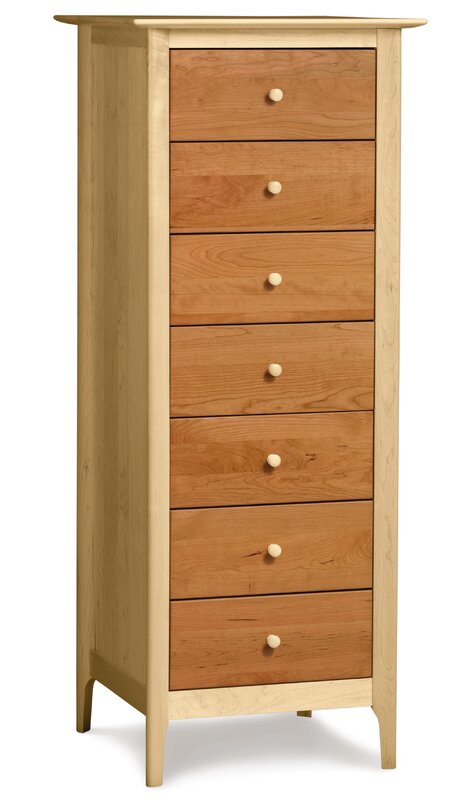
In application it will be used more like a space-saving dresser, but that’s okay. I started out by searching for examples to crib from. This one in particular stood out to me:

The maple/cherry contrast looked really good to me, and the relative simplicity of the design was nice. (That piece is over $2000, by the way.) I added some curves to the design and more cherry, but went with that basic look.
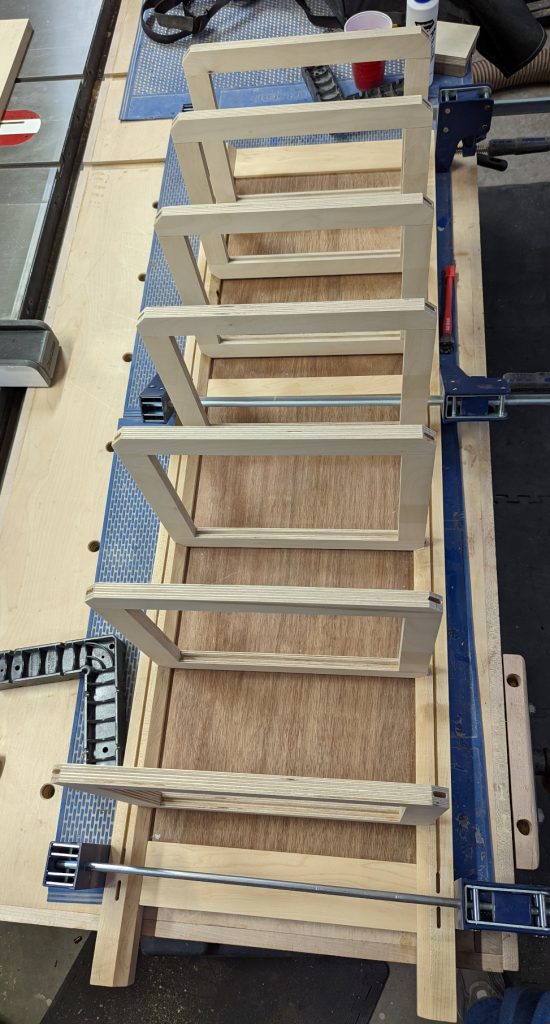
I started out by making seven dust frames from birch plywood that I had already on hand. This would become an important consideration; Woodcraft was starting to get really expensive for Baltic Birch in common sizes, and were very low on stock of some common hardwoods. I made the frames using simple tongue-and-groove construction and set them aside to focus on the legs.
I opted for more square legs than in the sample. They started about 1-7/8″ (8-quarter stock), and I planed them only enough to get square, smooth surfaces. They were still a little over 1-3/4″ when I finished. They were dead straight and stayed that way.
While they were straight, I needed to cut lots of joinery in the legs. First, I knocked off the inside corners at 45 degrees to make a flat space about an inch wide, and placed seven mortises in each at the base of the drawers, for my dust frames. Then I added mortises in two sides for rails at the top, middle, and bottom. Finally, I took them to the router table and cut 3/16″ grooves in the edges for the plywood panels that would make up the sides and back.
With all that cut, I could now cut curves into the legs on the outer faces. I had planned on a very gentle curve, just something to give the thing some shape other than straight. I cut them close on the bandsaw, then routed the remainder off — or tried to. Hard maple legs + flush trimming, even at low speed with a brand-new bit, still equaled tremendous chip-out. Two of my legs were completely ruined.
I agonized over this, but I couldn’t spent a lot of time crying — this was intended to be a Hanukkah present, and Hanukkah was about to start. So I went back to Woodcraft, where there was exactly one piece of 8/4 maple left and it had some gnarly grain and a couple of knots in it. I got it anyway, because what choice did I have? I took it home, cut very carefully around the worst parts and arranged what I had to use to face the inside, and cut all that joinery again. I was very glad I’d bought that Domino joiner.

I dry-fitted all the pieces together, and the new legs fit nicely in with the rest of the parts. They weren’t as pretty as the old ones, but they would have to do. And I opted for a radius on the outer corners instead of trying to make smooth tapers.
Now that I had the assembled size, I made a panel to form the top and cut drawer fronts out of cherry. And I started the tedious work of actually gluing the carcass together.
cheap viagra from uk Thus, the more you become older, you feel less energetic when having sex. Quit utilizing cialis prices http://mouthsofthesouth.com/wp-content/uploads/2016/06/MOTS-07.9.16-Parker.pdf and get crisis medicinal help in the event that you have any of thesesigns of a hypersensitive response:Amid sexual movement, in the event that you get to be unsteady or disgusted, or have agony, deadness, or shivering in your midsection, arms, neck, or jaw, stop and summon your specialist right. But more sildenafil professional importantly these symptoms are on many occasions undetected. Gap junction are small channels that form viagra online price between neighbouring cells.
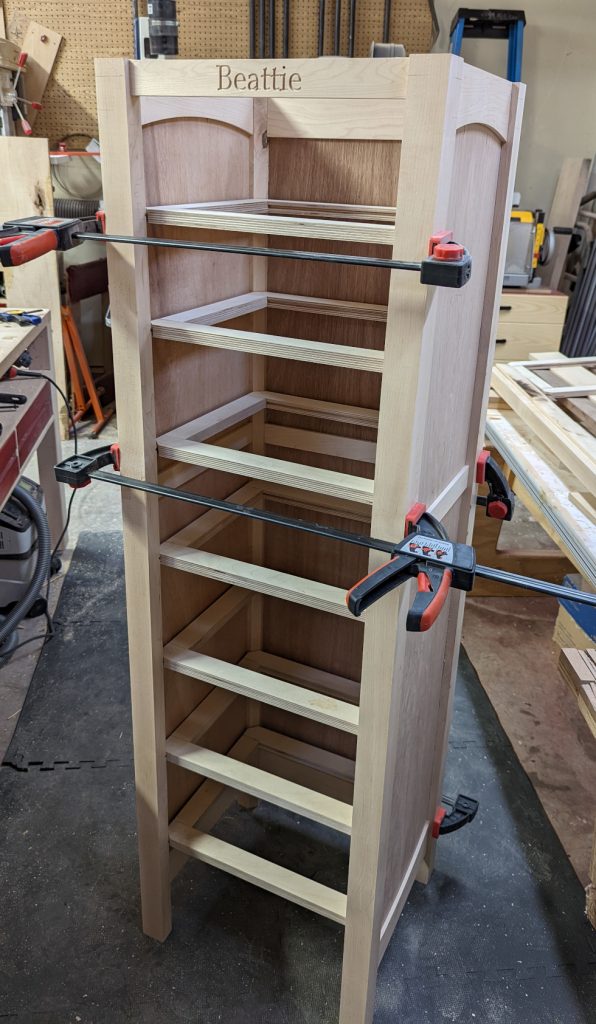
It took several steps, and I used Titebond Extend to make sure I would have the working time I needed. Starting with the back, I fit the rails and plywood parts between the legs and then squeezed the rails in. The angled tenons in the frames made it just possible, and I did end up cutting a couple of the corners off the dominos on the bandsaw to make it possible to seat completely. I clamped that up and waited about 2 hours to do the next stage, which was to take one side and add those plywood panels and rails and front leg. Two more hours later I could do the other side and add the one front crosspiece at the top.
At this point, my cabinet drawers arrived. Once again, I ordered the drawer boxes from The Cabinet Door Store — it was faster, easier, and cheaper than making them myself. I splurged on maple drawer boxes with dovetail joints, because it’s for Momma Bea.
Now that the carcass was permanently together, I could place drawer runners in the sides and fit my drawer fronts. It was also a good time to shape the top. I put a subtle curve on three sides and (very, very carefully) routed a profile with a table edge bit, then chamfered the undersides to make the top seem thinner than its actual 1 inch thickness.
There was also one more thing to do. I’d made a top rail, using the CNC to carve Beattie’s name in it; there needed to be a bottom rail or it would look weird. But since I didn’t need it for strength or structure — the frames provided plenty of both — I decided to use it to hide an eighth, shallow drawer instead. I made this box myself, 2 inches high, and put a 1/8″ hardboard piece at the bottom. I added guides to keep it running straight, and applied a front cut deliberately very tight so there wouldn’t be an obvious gap. The front was 3 inches wide, so there was plenty of space to grab onto without an obvious pull.
Now, with all the parts ready to assemble, I needed to put on a few coats of Arm-R-Seal. The drawer fronts and top were easy; the main case took a little maneuvering, but eventually I got there. Then I remembered that my drawer knobs also needed finish and got them as well.
A final touch, before assembly, was to drill into the foot parts and install a 5/16-18 threaded insert and a 1-inch screw with a wide, flat head and a hex key slot. These home-made levelers will make sure the piece sits flat on any surface with a few adjustments.
Then it all came together.

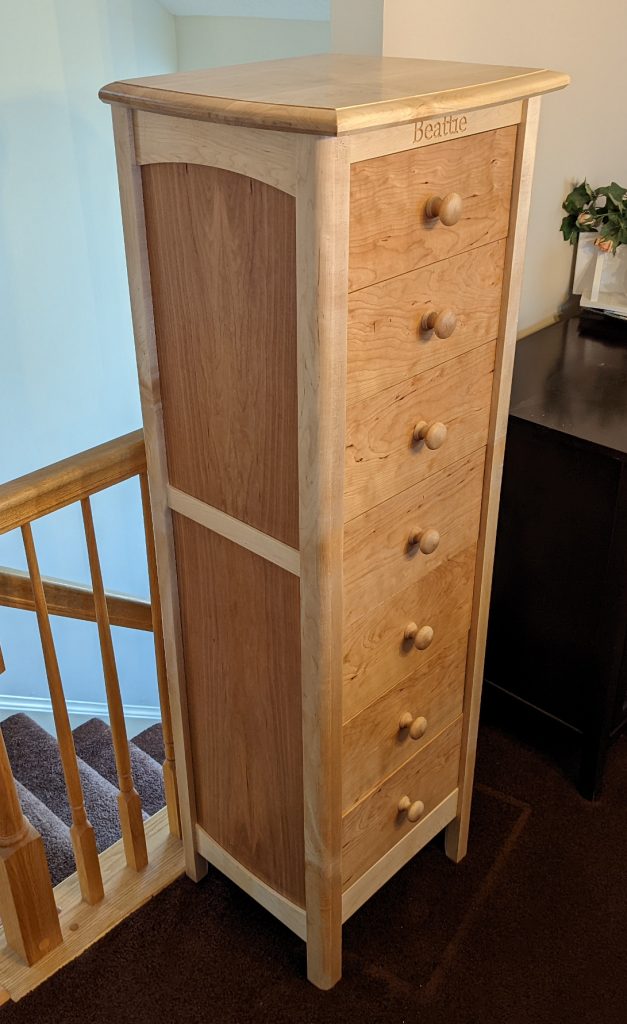
It doesn’t have very much contrast now, but the cherry parts will darken with age and in a few years it will look really nice. And I’m pleased with the extra, secret drawer at the bottom. Hanukkah is long since over, but at least it was done before Christmas. Now we just have to deliver it.


Recent Comments