
Matthew & Jenny’s End Table
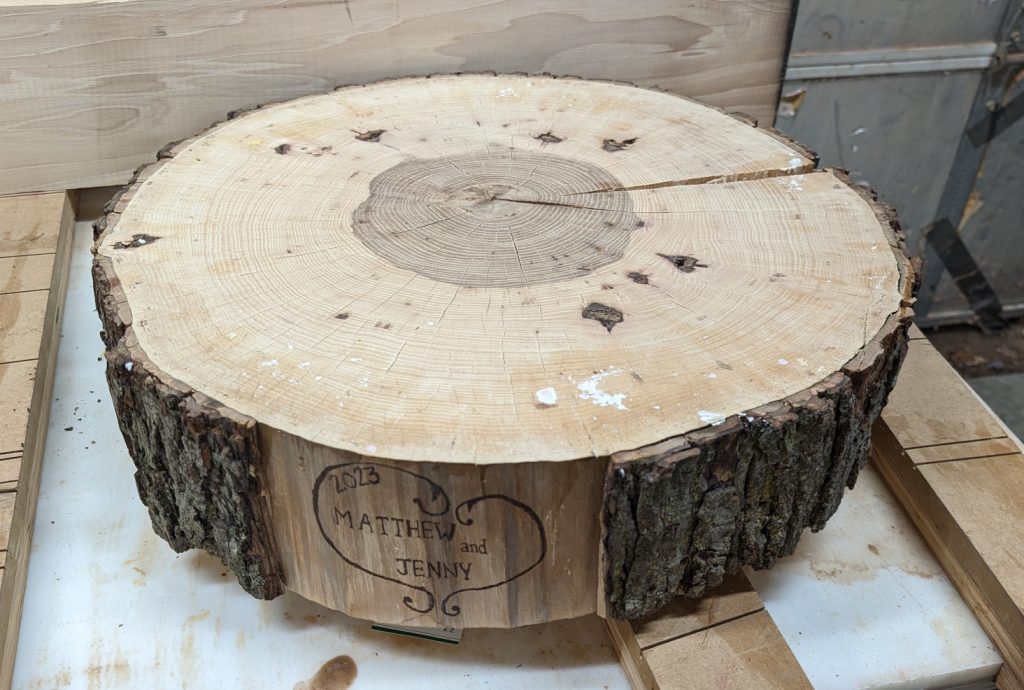
One day in October a neighbor came over with a request: he had a cookie (ie, a radial segment cut from a log) from a hickory tree, and he wondered if I could make it into and end table. The idea was to make it a Christmas gift for his son and his new wife.
As it happened, I had just recently gotten some hickory from Woodworker’s Source to make the underpinnings of my new table top, and I had ordered a lot of spare. So I had the stock on hand and no particular plans for it. I agreed, and got to work on it shortly after.
I have never worked with a slab or a cookie before, so I took advantage of one of Bourbon Moth Woodworking‘s weekly livestream Q&A sessions to ask about working with a cookie.
Bottom line was, it depended on the age. I found out that this cookie had been part of a live tree as recently as August, and it was about 4 inches thick, so no way was it anything like dry enough to rely on. Anywhere I would make a mortise or try to attach anything was very likely to crack and weaken as time went on and the cookie dried naturally. Wood shrinks in width, not length, but in the case of a cookie “width” actually moves out from the center in all directions, so there was nowhere I could really work with.
However, I am sentimental, and one of my own sons got married a couple of weeks ago. So I came up with a design that would basically use the cookie, even feature the cookie, but not as a structural part. I didn’t even draw this up, I just grabbed wood and started cutting.
My hickory boards were roughly 8 feet long, 7-3/4″ wide, and 8/4 thick (which worked out to 1-15/16″ in real life), with one edge already jointed straight. So I started with a handheld circular saw rough cutting my board in half, and then took the halves to my bandsaw, where I resawed them asymetrically. When I was done planing them smooth and parallel I had two 1″ thick boards and two boards about 5/8″.
The 5/8″ pieces I cut again and glued up two panel blanks, setting aside the rest. The thicker pieces I cut to make 4 tapered legs and two cross-pieces for the middle. In a lot of ways I was creating my bedside bench again, but in a tall, narrow version.
I had plenty of wood, so I aligned the legs with the grain rather than with the straight edge. That meant cutting them at the bandsaw, and the initial plan was to then straighten them with a router template. But hickory, I quickly remembered, is very difficult to route — the fibers are very prone to tearing out even when taking as little as a 16th of an inch — and the first two legs ended up in the waste pile. Good thing I had spare!
So instead, I used my tapering sled to do the long edges (which tapered anyway) and then the miter gauge on the short edges, using stop blocks to keep the pieces the same length. Then I half-lapped the crosspieces, which was much easier at 90 degrees, and put domino slots in the crosspieces and legs.
That allowed me to lay out two of my legs and the cross piece, and get an idea of how big my base would be 5 inches from the floor. The answer was 16-1/2 inches, so I added a couple of thin cutoffs to the sides of my second panel and glued that up to make 17 inches of width.
Having been reminded how brittle hickory can be, I did not fancy using the router to cut circles with it. Instead I took a piece of plywood, super-glued on a couple of blocks. and improvised a band saw circle-cutting jig. The smaller panel I cut into a 14-inch diameter circle, and the larger one 16-1/2 inches.
(And in that process, I made another discovery about my Laguna band saw. I’ve been training myself to release the tension on the blade when I’m not using the saw, but I haven’t learned yet to always put it back before starting. I reached over to take off the tension *after* cutting these two circles, and the lever was already down — I cut those circles with the tension released! They were still perfect. Amazing.)
Now came the fun part. I wanted to half-lap the round shelf into the legs so that it would serve as a bottom brace. I struck a line right in the center (using the small hole I centered the circle-cutting jig with to be sure) and another perpendicular to that, and made a mortise 3/8″ deep and 1 inch wide at each of those 4 points on the perimeter. This was more bandsaw work, carefully nibbling away at the waste, although I probably could have gotten away with using a chisel.
Then I put my 4 legs together and clamped them, and cut the mortise into all four at once to make certain they would be at the same height — 5 inches from the bottom. I made a carrier for my miter gauge that has a 1-1/2″ spacer block at the end and then a stop block, so I could set my dado stack to 1-7/8″ high and cut the dado in one pass. Because of the spacer block, the legs were angled as they would be when assembled, so my dado came out perfectly parallel to the floor. Whew!
I then dry-fit it together with the shelf, and finally had an idea of what it would look like assembled.
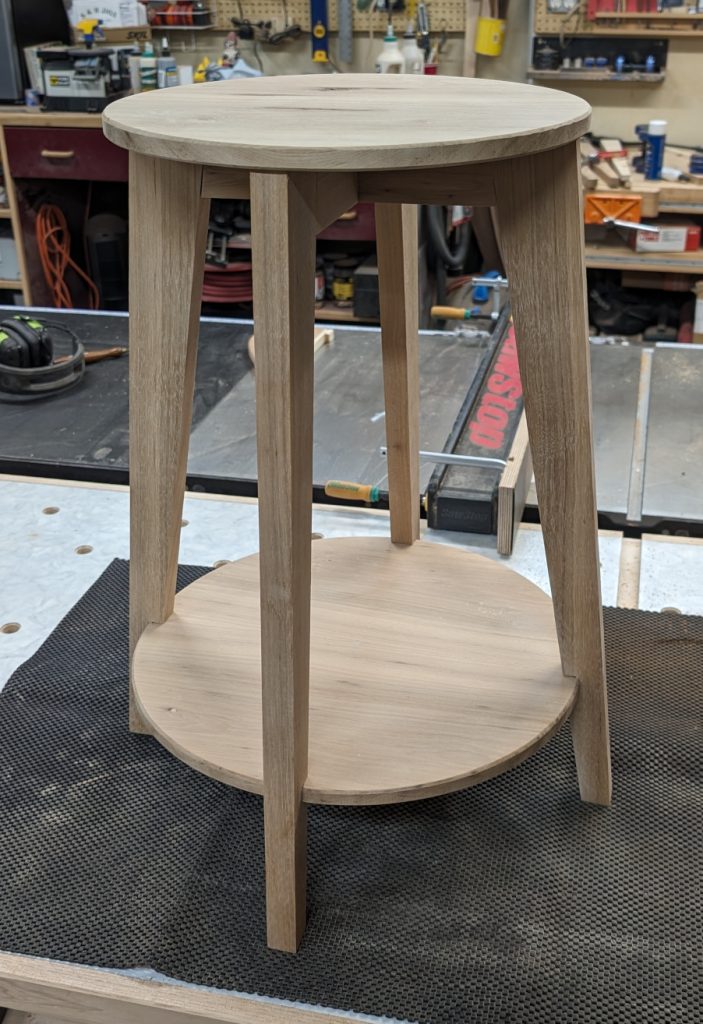
A little plain, yes, but I wanted the cookie to be the star so that’s appropriate. I did decide to pillow the outer edge of the legs because that’s a subtle detail that really makes a big impact (and depends on a sharp plane, not a router bit, so it felt safer).
Now it was time to deal with the cookie. It was originally cut to be the wedding cake serving stand at Matthew and Jenny’s wedding, and the solution the original maker had come up with was to put 3 feet of differing heights on the bottom to make it stand level, and then only to level the top. Which worked fine for his purpose, but wouldn’t for mine. Plus, the cookie hadn’t stayed flat, so neither surface was usable. To add to the fun, there was a decoration wood-burned into the side that took up pretty much the entire height of the cookie, so even if I could have fit it onto my CNC I couldn’t just level it without losing some of that vital decoration. Hmmm …
I decided to level about 85% of the bottom, so it could sit on the 14″ circle I’d made for the top, and let the woodburning hang below that base. Did I mention I’ve never worked with a slab before? So of course I didn’t have a slap flattening jig. I cobbled one together from scraps of plywood.
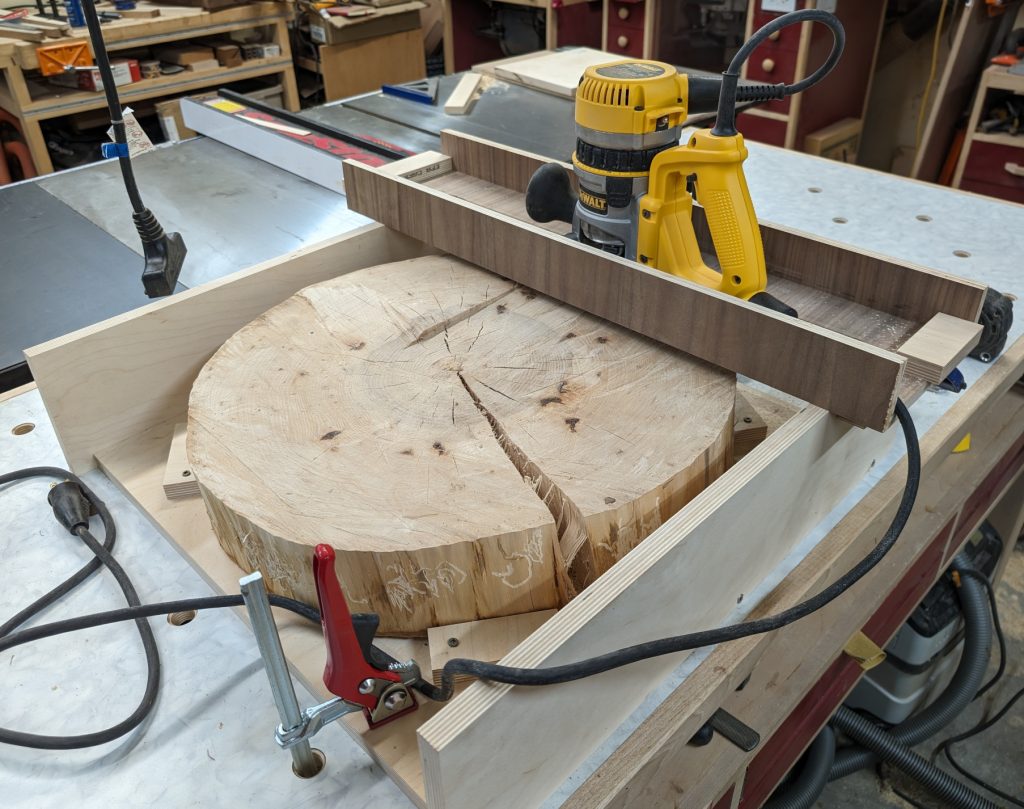
I put a couple of shims under it so the cookie wouldn’t wobble, and chucked a 1-1/2″ straight router bit that I’d bought for the occasion (thanks, Amazon) into my beefiest non-table router and took it really slowly. And, much to my surprise, it actually worked pretty well. I left about 3/4″ behind the woodburning and ended up turning about an inch of the cookie behind that into chips. (Lots of chips!)
After cleaning up that mess, I made a short trammel for my trim router and a 3/4″ bit and removed a ring 14-1/16′ wide from the rough center of the cookie. I moved the hole in three more times so it was a wide circle, and then used the trammel as a long base to remove the rest of the circle.
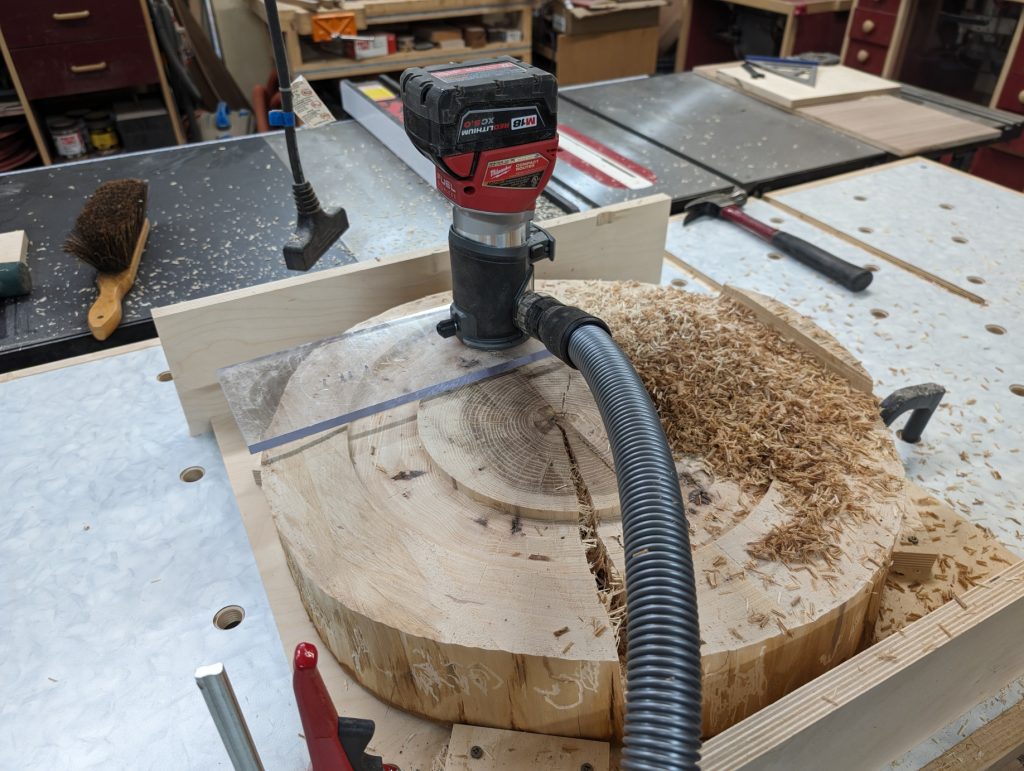
This smaller circle, just a hair bigger than the top of the base, allows the cookie to register with the base and locks in. No fasteners, just gravity and the ledge. Time for a dry fit.
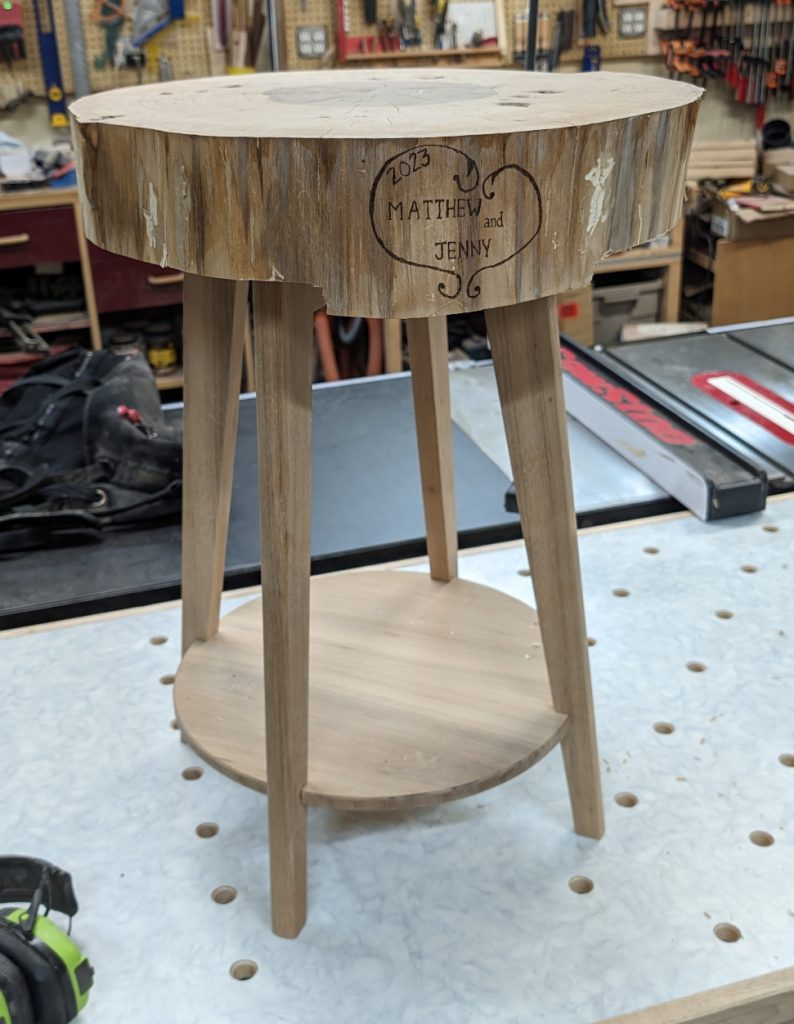
Okay, pretty good. So I finally glued the base together and applied a couple of coats of Oli Natura hard wax oil to it, and then turned to another tool I haven’t used before: a penetrating epoxy finish for the cookie. The idea here is to slow down the inevitable additional cracking and moving that all cookies are prone to. I brushed on 3 coats of Total Boat’s Penetrating Epoxy, including pouring some into the cracks, and gave it several days to dry.
While it dried, I ordered a 21-inch round of 3/8″ glass to form the actual table top. I’m taking it as a given that the cookie won’t remain flat on top, and this way they can use clear plastic shims to keep the glass level while the cookie moves however its nature dictates.
The cookie actually surprised me. I left it sitting on the base while waiting for the glass, and after a day or two it was actually sitting almost perfectly level. When the glass came, it didn’t need shims (but I’ll still provide some so that later, when the cookie moves more, they can still keep the top level).
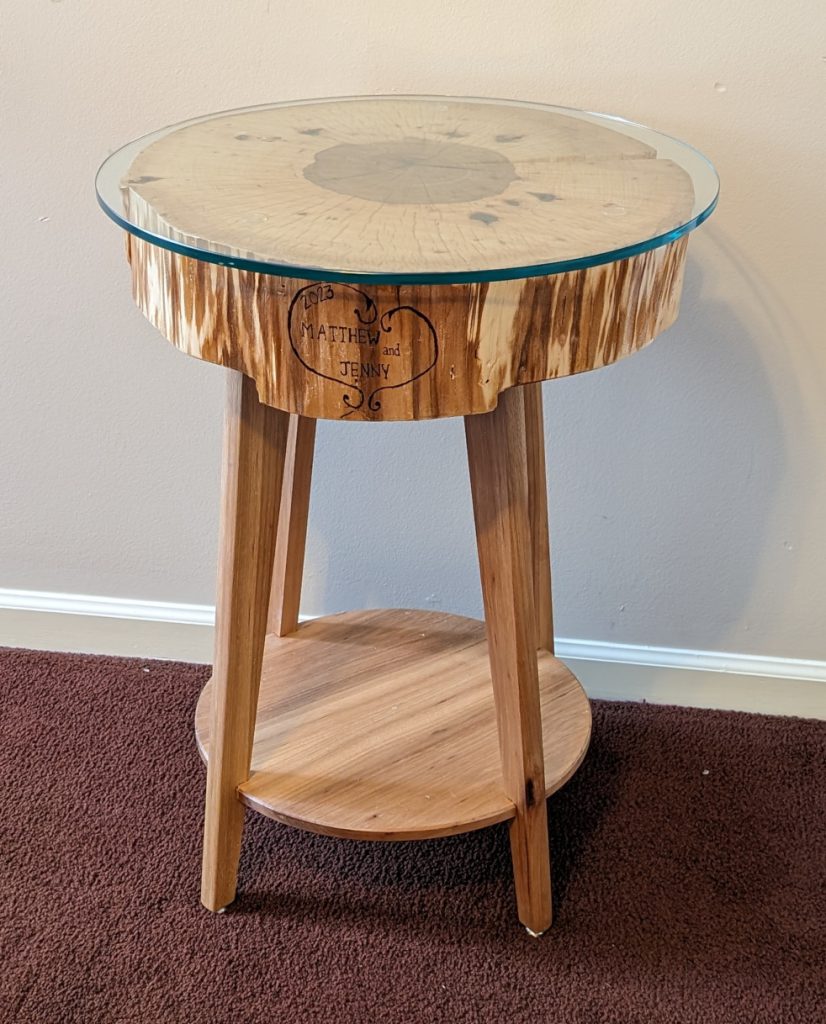
This was a really interesting project, because I got to try several things for the first time: working with a cookie, leveling with the router, penetrating epoxy, and the half-lap joints with a round bottom shelf. And hopefully it will last a long time.


Recent Comments