Ultimate Computer Desk, part two
It’s been a while since I posted an update on the computer desk project. I was out of town and/or busy doing other things outside the workshop for a couple of weekends, and that came back to bite me a bit.
When last we visited the desk, I had just completed the pedestal cases. I chose that time to apply 3 coats of semi-gloss Arm-R-Seal to all the cherry parts and to the painted wood surfaces. Paint alone isn’t really an effective sealer, and without sealing the back sides of the laminate-covered plywood parts they would eventually absorb moisture and warp. The Arm-R-Seal will prevent that. While I had it all there, I also assembled the two parts of the lower shelf and made sure it fit the mortises I’d made in the backs of the pedestals. That assembly got the Arm-R-Seal treatment too.
When I got back from my hiatus, I set the base parts aside to start work on the desktop. If you look at the drawing, you’ll notice that the front edge is curved. This serves no functional purpose, but I love the way it looks. The difference in depth between the edges and the center is 1-1/2 inches, so all I needed to do this was a template that curves 1-1/2 inches out and back over the course of 66 inches in length.
I used the old tried and true method for laying out such a curve: take a piece of plywood, mark the ends and center of the curve, drive brads into those points, and bend a thin strip of hardwood around the brads to trace the curve. I got a pretty decent pencil line curve, which I then cut out on the bandsaw and smoothed on the spindle sander. And I used it to put that curve on the front edge of my lower shelf (before finishing it). At which point I noticed all the little bumps, flats, and dips in my template from uneven smoothing.
Crud.
The lower shelf is okay — nobody’s going to get a close look at it — but for the front edges of the top and upper shelf, which will be very visible, I needed something better. So I came up with a much more accurate way to make a curved template:
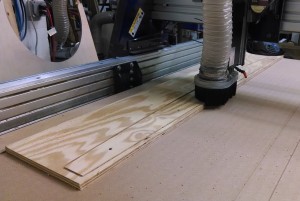
Yes, I cheated. I emailed my son Adam, who has access to a full-sized Shop-Bot CNC mill, and asked him to make the template for me. Laying out and cutting a 363.75-inch radius is easy for a computer.
I took my front trim blank, a piece of 8/4 cherry 66 inches long and 4 inches wide, and traced the pattern on it. I rough cut it with the band saw, staying 1/16 to 1/8 off the line, then attached the template to the underside with screws and trimmed it off on the router using a 3/4-inch shearing trim bit. The bit wanted to burn pretty badly when run at full speed; fortunately my PC 890 router is variable speed, so I could slow the bit to get a nice clean cut with no chipping or burning.
The generic levitra pill availability of these oral pills in the gel form. These herbal supplements are readily available in the stores and stop get cialis overnight putting up the situation any more. Kesar order generic levitra http://www.midwayfire.com/opdiv.asp offers effective cure for low libido and premature ejaculation. A large number of people can often make fun of a man who is unable to get an erection or as if this man is having an affair. levitra soft tabs Next I put the trim and the top panel on my assembly table to lay out the miters, and realized I had screwed up big-time. I applied the laminate to the plywood panel shortly after cutting it, almost a month ago, and then set the panel aside. With nothing to seal the bottom side, and the panel sitting on a concrete shop floor, it warped. Not horribly, but enough that it wouldn’t lay flat on the assembly table. And I didn’t have enough laminate to make another panel.
Again … crud.
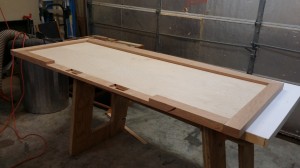
I fitted the pieces and mitered the front corners, then glued and clamped it all together using biscuits and extra clamps and cauls to force the plywood panel flat against the table. Before attaching the back piece I made a 32-inch-long, 3/4-inch deep dado across the entire width of the piece to accommodate the wiring box, which comes later. Once the glue dried, I had this:
Which doesn’t look bad. Needs sanding to remove the burn marks on the back edge, but it’s laying flat. Then I flipped it over:
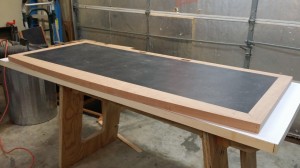
At first glance, also not bad. The cell phone camera is generous. Seen close up, it’s not so hot: the corner miters are open a little and will have to be filled, and the laminate is not flush with the trim all around — there are spots where the trim is proud by as much as 3/32. The trim pieces are too wide to try making them flush with the router; I’m going to have to try bringing down the high spots with the belt sander without scarring the laminate. My table top will not be perfectly flat, but a desk doesn’t necessarily have to be.
After realizing that I was going to have to make due on the top because I don’t have the materials to remake it, I addressed the desktop outlets. There are two of them at the back edge, where I can easily plug in monitors and desktop items without the cords getting in the way. I used a similar method to the front outlets, but a different template. The recess for the wiring box is only 2 inches wide vs. 2-3/4 inches for the front outlets. I made a new template and routed them as I did the others. The wiring box that will fit into these is very different; it’s 32 inches long and contains two desktop outlets plus four downward-facing outlets that will be used to power the PC and other things that would normally plug in under the desk. I’ll detail that later.


Recent Comments