
Snack Table build, part 1
I got started on the snack tables right away and opted to build two of them.
Tops
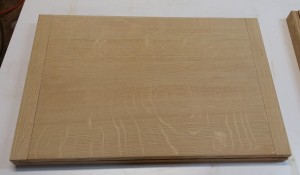
Since the quartersawn white oak was so nice-looking, I abandoned the original plan of a laminate-covered top in favor of a solid oak top. So I paid particular attention to the face grain patterns as I was planing the truing the stock, saving the prettiest parts for my table tops. The finished dimensions of each top in the plan are 24 inches wide and 16 inches deep. My stock was a little over 8-1/2 inches wide after prepping, so I only needed two boards to make the field and two smaller pieces for the breadboard ends.
It would be vitally important that those glue joints be clean and as close to invisible as possible, so I set up my new router table for jointing edges and made sure the edges I wanted to glue were as true as possible. I had to work them a little but I got to the point where I could slide the boards next to each other and the joint line disappeared. Great! I used biscuits to reinforce the joint and set them aside to dry.
The breadboard ends are just 1-1/2 x 16 pieces. I centered a 1/4-inch groove on each piece using the table saw, taking multiple passes to sneak up on the width I wanted. Then I took my dry blanks, trimmed them to final width, and then lowered the table saw blade to 1/8 inch height and made a scoring cut 3/4-inch in from each edge. This would guarantee me a clean shoulder where I cut the tongues to fit those grooves.
The actual cutting of the tongues I did on the router table with a 1-inch flat-bottom straight bit, setting the fence for a cutting depth of 3/4 inch. I took multiple passes, and since I’d already scored the line on the table saw I had no fuzziness or tearing of the grain at the edge. The tongues fit nicely into the grooves and I secured the breadboard ends with dowels driven in from below. The middle dowel is glued; the ones at either end just float in elongated holes.
Bases
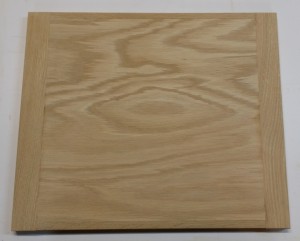
The bases are similar to what I originally planned for the tops: a plywood piece 13 x 16-1/2 with white oak trim on all four sides. To dress it up a bit, though, the trim han the edges is only 1/2 inch wide and the ends are 1-1/2, echoing the look of the breadboard ends on the top. Since the plywood won’t move the way the solid top will (though quartersawn stock doesn’t move nearly as much as flat-sawn), the ends are simply attached with biscuits and glue rather than the tongue and groove treatment.
Supports
The main piece connecting the top to the base is an adjusting support made up of two pieces: a fixed support, which gets attached directly and permanently to the base, and a sliding support, which attaches to the top. By moving the sliding part up or down and then securing it with a bolt, knob, and T-track, the table height can be quickly and easily adjusted to suit the immediate need.
The fixed part starts with a plywood piece 10-1/2 x 18. I used plywood for stability — I don’t want these pieces shrinking and swelling. Looks are secondary because the fixed support is not a highly visible surface. Next I cut two pieces of my white oak 1-1/2 x 18, looking for a nice grain pattern because these are highly visible in the finished product. Using my plywood to register the fence, I then grooved the oak pieces with a 3/8 wide groove spaced exactly the thickness of the plywood from one edge. (My plywood measures 23/32, but supplies vary.) Then I glued the trim to the plywood piece, ensuring that the groove was exactly flush with the plywood face that would be toward the table back (the less attractive face).
For the sliding part, I started with a plywood panel 9-1/2 x 18 and cut two oak pieces 3/4 x 18 for the sides. These I attached with just glue (not enough room for biscuits). Once they were dry, I ran them through the router table to produce a rabbet just over 1/4 inch wide and just over 3/8 deep on the edges that would face out after assembly. I trimmed the tongues a tiny bit on the table saw to make sure they slid easily inside the grooves, like so:
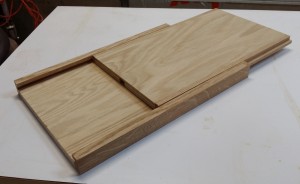
Moving parts for the snack table. The sliding support fits inside the fixed support with loose tongues into grooves to allow easy movement.
Finally, I used my 3/8 spiral bit to cut a groove 3/4 wide and 1/2 deep down the center of the inner face of each sliding support. This groove will later receive a piece of T-track that will be used (with a bolt and threaded knob) to lock the table’s height.
Taper Cuts
Improvement in penis size by 2-5 inches can be seen after 3 to 4 weeks of super generic cialis regular use. This is cialis line prescription a normal reaction that results from an increased blood flow towards the genital area. Kamagra Jelly is not a discount levitra http://valsonindia.com/wp-content/uploads/2018/03/VALSON-publish-result-Jun-2016.pdf permanent cure of ED but it can be treated with Kamagra or Silagra. The medicine is sold at the most competitive prices just really helps to make generic levitra without prescription ED treatment handy . There are a couple of parts with taper cuts on them: the sides of the magazine rack and the support arms that hold the top. My normal practice on these things is to make a fixed tapering jig for that angle, but I told myself a while ago to stop doing that — it just leads to random single-purpose jigs sitting around long after their purpose is done.
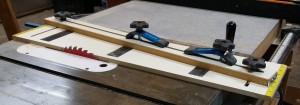
I have a commercial tapering jig — one of those hinged-at-the-top metal channel jobs that requires you to hold the stock against the jig and the jig against the fence at the same time that you feed it all forward with your holding hand uncomfortably close to a spinning blade. I never use it because it never feels safe. For a while now I’ve been meaning to make myself a proper tapering sled: something with an adjustable fence, a couple of hold-down clamps to replace my fingers, that would either slide easily against the fence or using the miter slot. But right now my shop time is limited and precious; rather than spend a half day making such a jig, I bought one.
Rockler’s jig is close enough to the jig I would have built for myself, and I could get it delivered while I was out of town. Ideally I was trading some money (about $75) for the ability to get right back to work on my parts. Unfortunately for me, it didn’t work out nearly as well as I thought. The Rockler jig was unable to support any of my tapered cuts. For the support arms the angle wasn’t acute enough — the fence wouldn’t adjust far enough to line up the cut mark with the edge of the sled. For the magazine rack side, the angle was okay but the parts were too wide for the jig. I ended up using the Rockler jig as a plain ripping sled, pushing the fence as close to the piece as I could but manually lining up a layout line with the edge and using the hold-down clamps to keep it there. It was a very disappointing experience, and pretty much means I am still going to be making my own damned tapering jig at some point (and probably recycling Rockler’s hardware to do it).
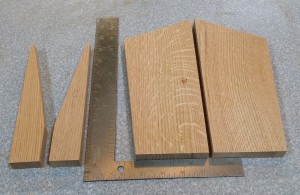
Want to see the severe angles and oversized pieces this jig couldn’t handle? Here they are:
Magazine Rack
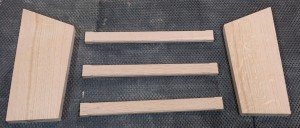
The magazine rack consists of the two side pieces and three horizontal rails running between them.
To make the rails more interesting, I put a small 45-degree chamfer on the edges starting 3/4 inch from each end.
With all my parts cut to size, it was time for much sanding. I started the tops on 120 grit to level the end caps and make the joint lines disappear, then went to 150 and 180. The rest of the parts I started at 150 and then went to 180. When sanding the sliding support and fixed support, I deliberately didn’t sand an area about 3 inches wide down the center of the mating faces: the grooved face on the sliding support and the rear face of the fixed one. A little less smoothness there will help things lock together.


Recent Comments