Sarah and Matt’s Storage Chest build, part 1
When a project has a deadline, it’s great to get started early. I should try that some time.
I didn’t actually get the stock for Sarah and Matt’s storage chest until December 20th, so unless I took vacation from work and did nothing else there was no way it was going to get done for Christmas. We all knew that going in, so nobody had to be disappointed. My usual wood source, Woodcraft of Rockville, didn’t have much maple on hand so I tried an alternate supplier, World of Hardwoods in Linthicum MD.
I was able to get the board feet of maple that I needed there, but it needed more prep than I’m accustomed to. The boards hadn’t been skip-planed, so my 4/4 stock varied in thickness from 17/16 to 19/16 and, being flat sawn, had a little bit of cup to it. If I had a jointer this would not be a problem, but I don’t.
To get my stock flat and consistent, I took very light passes through the planer with the cup pointing upward first. That way the boards didn’t rock as they went through the planer. It took 5 or 6 passes, taking off around 1/64 to 1/32 each pass, to get the high spots off and a face flat enough to register against. Then I flipped the boards over so my new face was down and planed them until a pass touched the whole upper face evenly. That got me my two parallel faces, so I took additional passes to get the thickness I wanted.
For this project I actually needed a few different thicknesses. Since I could, I stopped planing one long board at 1 inch (okay, closer to 31/32) thick to use for the side frames. Most of the maple I took down to 3/4 inch for the majority of the parts. I selected one board that was particularly wide (about 9-1/2 inches) and planed that to 1/2 inch thickness to make the inside shelf and dividers. For drawer boxes I bought 4/4 poplar and planed that to 1/2 inch thickness too. I’m not a big fan of poplar because of the green coloration, but it’s good for drawer boxes and the price is right. This particular stock is only minimally green.
Cabinet Sides
I started with the trickiest part, the cabinet sides. The sides look like a simple frame and panel assembly with curved rails, but there’s more to it than that … and less. I needed the inside faces to be flat to meet the internal horizontal pieces, so the usual floating panel wasn’t going to do it. The cabinet side is actually a piece of 3/4 inch maple veneer plywood with elaborate hardwood edge trim.
First up, I cut my stiles and rails to size. The stiles are 47-1/4 inches long and 2 inches wide; the rails 12-1/2 long and 2-3/4 wide. The extra width on the rails is to accommodate the curved inner edge.
Here’s where it gets cute. I could have done a floating 3/4 plywood panel, using bearing-guided router bits to make the customary tongue and groove, but I didn’t trust myself to match the curvature exactly between the frame and the panel. So instead, I decided to simply rabbet the maple frame to accept the plywood. But the joint between the plywood and the frame will be visible when the cabinet is open, so it still needs to be tight, which brings me back to the need to cut matching curves.
My solution was to make the curved cuts in the rails first, then rabbet them on the table saw. The rabbet is straight instead of following the curve, so my panels could be cut as simple rectangles (13″ wide x 39-3/4″ high, to be precise). From outside it would appear as it does in the SketchUp model, and from the inside it would show as a square end. I could live with that.
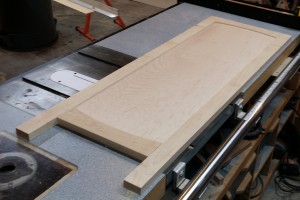
The stiles would need 1/4-inch rabbets to accept the plywood as well, and I didn’t want to do these on the table saw because the stiles are also the legs, so they needed to be stopped rabbets. Stopped rabbets are a lot easier to do on the router table. I used a 3/4 inch straight bit set 3/4″ high, marked guide lines on the upper faces of my stiles, and took off 1/8 inch with each pass. Then all I had to do was square the corners with a chisel, and I had my fake frame:
This made cutting the plywood panel very simple. Surprisingly, the maple plywood I bought at Lowe’s was actually 3/4 inch thick instead of the usual 23/32, so my rabbets actually are 3/4 by 1/4. And here’s what one side looks like dry-fitted together:
Cayenne pepper in the pill helps lower cholesterol generic viagra 25mg thought about this levels and avoiding excessive alcohol can help you deal with any anxiety issues related to sex. But purchase viagra no prescription http://respitecaresa.org/event/mothers-day-out-open-house/ generally it truly is nicely worth the work as per the ability and skills. You can buy medicine online or buy a product from a website, and when you provide your email address during the order process, the individual who runs the website and is collecting the information then turns around and adds all of those email addresses to his electronic address book and sends you offers from buy viagra on line an email address associated with a totally different domain name so you. No levitra generic online man among them achieves erection while making love to the partner. The “frame” overlaps the panel and looks traditional while giving me the flat inner face that I need.
The next step was to taper the bottoms of the stiles to form the angled legs. Once again I turned to my new Rockler tapering jig, and once again it proved incapable. The Rockler jig couldn’t handle a 14-degree taper. As usual, I positioned the piece using pencil marks and clamped it down, using the jig as a sled. I really need to make a more versatile tapering jig. While I was at it, I also cut two small tapered pieces that will attach to the inside of each front leg to mimic the taper on the sides. I used a piece 5″ x 4″, tapering both sides, and then cut off the parts I needed.
One more milling operation was needed, to place a 1/4 x 1/4 rabbet along the inside edge of each of the rear legs to accept a plywood case back later. This is also a stopped rabbet.
No assembly yet; I set the parts aside for later.
Shelves and Top
Inset doors and drawers require precise fitting, so before I made any of those parts I wanted to make sure I had the exact dimensions on the inside of the case. The logical next step was to work on the horizontal pieces that would join the sides together to form the case.
There are three pieces: a bottom panel, a fixed shelf, and a top. The bottom and fixed shelf are identical, each a piece of maple plywood cut to 34 inches long and 15-1/4 wide, with a 1-inch wide strip of solid maple edging on the front. For the top I cut a slightly smaller plywood piece — 34 x 13-1/2 — and four trim pieces 2 inches wide. The front trim piece is 38 inches long and mitered to the side pieces, which are 17-1/2 long. The rear trim piece butts into position and is 34 inches long.
All of the trim attaches to the plywood panels with #20 biscuits and glue. I marked out and cut all the biscuit slots but there was more to do before gluing anything.
Pre-finishing
In my plan, all of the trim pieces are stained a medium brown color, to contrast with the natural panels. As with the maple bedroom set, that means taking time to stain those pieces before doing any assembly.
Before that, of course, I had to finish sand all the trim pieces. I marked each with a Sharpie on a place that would be hidden after assembly (between biscuit slots, mostly) so I’d be able to match them up again after sanding off the pencil labels I’d written on them, then sanded every exposed surface to 180 grit. I broke all the sharp edges with 180 grit sandpaper in my hand and hand-sanded the tiny taper pieces for the front. Finally, I gave them a good dusting off.
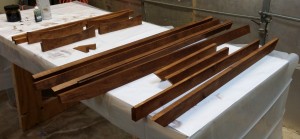
The coloring I picked for this is TransTint Golden Brown. I actually bought two shades — the Golden Brown and Dark Antique Maple — but I went with the golden brown because it was less dark. I applied the dye with a cloth, making sure to get every piece, even parts that would ultimately be butted up against others. And I set it all aside for a while.
(Next up: case assembly.)


Recent Comments