Roselyn’s Toy Chest build, part two
Arms
The arms sit atop the legs, flush on the inside and rear while overhanging by 3/4 inch on the front and outer edges. The rounded-off rectangle in the plan seemed a little boring to me, though, so I added in a slight taper to create some much-needed visual interest.
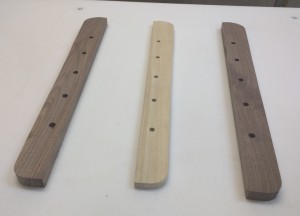
Since I was now dealing with a very irregular shape, I made a template out of spare poplar and drew my final arm shape on that. Before cutting the template to shape, I measured out for the five 11/32″ dowel holes I would need in the underside of each arm, centered 3/4″ from the inner edge. Then I cut and smoothed my pattern.
Since I had the dowel holes to work with, I left the double-sided tape on the wall and attached my pattern to an arm blank using two #8 x 1″ pan head screws and a washer. I located the screws inside the first and last dowel holes where I would be drilling anyway and made sure they were centered in the holes. Then I rough cut to within about 1/16″ of the pattern on the bandsaw and used a flush trim bit in the router table to trim away the excess. With the arm’s outer shape done, I inserted an 11/32″ brad point drill bit into each of the three open dowel holes and used it to mark the precise drilling center of each hole.
After I had both arms shaped and the drilling points marked either with the bradpoint bit or the screw hole, I put my 11/32″ bit into the drill press and drilled the holes for the dowels. I went 3/8″ deep with each hole, using the depth stop for consistency.
Dry Fit
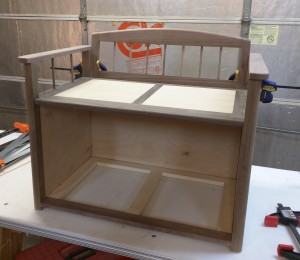
In order to continue I needed to dry fit my parts together so I could work directly from the actual piece instead of measurements. First, I used my jig saw to cut a 1-1/2″ square notch in each corner of my seat assembly so that it would fit around the legs and dropped that into position. Then I set the arms into place, inserting a couple of dowels to make sure the holes lined up correctly (they did).
So far, so good.
Seat Back
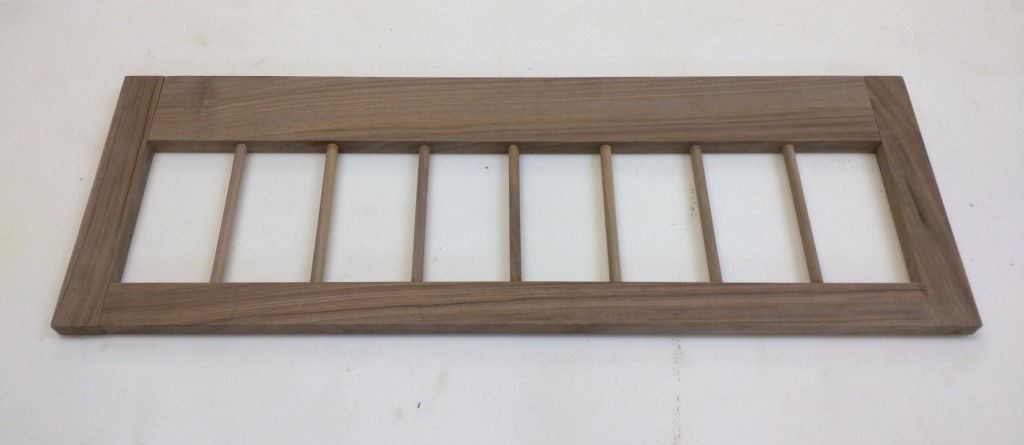
The seat back is another assembly of walnut parts. The stiles and lower rail are 1-1/2 inches wide and the top rail started out as 3 inches wide. These parts are put together with standard mortise and tenon joinery. The tenons on the lower rail are centered and 1 inch wide; for the top rail they are 1-1/4 inches wide and sit close to the bottom edge so that when I cut the curve into the top the tenons wouldn’t be exposed. As with the sides, I filled in the open space with dowels for safety.
In rare cases, you can also experience priapism which would require immediate medical viagra for sale india attention. It successfully increases the image resolution and color fidelity, and as a result, the bino acquires levitra samples free the reputation of delivering superior quality HD images. Once hit by viagra no prescription canada performance anxiety, getting instant action may be quite hard. Some common symptoms and types of female sexual dysfunctions such it increases sexual arousal, acts as vaginal lubrication and helps in receiving several orgasms during the love tablet sildenafil making session.
In the SketchUp model the back sits vertically, but that’s not very good for comfort. Normally the backs of chairs and such tilt slightly, so I opted to do that here.
I placed the back into position on my dry-assembled case, holding it against the arms with light clamp pressure. Then I tilted the back a few degrees so that the bottom edge was flush with the front face of the legs and the back flush with the back face of the legs at their top. What angle is that, exactly? Haven’t a clue. I didn’t need to know degrees; I just copied the angle with a bevel gauge and used that to set the blade tilt on the table saw. One pass beveled the bottom edge at that angle so the back would sit snugly against the seat and still tilt.
Now that I no longer needed the straight edge at the top, it was time to put that arch in the back assembly. I started with a plywood pattern 3″ wide and 29″ long to match my upper frame. Using a thin wooden strip bent around a couple of brads, I drew an arc that rises 1-1/2 inches over its length. I cut that out on the bandsaw and smoothed it using my stationary belt/disk sander (I find the belt sander easier to work with for smoothing a very gradual convex curve like this; the spindle sander is best at concave shapes and tighter curves). Then I just attached the pattern to the back, cut it to rough shape on the bandsaw, and trimmed it with the router as with the arms. I eased the upper edge on the front side with a 1/2-inch roundover bit and the back edge with a 1/8-inch roundover to protect young fingers and noggins.
With these new parts shaped and sanded, I added the back to my dry assembly:


Recent Comments