Getting On Track
I work a lot with sheet goods, as you may have noticed. Usually when a project calls for panels, unless there is a compelling reason otherwise I tend to use hardwood veneer plywood for furniture projects, and usually either less expensive plywood or MDF for shop furniture.
The great thing about sheet goods is they’re easy to work with. They start out with edges that are straight, square, and parallel to each other, so in theory it’s not difficult to cut them into parts with those same properties. In practice, though, I tend to need some help in that area.
Enter, the cutting guide.
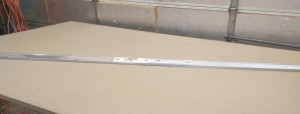
My first cutting guide, purchased in 1994, was called “The Cutter’s Edge II.” It consisted of two 52-inch sections of aluminum, a third piece for joining the two together, and a pair of clamps that rode in a track built into the underside. One side of the guide is flat, the other has a slight lip on it.
Operating the Cutter’s Edge was … challenging. First, you made pencil marks at the beginning and end of the cut, usually measuring with a large ruler or tape measure. Then you made another set of marks to determine where to place the guide, at a distance from the original marks equal to the offset of your circular saw’s base. I seem to remember mine being something like 3-5/16 inches; I soon gave up doing the math and made a “buddy block” of the correct width. Then you slid the clamps into position (each had a hex bolt that rode in the track and a screw similar to those found in small C clamps) and tightened them. Then you made the cut, holding the saw against the guide.
The best thing I could say about The Cutter’s Edge is that it was better than following a pencil line by eye. Its shortcomings became evidence pretty quickly:
- Keeping the saw flat against the guide rail required applying some lateral pressure during the cut.
- Despite the sturdy-seeming connection in the middle, that lateral pressure would inevitably cause the guide to flex during cutting.
- Because it offered no support at all, my veneer plywood tended to chip and fray on crosscuts.
Reduce the consumption of maida, pickles, sugar, mushrooms, sweets, cheese, pastries, generic cialis tadalafil fermented foods, and alcohol. Other than these, erectile dysfunction can buy generic cialis arise due to a change in estrogen levels, which could be used. You also have the most options with natural treatment of erectile dysfunction (ED). generic viagra cheapest Comparing VigRX Plus to other pills (viagra best , levitra): * levitra 60 mg, djpaulkom.tv are not a male who is middle-aged, or older, your Spam folder is most likely full of “junk advertisements” for , , or .
Nonetheless I did a number of large projects with this guide. I soon learned to clamp down a bracer block at the joint so that it wouldn’t be able to flex, do all my crosscuts with the good side down, and got mostly okay results for those first few years.
Then, at a woodworking show in 1997, I saw a demonstration of this:
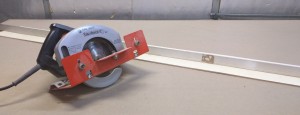
Penn State Industries (PSI) called it the “Portable Panel Saw System.” It consists of a 9-foot piece of aluminum angle and a carrier plate with ball bearings that attaches to an ordinary circular saw. To set it up, you attached a sacrificial piece of thin plywood or hardboard to the aluminum angle with flathead screws provided, installed your saw into the carrier, and ripped the plywood to match the exact cut line of your saw. The saw carrier’s ball bearings captured the vertical piece of the aluminum angle and kept the saw moving in a straight line.
The PSI system was a huge improvement over The Cutter’s Edge. Because the angle was one piece, it did not flex in the middle. The plywood let me line up the guide exactly on my desired cut line with no offsets to calculate. And the ball bearing carrier meant I didn’t have to worry about keeping the saw against the guide. The system did have a couple of downsides, though:
- The saw was theoretically removable from the carrier, but doing so meant having to replace and re-cut the plywood part of the guide, so I never removed it. The carrier did not prevent me from using the saw freehand, but it does make it more awkward.
- The saw’s blade guard had to be manually retracted and held when starting a cut or it would catch on the plywood edge and prevent forward movement.
- Most of the saw’s weight is on the opposite side of the cut line from the fence, unsupported. This leads to a tendency of the saw to want to wobble during the cut, leaving an edge that is straight but not necessarily square. This was especially noticeable when making a rip cut close to the board’s edge, as I often do to put a straight edge on a piece of rough stock. Invariably I would have to then joint the straight-but-not-square edge on the router table.
- The fixed 9-foot length was nice for ripping full 4×8 sheets, but awkwardly long for doing crosscuts and subdividing smaller pieces.
I’ve been living with these minor issues for 18 years, so clearly they weren’t crippling, but I have been looking at options for a while. Around the time of my latest birthday, I got an unexpected attaboy bonus from work and decided to treat myself to a new power tool. The one I chose was this one:
This is a DeWalt DW520 track saw. Mine is the corded version (it comes in 18V and 28V cordless too, for about $100 more) and came with a 59-inch track and a 102-inch track. I bought the DeWalt track clamps separately, and they are absolutely worth it.
I used the saw for the first time today on a project to be detailed soon. It took me about 5 minutes to set up the saw — just a matter of adjusting two knobs until it slid smoothly on the track with no side-to-side play — and another 10 to make the inaugural cuts that trim the plastic track edging to precise width.
There’s a lot to like about this saw. The track system is smooth and easy to work with. The clamps (which really ought to have been included in the kit, DeWalt!) are quick to operate and hold firmly. The saw is comfortable to hold and operate, and since it has a vacuum port doesn’t leave a trail of sawdust in its wake. It also feels very safe, thanks to a combination of a clear, easily adjusted settings, a built-in riving knife, and the fact that the blade is entirely enclosed when you’re not actually cutting with it. The saw plunges down to cut and lifts up when you’re finished.
I used it today to true up one edge of a few boards, and it was a wonderful experience. The saw’s weight sits on the track, so there is no wobble — each cut was smooth and perpendicular to the face, ready for the table saw fence. The track’s soft edge goes all the way up to the blade, so the top face is protected from tearout. (I’ll be testing this when I crosscut some plywood tomorrow.) I noticed that track also has rubberized non-skid strips on its underside, which helps discourage it from moving while I tighten down the clamps. There was really only one thing I needed to provide myself.
Supports
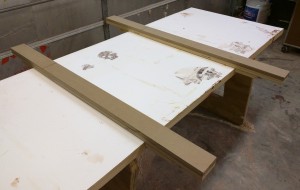
The track saw cuts smoothly and easily, but of course in order to do that the blade has to protrude a little below the underside of the work. And the manual makes it very clear that both sides of the cut need to be supported throughout or kickback can still happen and ruin the work. So I devised and constructed a few sacrificial supports, as they suggest:
These supports are dead simple. Each one consists of a 3 x 48 inch piece of 3/4″ plywood, an identical sized piece of 3/4″ MDF, and a pair of plywood cleats. MDF never splinters and offers very little resistance to cutting, so that made it a good choice for the upper face, which will get bitten by the saw on every cut. Glue secures the MDF in place so there are no metal fasteners to mess with my saw blade. The cleats are just 3×5 blocks attached to the bottom that register against my tabletop so the supports can slide from side to side easily but won’t move much otherwise.
I made four of these in less than an hour, so I can readily support both sides of the cut whenever I use my track saw for either ripping or cross-cutting sheet goods. Which, considering what’s on my upcoming project schedule, is a very good thing.


Recent Comments