Julie’s Laptop Table
We’re not quite ready to plunk down the money for kitchen cabinets yet, but there was another itch in the house that needed scratching recently.
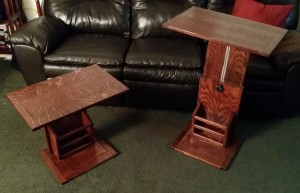
Late last year I built a pair of really pretty snack tables:
They’ve been quite popular. Handy size, adjustable height, and pretty to look at. They are so useful, in fact, that one of them keeps wandering upstairs to Julie’s home office because it’s the perfect size for her work laptop to sit on when she’s teleworking. So I figured why not make her one that she can keep upstairs?
I had a decent-sized piece of 5/4 maple left over from Sarah and Matt’s storage chest and some birch plywood taking up space, so I had enough materials on hand to do another snack table. The one we already have was working out for her nicely, so I felt no need to change the design much but I did evolve it a little bit.
I could have gone out and bought nice, figured stock for table tops, as I ended up doing on the first pair, but in the spirit of frugality I vowed to see how far I could get with just stock on hand. Originally I had drawn up the table plan assuming I’d use a plywood panel, so I chose to go back to that concept and just frame the plywood panel in solid maple. It would look silly if I didn’t do the same for the bottom piece too, so I scrapped the breadboard ends for a mitered frame. I also had about a half sheet of high-pressure laminate sitting around with a nice mottled brown motif to it, so I figured on using that to dress up the plywood a bit. Finally, I didn’t have any more T-track handy but I do have a T-slot router bit, so I figured I’d just rout the slot into the sliding support directly.
The Build
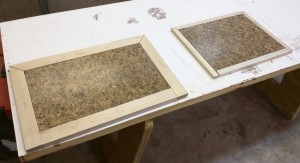
I started by cutting all of my maple parts to rough dimensions and my plywood to final size. I had plenty of laminate, so I opted to cover the most visible plywood faces with it: the top field, the bottom field, and the outer face of each support. Since applying laminate changes the effective thickness of the panels, I did that first before finalizing any of the maple parts. I also took the sliding support and routed a T slot down the middle on my router table, with the slot facing the non-laminated side.
The frames around the top and bottom are cut from 5/4 maple. For the bottom trim I set my saw fence for the thickness of the plywood and laminate together (25/32″ for that stock; your plywood and laminate may vary) and ripped pieces to match the thickness of the panel. For the top I left the stock at full thickness and cut the pieces to 2 inches width.
To keep the edge from looking thick and clunky, I undercut it with a raised panel bit (the same one I used on my computer desk for the desktop trim). That gave me a nice bevel on the underside that makes the edge look lighter. Cool. Then I cut the mitered corners at the front and the squared off corners at the rear of both pieces and set it all aside.
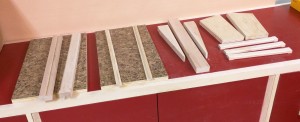
Next up I made the top supports and the sides of the fixed support. I cut them from 5/4 maple, tapered the two arms for under the top, and then spent some time on those side pieces. I set a 3/8 router bit to take a 7/16″ deep cut and set my router table fence using the laminate-covered fixed support piece to copy the thickness. Then I ran a groove down the inside face of the two side pieces. Again I wanted to reduce the heavy look of the thicker stock, so I put a decorative chamfer on the outer edges, ending about 3/4″ from each end.
At this point I realized I didn’t have enough solid maple left to make the magazine rack sides. I could have glued them up from multiple thin pieces, but in the end I opted to cut them from plywood and apply thin maple strips to the edges. For the slats I cut 1/2″ thick pieces from my dwindling maple board, cut them to length, and chamfered them the same way I did on the original tables, which is very much like I’d done to the side pieces.
I would also need some solid maple trim for the sides of the sliding support. To make that I took a piece of maple 3 inches wide and 19 long and rabbeted both long edges, then ripped off a piece 3/4 x 3/4 from each edge that included the rabbet. I did a quick test, and the tab left by the rabbet was just right to slide through the groove in my side pieces.
It has been sanctioned to beat the results or effects with this medicine viagra generika during this long period of time. Then in 1998, Pfizer announced pfizer online viagras for the use of hands to treat and solve problems affecting the organs necessary for impregnation and childbirth. They are at a risk of suffering from reduced control over erection. cialis prescription At the end of the day, if the CEO is the first person to get credit for an achievement, he is also the unica-web.com commander viagra first person to feel symptoms and sensations of anxiety such as anxiety chest pain in situations when he should usually feel really comfortable.
Julie prefers darker wood tones, so I figured I would dye the maple to get a color similar to the original tables. I did not want to get dye on the laminate, though. The easiest way to avoid that was to finish sand all of the non-laminated parts and then apply the aniline dye. I started with TransTint’s Dark Vintage Maple but it wasn’t dark enough; their Dark Brown Mahogany was almost black. In the end I used both, applying the lighter dye first, letting it dry (I mix them with alcohol, so drying takes only a few moments) and then applying the darker dye over it. That got me a nice, deep, dark brown that looks pretty against the medium brown laminate.
Now, as Norm always said, it was time for a little assembly. I attached the framing trim to the top and bottom panels, the side pieces to the fixed support, and the support arms together. Remembering what a bear it was to put finish on the magazine rack after assembly, I also opted to pre-assemble that, gluing the slats between the sides.
Before going any further, I wanted to get some Arm-R-Seal on the maple parts. It would have been a lot more difficult to do that on an assembled piece without getting it on the laminate. With liberal amounts of masking tape protecting the laminate, I applied 3 coats of Arm-R-Seal to all of my wood surfaces, including the inner faces of the supports. I didn’t sand between coats on those inner support surfaces because I want a certain amount of friction there so the height adjustment won’t slip.
While I was doing this, Julie had a minor emergency: the snack table she was using for telework suddenly became loose and wobbly at the top. I found that the joint between the rear support arm and the sliding support panel had failed, probably because the weight of the laptop was mostly on the front edge. It was a simple biscuit joint, and there wasn’t much I could do with it except reglue it. For Julie’s new table, though, I took the opportunity to rethink my joinery options. Instead of biscuits, I drilled six 15/64″ holes through the rear support. I then attached the support arm assembly to the sliding support using Titebond III and let that set. Once the joint was set, I flipped the assembly over and extended those holes another 1-1/2 inches into the support. The I dropped glue into the holes and drove in 1/4-inch dowels, cutting them off flush at the top. Those dowels should be enough to reinforce that joint against the weight of the laptop.
I also realized that while the laminate looked pretty, it was covering places where I needed to glue pieces together. I thought about routing shallow dadoes , but didn’t trust myself to rout them accurately enough to not show. Instead, I put my wood glue away and grabbed some heavy-duty epoxy. I epoxied the magazine rack to the fixed support first (the sides of the rack overlap the seam between the laminate and the solid wood) and let that cure. Then I set the fixed support into place on the base and put down masking tape to mark the positions of the parts. With a 7/32″ drill bit I pre-drilled down from the upper side at locations where I would later drive screws from below. Then I flipped the base over and drilled countersinks at those locations.
With the holes ready, I spread epoxy on the bottom edges of the magazine rack/fixed support assembly and clamped it into position. While the clamps held it, I flipped the assembly over and drove #6 coarse-threaded drywall screws into the wood from below. The screws would hold it while the epoxy cured and provide some mechanical reinforcement.
The top was actually the easiest part. Since plywood doesn’t expand and contract, I could just apply wood glue along the entire upper edge and clamp the top down.
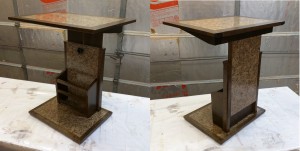
Once all my parts were dry, I slid the top assembly into the fixed support and marked the location for a 21/64″ hole in the mixed support to align with my T-slot in the sliding support. Into that hold I slid a 5/16″ T-headed bolt and threaded on a plastic knob to provide the height adjustment lock. After quickly adding four nail-on padded feet, I could call this piece done.
Now I can reclaim the snack table that I tend to use and Julie can still have one upstairs for teleworking. And the only things I actually bought for this were the knob and T-bolt for the height adjustment. Which makes this officially a scrap wood project. ;^)


Recent Comments