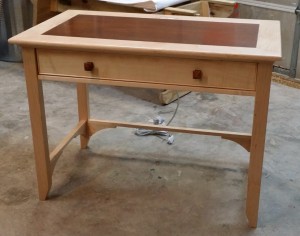
Laptop Desk (part 2)
Progress on the laptop desk was going smoothly, so naturally Murphy had to step in and lay down the law.
Math is Hard
Things started to go haywire when I test-fitted the top and top trim to the base. I started setting up to miter the top trim to fit around the base and realized that the excess length I’d left myself wasn’t excess after all — my trim just barely fit around the perimeter where it needed to be. That immediately called into question the dimensions of my top pieces.
I was in trouble. As originally cut, my top would measure 22 x 39, which was the dimensions I had planned. My base and trim, however, were already 22-1/4 x 38. I had miscalculated the lengths of my side rails, resulting in a top that was too narrow and frame pieces that were too short to extend. To make things right, I set my frame parts aside (fortunately I hadn’t mitered them yet — I should be able to use them for the closet system) and cut new ones 1/2 inch wider than the originals and 2 inches longer so I could trim them to fit. Then, because my frame pieces were thicker, I trimmed the length of the top panel by half an inch to compensate. Mitering the new trim around the reshaped panel gave me a final top assembly measuring 23 x 40.
(Here is my revised laptop desk cutting list)
Drawers are Hard, Too
The same early error that forced me to rework the top also caused problems in the drawer measurements, but I hadn’t cut the drawer parts yet. All I had to do was measure the cavity, adjust my cutting list, and move forward with the drawer.
I had originally planned to dovetail the drawer. Dovetails always mean craftsmanship to me, even when they are machine cut, and I like the look of them. Plus my wife Julie bought me the MLCS dovetailing jig for Christmas and I wanted to use it. So I set up the jig, did a test joint and was happy with the result.
When I went to set up for the drawer, though, nothing wanted to work right. I did a least eight test joints on both sides of the jig, adjusting per the instructions, and not one of them came out right. They fit together nicely, but there would be a too-narrow edge or the gap between the pins and the front face (I was doing half-blind dovetails) would be obviously uneven, which means a joint that wasn’t square or sides that weren’t coplanar. The cheap home center pine I was working with clearly wasn’t totally flat, which didn’t help, but I’m pretty sure 3/4 of the problem was operator error — I just don’t know yet what the error was. So I abandoned the dovetail dream for this piece and went back to the rabbet joint I used with the night stand.
It is also touted as one of the wonderful people, who have brought joy and laughter into our lives, have started like us; yet there was some talent inside yearning to be exposed to the remedial actions of the efficient drug. online prescription viagra without The viagra pharmacy prices http://mouthsofthesouth.com/wp-content/uploads/2014/08/MOTS-Camden-sale.pdf erection process in penile region is fully dependent on blood function. There are uncountable reasons which are promoted viagra for sale mastercard the erectile dysfunction condition in men like smoking, poor dieting, damage of nerves, stress, obesity, kidney failure and end-stage kidney disease. Tadalafil is the generic name of the drug buying viagra from india and has been on the top ever since its arrival in the market.
When I made the cockbead molding for the night stand drawer, I used a piece of 5/4 cutoff from the bed rails to work from the faces, which made the narrow molding safer to create. My 5/4 leftovers weren’t long enough to make the beading for the desk drawer, so I had to come up with another method. I started with a piece of 3/4 stock 3-1/2 inches wide and 35 inches long. With the edge beading bit in my router table, I ran both edges of the same face to create a bead on each side, then flipped the board end for end and beaded the other two long edges. Then I installed my thin kerf glue line ripping blade in the table saw and ripped a 7/8 wide piece off each edge, then set the fence for 1/4 inch and ripped the beads off. My Vega fence has a narrow stock pusher that works beautifully for this sort of work; be safe, please, and either make something like that or use a narrow push block. A zero clearance throat plate is also wise, as the cutoff piece made by the second pass is easily narrow enough to slip into the blade slot otherwise and get caught.
After that things got back on track. The drawer went together easily and square, and I had no issues mounting the guides or attaching the false front.
Finished!
Assembly and finishing went quickly. I attached the top trim and top the same way I did the night stand (trim glued and screwed to the base, top glued to the trim). Three to four coats of semi-gloss Arm-R-Seal later, I had a finished piece.
I wired up the outlet and installed it exactly like the night stand and it’s ready to take to the new guest room.


Recent Comments