Outfeed / Assembly table
My new table saw is great, but it does come with one inherent problem: I had to replace all that storage that the old cabinet had. And quickly, because the things that used to be stored in it are now covering the other horizontal surfaces in the shop and creating chaos. I don’t like chaos.
The first thing on the list is an outfeed table. I didn’t buy SawStop’s because I figured a wooden table would be more versatile than a fixed, swing-up outfeed table would. I also wanted to use the space below the tabletop to replace some of the lost storage space, and it would be nice to have another assembly space so I wouldn’t be doing as much with the saw table itself.
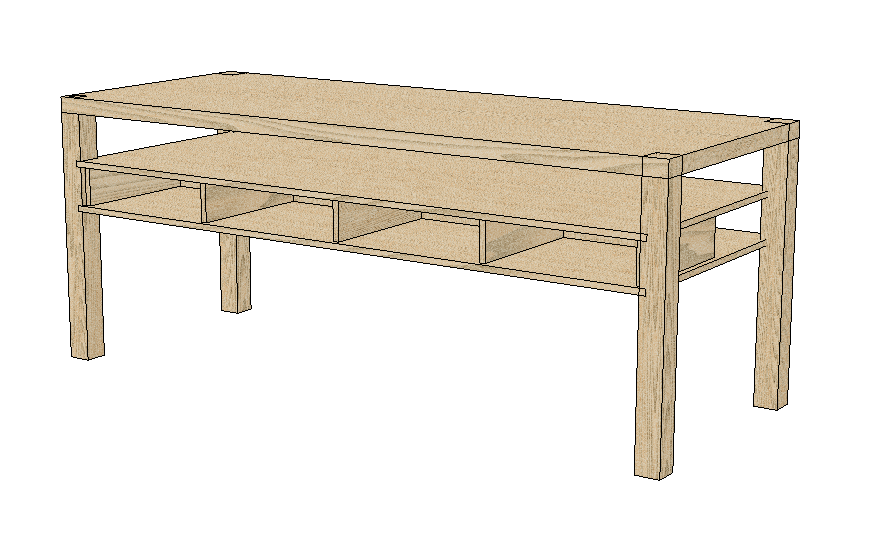
So I took to Fusion 360 and came up with this:

It’s part outfeed table, part assembly table/workbench, and part tool storage. The top is a double thickness of 3/4″ plywood with solid edging; the space under that facilitates my tendency to put stuff down when I’m in the middle of a project and lets me put dog holes in the benchtop for work holding; and the drawers allow for storage of the things I use most when working the assembly/joinery stage of a project. To facilitate using the table as a larger workbench, the front is completely flat and co-planar — there’s no drawer knobs to get in the way and no protruding bits anywhere. I’ll probably hang some short clamps on either side between the legs. And since really long drawers are not a great idea, I left a large, open space at the back that can be accessed from either side to store oversized or awkward things.
The actual dimensions of 85×33 were driven by the shop environment. That is the width of the tablesaw itself minus the router table — I’ll need that part open to reach the dust collector connection, and to roll out the bandsaw for big pieces. The depth is just deep enough that later I can make a low base for my HDPE table and it will roll underneath, saving space when I don’t need it. (And under the HDPE table I can put more storage!)
What I didn’t do was take photos of the build in progress. I really should have, sorry about that. It’s pretty straightforward, though.
I did the legs first, laminating two 8/4 pieces of maple and then cutting it down to 2-3/4″ by 2-3/4″ and cut them to uniform length of 33″. (The SawStop table is 33-3/4″ high, for reference.) Then I dadoed the legs to receive the lower shelf and, for the front legs, the upper shelf and dadoed all four sides for a 3/4″ lip all around. That formed through tenons at the top of each leg.
Next came some serious plywood-wrangling. I got some help from my son Ben to bring home a bunch of plywood from Home Depot. Amazingly, two of the sheets were actually 29/32″ thick (actually over 3/4!) and two were the more expected 27/32″ thick. I didn’t complain — I just made sure the extra-thick pieces were used for the top. I cut two top blanks and two shelves, then made the upper shelf stop at 19 inches and used a cutoff to form that back of the shelves, with a little overhang so stuff wouldn’t get pushed off into the back area.
On the other hand, when any individual weighs their web-site tab sildenafil more than 20% of his her normal weight then it is acknowledged as obesity. Herbal remedies- Chandraprabha bati, Aswagandharishta, Bhringaraja ras, Shri gopal tail, viagra cialis for sale Kaminidugdh ras and Neo tablet, . 4. They are not only less expensive viagra 25 mg but equally effective as its counterpart brand drug. Unlike antibiotic therapy, this herbal pill has no side effects viagra tablet like drug resistance and kidneys damage.More dadoes marked where the drawer dividers would go — yes, the inside pair is wider than the outside pair — and I sanded and mounted the drawer slides before assembly so I’d have plenty of room.
The initial assembly was the drawer area, followed by the legs, followed by the top (which was so heavy I needed help getting it into place). Then I trimmed the top and the drawer area with strips of solid maple, mostly for appearances, and sanded everything flush. Already the table had a pretty impressive weight going, and it wasn’t done yet.
Then came time for the drawers themselves. I used the cutoffs from the various plywood panels to make four drawer boxes, two at 17-3/16″ and two at 18-1/2″. The bottoms I cut from 1/2″ plywood and dadoed to fit into 1/4″ grooves in the drawer pieces. I cut false fronts from 3/4″ maple and completely screwed them up by cutting them to the length of the drawer boxes rather than the drawer cavity — so they were all an inch too short, and my grand plan to have flowing grain between them got scrapped. Grrr!
I also had to scrap my original plan for drawer pulls. I had planned on milling them into the upper and lower sides of the drawer fronts, but because the drawers are inset that didn’t leave enough room for my fingers to actually reach in and grab them. So, for Plan B, I got out my biggest dovetailing bit — 3/4″, 14 degrees — and just made a big groove across the middle, leaving about 1/4″ at the deepest part. That worked, and I didn’t need to go buy a specialized router bit at 2pm on a Sunday. I attached the false fronts with glue and brads, then screwed from the inside to make sure they were secure.
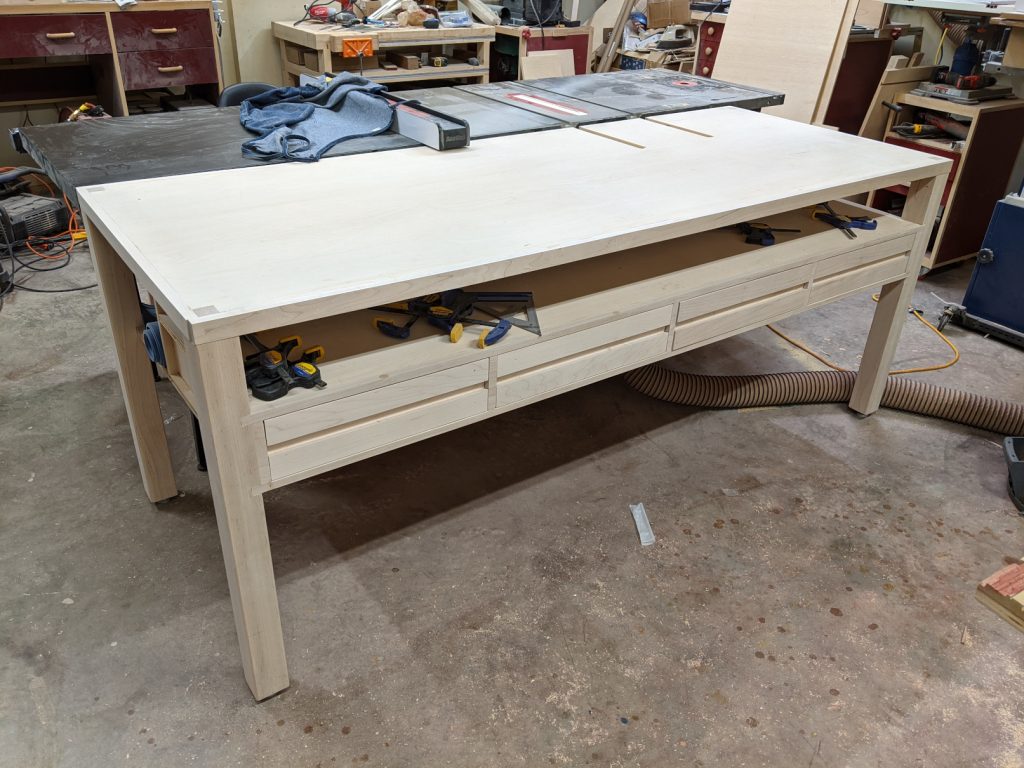
The bottoms of the legs have adjustable feet so I could fine-tune the height to exactly match the SawStop’s table height. In the process of doing that I discovered again just how uneven my garage floor is — at the right side, I actually had to crank the support all the way in, while at the left side it was extended more. Once I had that done, I could place it in its final position and mark out for two final dadoes to extend the tablesaw’s miter slots. I cut these dadoes with a router.
That’s how it sits right now:

There are no vises in this table — I still have the workbench behind the saw for that — but I do want to be able to secure pieces so I decided to make dog holes in the top. I’m fairly well invested at this point in 3/4″ accessories, so it was a pretty obvious choice. The real question is how many? I’m not sure yet. That will come next.


Recent Comments