Quick Shop Fix
I did a quick fix on my assembly/work/outfeed table, because it badly needed it.
Most of the table worked fine, but the top … the top had problems. It’s only 3 years old, but it has developed a really nasty sag in the middle, the vise is out of square (always has been), and on the right end there is a very long void in the plywood that has caused a lot of chipping. And on top of that, it’s dirty and holds onto glue spills and other nastiness. So it has to go.
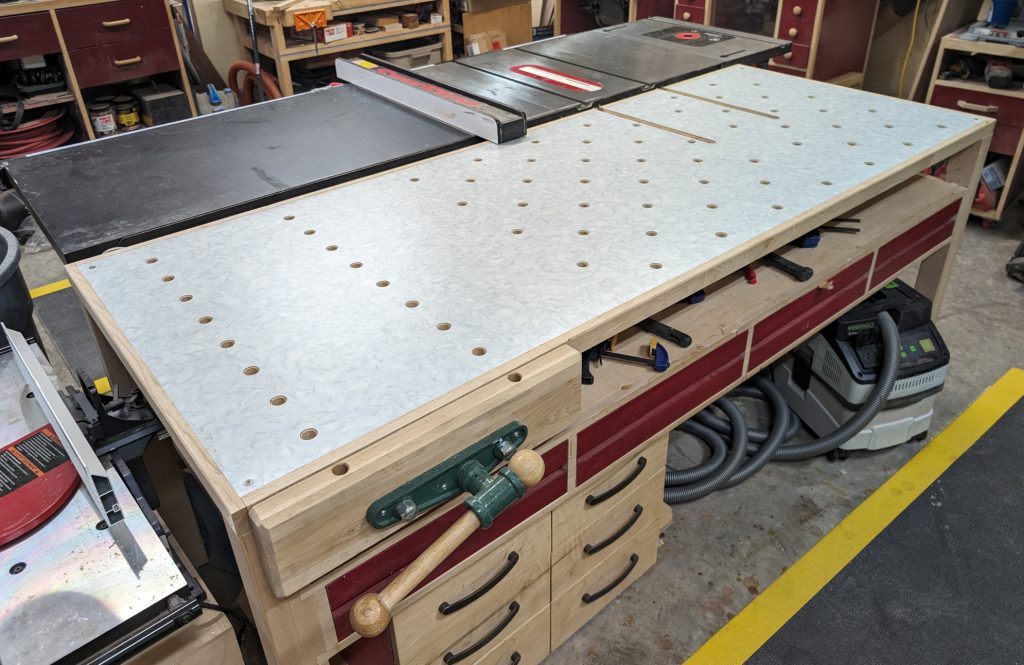
I’ve learned a few things since making it, so I applied some of that to the design of a new tabletop. I used birch plywood instead of cheap Home Depot ply to take care of the voids problem. Instead of doing two layers, I made one layer with reinforcing ribs dadoed into it and a thick border molding to reinforce the top and keep it flat. And the top is covered in plastic laminate to make it more durable and resistant to glue spills (or easy to scrape off, which is just as good).
I made the trim and the vise chop from hickory. Way back when I had that Delta contractor’s saw, I made the cabinet from plywood and hickory and that sucker lasted and lasted, so I got some more for this. I cut 2″x2″ pieces for the long sides and dadoed out so it would wrap the plywood with 3/4 of an inch exposed. The short ends are 3/4″ thick and there are 2 ribs dadoed into the plywood about 24″ from each end.
While the top was assembled, I took the opportunity to make and attach the front vise while it was easy to get to the table. I cut a block of hickory for the underside to mount the vise to and glued that down, then drilled for the 1/4″ lag bolts and drove them in with the vise held steady so I could be positive it was square to the side. Next I measured out a new chop and used the old one as a template to cut the holes in it. (Holy crap is hickory hard to drill through! I’d forgotten that.)
To take off the old top, which I had not made removable, I carefully sawed each corner with a Japanese hand saw, because the kerf was small and the saw was easier to maneuver around than any power tool I have. It was actually pretty easy, and by marking on two adjacent sides of each leg I was able to saw pretty straight. The old top came right off.
To mount the new top, I decided to use threaded inserts and screws. I hope this top will last longer than the other one, but I can’t be certain, after all. One 5/16″x18 bolt in each corner holds the top secure to the legs.
Next came the dog holes. I tried something a little different this time: the left 1/3 of the bench has only 2 rows, lined up with the vise chop (which I drilled at the same time). On the other 2/3 I used a slightly higher density of holes than I had before, but not the extreme number that I could have with the Woodpecker’s jig. Basically I want part way, drilling every other hole and offsetting the rows. The distance between holes is shorter this way, but my bench is not as Swiss cheesey.
Finally, I made miter slot grooves aligned with the miter slots in the saw table, and added 3 extra support legs that carry the load from the table top to the shelf below, which did not sag even slightly over the 3 years. That should help the narrower top to stay firm and flat, while letting me use some extra clamps that didn’t work with an inch and a half thick table.

The new table looks good, cleans easily, and is actually flat. I leveled it with the saw table, and it all looks and acts well. Time will tell if this tabletop is more durable.


Recent Comments