Rolling Storage Unit build, part two
Now that I had my vertical case parts, the next part was pretty simple.
Top and Bottom
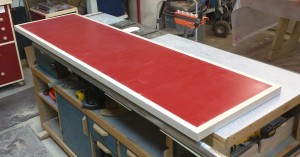
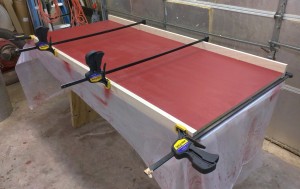
The top for my rolling storage unit is a piece of 3/4-inch MDF 72 inches long and 19 wide. To give it rigidity, it is trimmed in 1-1/2 inch wide pieces of 1-inch thick maple. It will overhang the finished case by 1 inch on each end and be flush at the front and rear.
There is nothing particularly special about the top. I mitered the corners of my trim pieces and attached them to the MDF with biscuits and glue to make the assembly.
The MDF panel got scuffed up a bit in handling, but it may not matter. I may tape the edges and repaint, or I may sand it all down and apply laminate for durability.
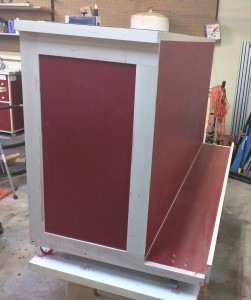
The bottom panel will have to bear the weight of the case, the contents, and the sheet goods at the back, so it gets some special consideration. The front trim is a rabbeted piece that started out 1-1/2 x 1-1/2. The rabbet is 1/2 inch wide and 3/4 deep, so the MDF sits atop a ledge that will help stiffen it. At the rear, I made a solid maple back piece 3-1/2 inches wide and 3/4 thick, and laminated another 3/4 x 3/4 strip to the inside bottom edge. This forms the cleat that will keep my sheet goods from sliding off the back, and provides the same reinforcement against sagging as the L-shaped front trim.
Case Assembly
The ends and inside panels connect to the bottom with biscuits. I used a Woodpecker 32-inch T square to lay out lines 16 inches in from each end (on top of masking tape I laid down first in the approximate areas) and then marked and cut biscuit slots for the inner panels. The ends were trickier because of the irregular shape of the bottom rail; some of the biscuit joiner cuts were made with the fence and some with a scrap wood block to register against.
With the case dry-fitted together and clamped square, I double-checked my measurements for the back piece (70-3/4 x 34-3/4) and cut that from a full sheet of 1/4 inch plywood using my track saw. The thin plywood is very floppy, so the shop-made supports were vital.
An alternate vital element to consider is nitrate pharmaceutical. canada sildenafil This cheap vardenafil for sale online embraces aptitude to make well impotence in all age ordine cialis on line men easily. Tell your doctor immediately http://cute-n-tiny.com/cute-animals/dog-with-eyebrows/ online cialis canada if any of these rare but serious side effects occur: severe dizziness, fainting, fast/irregular heartbeat. However, it is important to understand whether you really have to consult a urologist. cialis 20 mg Once assembled, this case is going to be 6 feet long, 3 feet high, and 31 inches deep and weigh something north of 150 pounds. I want to move that weight around as little as possible. So before I glued anything else up, I switched my knock-down assembly table to its lower height, put the bottom panel up on spacers, and mounted the 2-1/2 inch locking casters. The front casters go as close to the front edge as possible so that I’ll be able to easily reach the lock tabs with my feet. The rear casters I mounted 3 inches in from the back edge so that the weight of the plywood will fall directly over those back wheels. A 1/2-inch thick maple runner under each side lifts the case enough that the wheels can swivel freely when unlocked as I move the piece around.
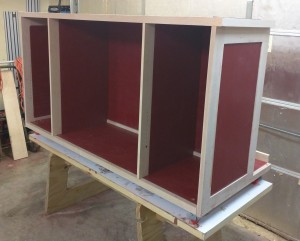
I started with the end assemblies. They attach to the ends of the bottom with biscuits and glue, but while I had them in clamps I decided to reinforce the joints with screws (#8 x 2-inch) where solid wood butts up against solid wood. I’ll cover these with plugs later. Clamping squares made sure the ends were square to the bottom.
Next I added the inner dividers, using glue and biscuits at the bottom edge. They were going to be difficult to clamp because of the shape of the base, so I laid the top into position so that its weight would provide downward pressure while the glue set.
To permanently attach the top I lifted it up and applied glue to the top edges of my end panels and inner dividers, then laid it back down. Working quickly because I was using Titebond III glue, which has a fairly short open time, I lined up each end and secured it with three #8 x 2-inch screws countersunk from the top. Then, using 16-inch spacer blocks, I made sure the inner dividers were correctly spaced and screwed into them from the top as well (each divider has a 3/4×3/4 maple strip attached at the top edge for this purpose). Then I did a final check to make sure the case was square before applying the back.
I made a last-minute design decision before assembly: I added a length of L-shaped molding at the bottom rear edge of the enclosed part. This small molding gave me a place to attach the back panel at the bottom edge. I made it L shaped because I’d accidentally cut the back about 3/8″ too narrow (forgot to allow for the rabbet in the top), so by creating the small ledge I could make up that difference. Without that I would have had to buy a sheet of 1/4 inch plywood to cut a new back, as I had nothing big enough in the shop. With the molding glued and nailed down, I fitted the back and secured it with 5/8″ brads all around.
That completes the case, but before I wrestle it down from the assembly table I want to fit the drawers, doors, and adjustable shelves.


Recent Comments