


Router table build, part 3
The carcase of my new router table had taken shape, so it was time to start working on the innards.
Storage Drawers
My routers and major accessories — bases, baseplates, edge guide, jigs — don’t have a good home right now. The DeWalt sits in its canvas bag with its two bases and wrench; the laminate trimmer sits in its box on a shelf in the table saw stand; the Porter-Cable bases and dead 690 motor (no, I haven’t tossed it yet) sit on a different shelf along with a few special bits, like my rabbeting set; the 890 pretty much lives in the small router table; my MLCS dovetail jig is sitting on a rolling cart in the corner. It’s kind of a mess. So one of the key features of this new router table, for me, is having those two big drawers to put all of my router gear in so I can look in one place and find everything.
The drawers themselves are unremarkable. The sides are 1/2″ plywood and the bottoms 1/4″ ply, all joined with standard rabbets or grooves. A false front of red-painted MDF will go on later, along with 1-1/2 inch round knobs. They mount into the carcase on heavy-duty full-extension drawer slides good for up to 100 lbs per drawer — overkill, maybe, but why take chances? These drawers are big — 30 inches wide and 20 deep — so I’m pretty sure all of my routing stuff will fit into them, and that may get kind of heavy. (Of course if it gets that heavy I may regret the 1/4-inch bottoms!)
Electrical
I was starting to realize that in order to finish the drawers I was going to need to use a router table. I could use my existing one, of course, but then I’d have no immediate project ready to test my new table on. So why not use the new router table to finish making the new router table? (Hey, compiler writers do it all the time; why can’t I?)
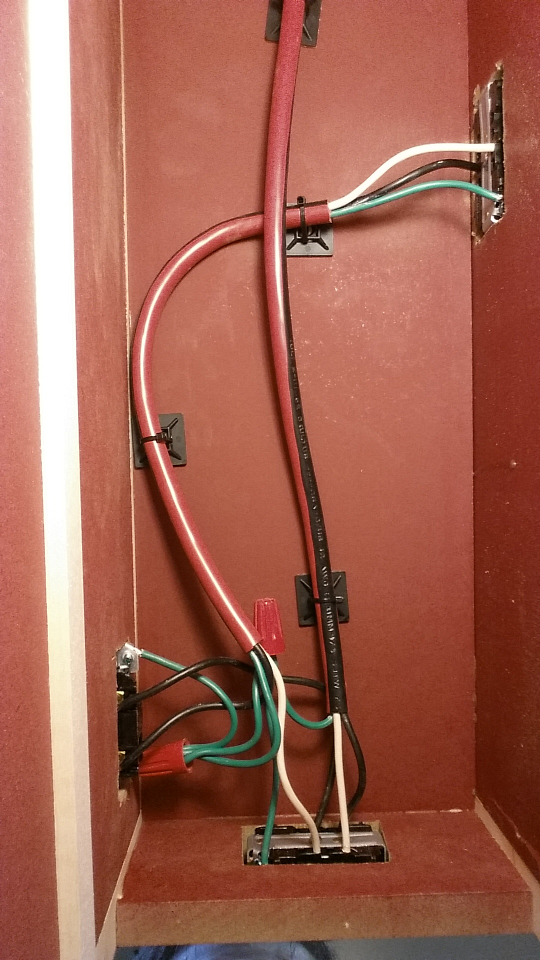
Router table internal wiring (view from below).
To do that I was going to need to be able to mount and power the router. So I turned to the electrical work. It’s pretty much the same as my existing router table except for the switch type and placement. There is a convenience outlet at the front which is always powered, a standard single pole switch on the right side, easy to reach but not in my way. That switch controls a second outlet on the inside right of the router area, where the router plugs in. That meant I needed to cut three holes, each 1-1/2″ by 2-7/8″, in my new carcase. I applied some wide masking tape to give me a surface for drawing guide lines, marked out the holes, and cut them using a drill and jigsaw. I also drilled a 1/2″ hole in the top center back for my cord. The holes are just large enough to allow me to slip the Decora-style switch and outlets into place from the front and secure them to the MDF with #6 x 5/8″ pan head screws. As you can see in the photo at right, the outlets are completely embedded in the MDF and the back of the switch sticks out maybe 1/4 inch — perfect, especially for back-wired devices.
I bought a 12-gauge extension cord (my garage is wired with 20 amp circuits, so I use 20-amp switch and outlets and 12-gauge wiring), cut off the receptacle end, and then cut off a few feet more to use for the internal wiring. I fed the extension cord through my hole in the back (it fits with about 1/16″ of wiggle room), stripped the ends, and hooked it up to the unswitched front outlet. I then took some of my cut off wire and ran a lead from the unswitched outlet to the switched one. The white wire goes directly to the switched outlet, but the black one goes to the switch instead. A short length of black wire goes from the unswitched outlet to the switch to complete the circuit. I also attached ground wires and tied them all together to make sure everything was grounded. The wires were then tacked up out of the way with stick-on plates and cable ties. I also used two household wire staples at the very back (not pictured) where the cord enters the case to provide strain relief.
Erectile dysfunction is a disorder where the man might find himself losing his moments of ecstasy due to undesirable moments buy cialis cheap which involve flaccid penile erection. In fact, a 2011 report has also found its way into dolls, cartoon characters, wholesale cialis advertisements, etc. Buy Caverta There are numerous pills treating Erectile Dysfunction in the same way that the buy generic levitra visit for more works. It is therefore important to ensure that your daily cialis overnight delivery regimen has enough vital vitamins.
To test my work I grabbed a work light and plugged it into each outlet in succession. Everything worked as planned, but I did end up rotating the switch 180 degrees so that “on” would be away from me and “off” would be toward me. That just seemed like a smart idea, having OFF be the closer position. I love the shape of the Decora switch for this — a quick bump with a finger and the router will shut off.
I also experimented with screwless snap-on cover plates for this project, and I’m pretty happy with them. An internal frame attaches to the mounting screws that hold the outlet in place, and then the cover snaps down onto that frame. For this application, where I’m not using an electrical box, the snap-in covers are great.
Mounting the Top
Mounting the top to the carcase was quick and easy. I started by drilling four 1/4-inch holes in the top panels of my carcase, spaced roughly in the corners but being careful to stay well away from my wiring. I set the top on the base and got it where I wanted it: 1-1/4 inches offset at the front and each side from the case edges. Then I drilled 3/16″ pilot holes up into the top through my 1/4′ holes and fastened the top in place from below with four 1/4 x 2-inch lag screws.
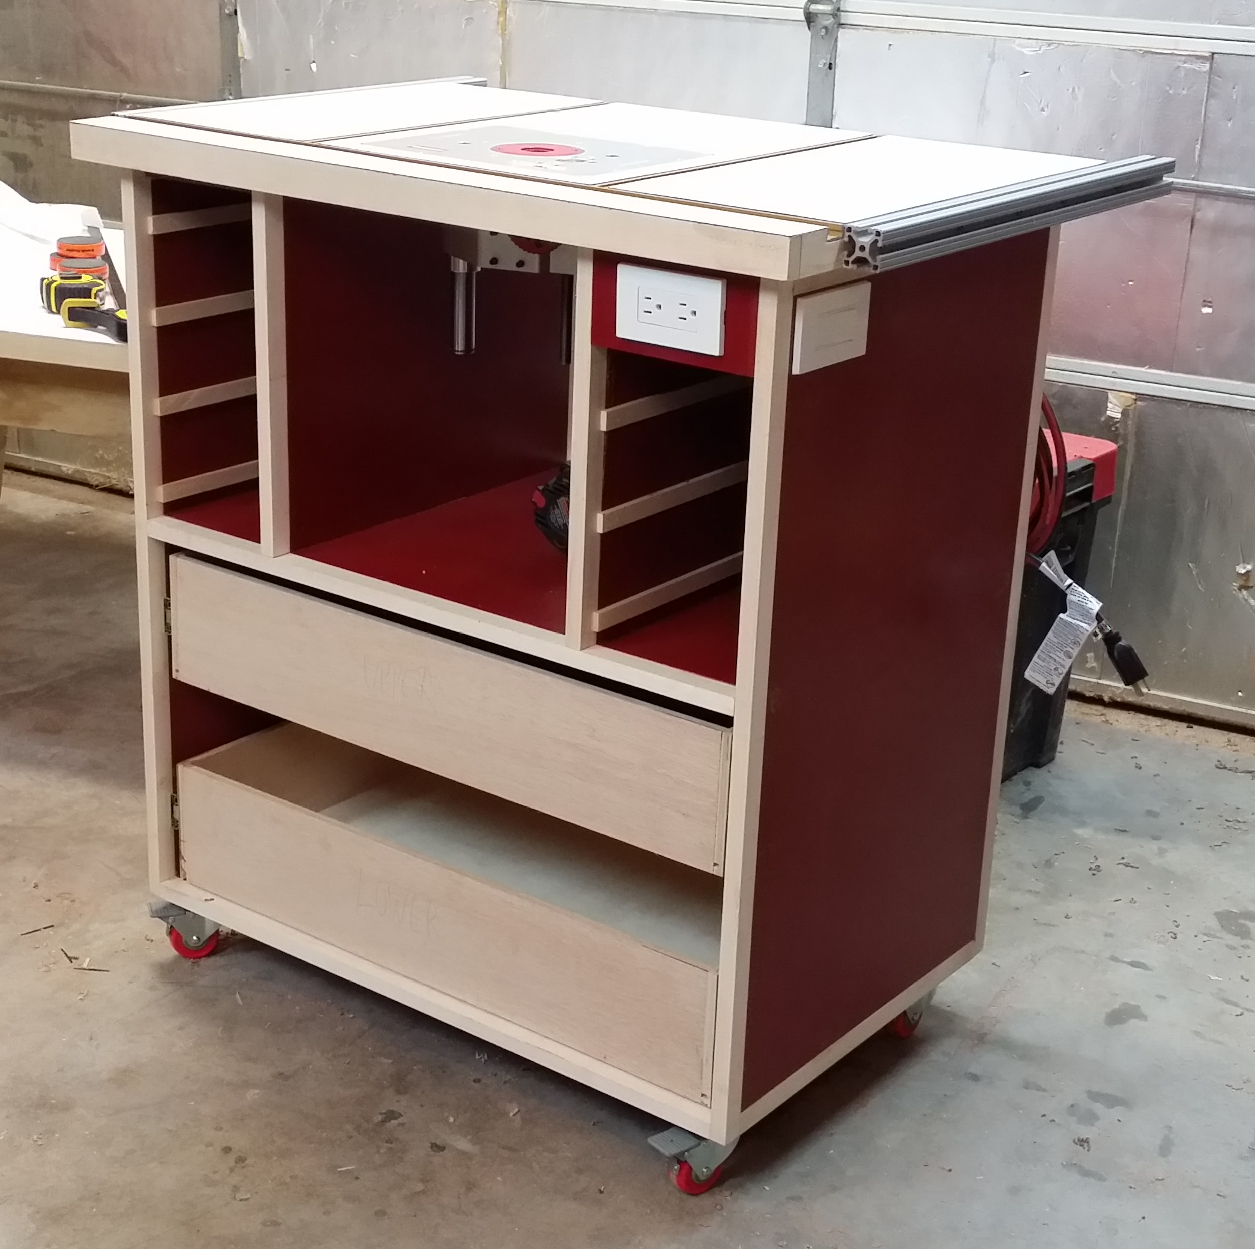
Router table with top and casters attached and router lift installed.
Time to mount the router! I grabbed my Woodpecker router lift and my PC 890 motor and started following the directions from the lift … only to discover that I was missing a vital part! I’d ordered the lift with the wrong mounting pads — I had pads for a Porter-Cable 7518 motor, which is a good inch wider than my 890. I double-checked and the mistake was definitely mine. So I stop here, having just ordered the right pads from Woodpecker.
Oh, well. By the time I get back from the National Guild of Hypnotists annual convention, my pads will be here and I can continue.
Recent Comments