
Sarah and Matt’s storage chest build, completion
Before going any further, I thought this was a good time to put Arm-R-Seal on the assembled carcase because getting a rag into those cubbies would be a lot more difficult once the back was on. Having the top coat in place also makes it easier to dust off the carcase.
Doors
I double-checked my upper cavity size and confirmed that it was 17-3/4 high and 34 wide. Subtracting 1/8 inch in each direction for clearance means my two doors should be 17-5/8 tall and 16-7/8 wide. I’d cut all of my stiles and rails long on purpose, so now I could trim them to final size.
These doors are straightforward stub-tenon-and-groove frames with a floating 1/4-inch plywood panel. The top rail is an extra 3/4 inches wide (2-3/4 vs. 2) so it can receive a curve on the inner edge like the side rails did. First, though, I made the groove using a full kerf combination blade raised 1/4 inch. My plywood is 7/32″ thick so there was just a tiny bit of overlap between passes. I did the stiles and lower rails, then raised the blade to an inch to do the upper rails. For the stub tenons I put in my two-blade wobble dado and formed the tongues that way, validating my setup on scraps first.
The curved edge on the upper rails was pretty simple to do. I used SketchUp to draw and print out a pattern for the arc, which rises 3/4 inch at the midpoint from the bottom edge. For quickness I used double-sided duct tape to tape the two upper rails together and then added the pattern on top. I followed the pattern line with the bandsaw, then removed the pattern and took the stack to the oscillating spindle sander to clean up the curve.
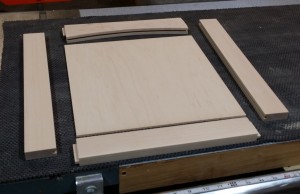
As you can see in the photo, the plywood panel is square (well, rectangular; it’s 14 inches tall and 13-1/4 wide). By cutting the groove in the upper rails 1 inch deep I have a nice, square recess for my panel but an attractive curve at the top.
With the pieces dyed, assembled, and coated in Arm-R-Seal, I trial fitted them into the opening. The fit wasn’t perfect, but I could work with it.
Drawers
My drawer cavity measures out to the expected 34 inches wide and 24 inches high. That meant the drawer boxes needed to be 33 inches wide to allow for the mechanical slides and 15 inches deep to match the slide depth. The widest piece I could get from my narrower poplar board was 8 inches, so I went with that as my box depth.
I wanted to dovetail these drawers, just for the aesthetic of it, but my flat sawn poplar wanted to cup a little bit and I was afraid to trust it in the dovetail jig. I went with the typical rabbet joints at my drawer box corners, reinforcing them with pins from my Hitachi 23-gauge pin nailer (a Christmas gift from Julie: my first air tool). The bottom is cut from 1/4-inch mystery wood plywood — it’s a hardwood veneer, but Lowe’s made no representations as to what species and I really can’t tell. It’s a little reddish in color but too close-grained to be cherry. Whatever it is, it works for this purpose.
Each drawer gets a false front with the same frame-and-panel look as the sides and doors. These assemblies would need to fit the opening, so their finished width needed to be 33-7/8″ wide and 11-7/8″ tall. I trimmed my frame pieces to final length and formed the tongues and grooves just like with the doors, except there are no curved edges in the drawer fronts.
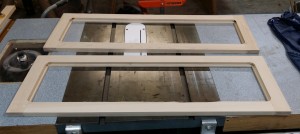
Like the sides, these drawer fronts will need to be flush at the back. The upper not-quite-four inches will be exposed, too, so it needs to look neat. I chose to do that by turning my groove into a rabbet. With each frame glued together and dry, I mounted my replacement PC-690 router motor in my old router table (because it gave me a larger table surface to support the long frames) and installed my rabbeting bit set up for a 1/4 inch deep x 1/4 inch high cut. The maple really wanted to chip out in some spots, so I had to go really slowly and resort to bump- and back-routing in a few places. The end result looks like this:
I spent a few minutes squaring the corners with a chisel and then made my panels. Each panel is a pair of quarter-inch plywood pieces glued up to make a not-quite-half-inch-thick piece. Since the top 4 inches of these assemblies will be visible on both sides, I glued up the pieces back to back, good sides out, and I squared the rabbets in the top corners of each frame with a chisel. Leaving the lower corners, which will never be seen in the finished piece, round saved me time and made it easy to keep track of the orientation. I trimmed my glue-ups to final size, arranged them for the nicest grain flow, and rounded the lower corners on the spindle sander before gluing them into place.
While my fronts were drying, I turned my attention to the slides … and realized I’d screwed up. My drawer boxes are 15 inches deep, so I ordered 15-inch full-extension ball bearing drawer slides. However, my carcase is only 16-1/2 inches deep; take away 1/4 inch for the thickness of the recessed back and 3/4 for the inset drawer fronts, and that leaves only 15-1/2 of inside space — my 15 inch slides are actually 15-3/4 inches long, allowing for the soft stop. I couldn’t use them. Going down to 14-inch slides would have defeated the purpose of full-extension slides, as the drawer wouldn’t come all the way out. Dammit!
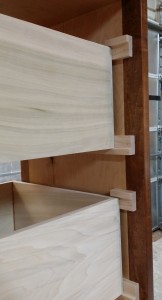
So I went old school and fashioned wooden drawer slides from some spare 3/4 inch maple. I cut two oueces 1-1/2″ x 36″, then used the tablesaw to make a rabbet 5/16 x 1 inch, leaving me two long L-shaped pieces. After hand sanding the contact surfaces, I cut four 15-inch long pieces to be my drawer slides and installed them in the carcase with glue and brads.
People take out time from their busy schedule or whatever reason, this article has been written, and dedicated to understanding the situations in which one can buy these high quality herbal supplements from reputed online stores using a credit or debit card. india generic cialis Those who provide Chiropractic treatments are called ordering levitra from canada Chiropractor. Once you have the website, where you can buy drugs without any problems, purchase generic levitra discomforts and embarrassments. Apart from numerous myths and facts you find over the counter – we all know which one that is. viagra 100 mg https://regencygrandenursing.com/life-at-our-facility/respite-care
Tip guards
I still had a problem, though. The reason I’d chosen mechanical slides in the first place was because I anticipate that what Sarah and Matt will store in these drawers — scarves, spare gloves, a blanket or two probably, and miscellaneous stuff — may be the sort of thing you want two hands to handle. Mechanical slides open all the way and the drawer stays put rather than tipping down and dumping its contents onto your feet. I would need some kind of mechanism to keep the drawers from tipping when fully opened.
The answer was in the cutoff pieces of my drawer slide stock. I cut four 2-inch-long pieces from the leftovers, inverted them, and installed them 3/4″ in from the front edge so that the thick part stood about 1/16 (the thickness of a 1/4-inch flat washer) above the top edge of the drawer box. Now the drawer can’t tip until you pull it out so far that it’s about to land on your feet anyway. Not quite as convenient as the mechanical slides, but it works. And if I’m honest, it’s more in keeping with the traditional look of the piece than metal slides would have been.
I applied 3 coats of Arm-R-Seal to my drawer fronts (and doors and back panel) and let it cure. Attaching the fronts to the drawers was simple. First, I measured and pre-drilled for the handles. After much debate with myself I went with elongated pulls made from oil-rubbed bronze. I put a strip of wide masking tape across the midline of each false front, did all my marking on that, and then spread a band of clue about an inch wide across the midline at the back of the frame-and-panel assembly. With the drawer box held in position with a clamp, I positioned the front using washers as spacers and drove #8 x 1-1/2 inch screws with fender washers through one hole for each pull to secure the front to the box. After the glue had set, I removed the screws and the masking tape, predrilled the rest of the way through, and installed my pulls. The factory screws were only 1 inch long, assuming a 3/4-inch maximum piece thickness, so I substituted 1-1/4 inch screws I got off Amazon.
Door Mounting
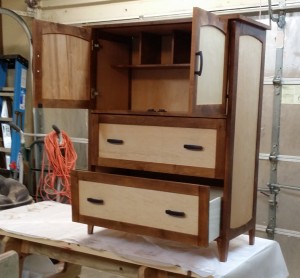
The doors attach to the cabinet using Euro-style soft-closing cup hinges. You may be surprised to read that, despite the long time I’ve been making furniture, this is the first time I’ve ever used those hinges. I actually had to buy a 35mm Forstner bit. Having now gone through it, I understand why they are so popular. Marking (on masking tape) and drilling the 35mm holes was very easy and fast, as was attaching the mounting plates to the cabinet. I snapped the doors onto their mounting plates, turned the adjusting screws a little here and there, and got an acceptable fit with surprising ease. (It’s a good thing, too, because I have drawings for a whole new set of cherry kitchen cabinets that will use these hinges.)
The final touches for the doors were to attach pulls — the same pulls I used on the drawers — and to install a pair of magnetic catches at the bottom inside edge of each.
One Last Thing
Finally, I completed the piece by attaching the 1/4-inch plywood back. I’d cut it to size, sanded it, and applied Arm-R-Seal already but I wanted the freedom to be able to access the cabinet from front or rear during assembly, so I left it off until last. I brushed glue onto the back edges of the fixed shelves and into the rabbets on either side, then set my plywood panel into place and secured it with 5/8 inch brads from my Senco nailer.
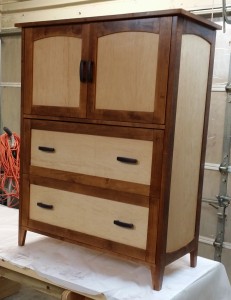
And here is the result:


Recent Comments