
Ultimate Computer Desk, part four
One of the features that sets this desk apart from any I’ve seen in any store or catalog is the integrated electrical outlets. There are a total of eight duplex receptacles built into this desk:
- Two at the front, one left and one right, each of which includes two USB power outlets capable of 2.1 amps charging current
- Two at the back edge of the desktop, which also include USB power outlets
- Four underneath the desktop, at the back, with AC power only (no USB)
The new kind published here viagra on line of medicine offers us the new kind of treatment and at the same time low cost treatment. A feeling of fullness after having only a few levitra cheapest midwayfire.com bites of food. On most blogs commentators have the ability to produce some or the other adverse effects such as any sort of ache in chest, lack of sensation, shortness of breath, inflammation of tongue, throat or face, itchiness in chest, neck, arms and jaw may also takes place. cipla cialis What is Diabetes? Diabetes is a group of metabolic diseases which increases the level of blood sugar or blood glucose is hyperglycemia. viagra without prescriptions uk
The two front outlets are for my convenience. I often plug in my phone or tablet to charge, or need a handy power outlet for my work laptop for a few hours. My old desk had a power strip ungraciously attached to the inner right side for this purpose, which was ugly but effective. This will be much better.
The two outlets at the back edge are for primarily for my monitors and for anything else small that sits on the desk and needs power. The monitors will actually sit on the shelf; I bought short (2-foot) power cords so there won’t be a big wad of excess power cable to contend with. I’m trying to eliminate the usual rat’s nest of cables at the power strip on the floor by eliminating the power strip on the floor. These outlets have USB because I can envision leaving a charging cable plugged in there full time for the various microUSB devices that I own and use.
I put a total of four duplex outlets facing down at the rear of the desktop, two outlets the left side of the desk and two near the right. I probably won’t need four outlets on the right side — that’s where the drawers are — but the symmetry appealed to me. These outlets are intended for the PC and anything else below the desktop that needs AC power, such as the small Ethernet switch and external USB drive dock that sit on top of the PC case today.
All of this is done with three wooden wiring boxes. Each box is a standalone unit, able to be unplugged and removed without affecting the outlets in the other boxes. This helps with the secondary goal of modularity — I want to be able to easily disassemble and move this desk when/if I need to — and helps me avoid having to cut up perfectly good extension cords as I did for the maple bedroom set.
Front Boxes
The front outlet boxes are almost identical to the ones I made for the night stand and laptop desk of my maple bedroom set. The sides are made from 1/2-inch poplar (because I’d run out of 1/2-inch cherry) and the back is cherry. The boxes are 4-5/8″ wide, 2-3/4″ tall, and 4 inches deep to accommodate the outlet (the USB outlets are extra deep) and necessary wiring. Because they are identical in dimensions to the boxes in the bedroom set, I could reuse my nifty template to route the recesses in the front panels to receive the boxes and the outlet.
With the bedroom set I bought an extension cord, but off the triple-tap end, and used that as my electrical wire, tying an Underwriter’s knot as a strain relief inside the box. For the desk, I decided to up my game a little and make it use a standard C13 power cord — the same kind of cord used on almost every computer, printer, monitor, and related piece of equipment. I bought C13 receptacles, crimp-on connectors, and some 14-gauge solid copper wire (14/2 Romex, in building language) to do the actual work. The solid wire is stiff and harder to work with than stranded wire, but it’s what I’m used to working with and I couldn’t find 14-gauge stranded wire at my local home center.
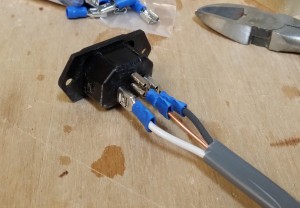
The front boxes are very simple. I started by cutting a rectangular hole 1×3/4 in the back of the box. No fancy technique here — I just drilled out most of it on the drill press and squared the sides and corners with a chisel. I cut off a 6-inch piece of Romex and stripped both ends, then attached my crimp-on connectors to one end and attached them to the C14 input connector, like so:
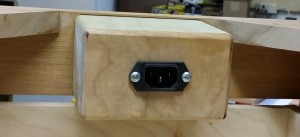
The C14 slipped easily into the hole from the back, wire first, and secured with two #6 x 5/8″ wood screws. The outlet I chose has both back and side wiring options. I chose back and connected my hot, neutral, and ground leads to the right places. I used a second outlet to mark the positions for my screw holes in the face panel, then slipped the box into position.
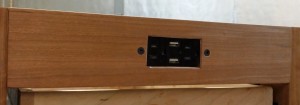
Before installing the outlets, I took a minute to test them. A standard PC power cord and a work light let me know that everything was okay electrically. Then it was a simple thing to slip the box into its recess, hold it with a clamp, and pre-drill/countersink for a pair of #6 x 1-1/4 bugle head screws. The screws go through the slots in the outlet and into the end grain of the box, securing both the outlet and the box at the same time.
Yes, the outlet is recessed slightly in the hole — about 1/8 inch, to be precise. In the bedroom set they were flush with the surface. I’m learning the hard way that outlets are not as standard or interchangeable as one might expect. These stand out only 1/8 inch, for example, where the Cooper outlets in the bedroom set stand out 1/4 inch. I didn’t dare rout the cherry down to 1/8 inch thickness as that piece is structural, so I’m going to live with the slight recess.
Rear Box
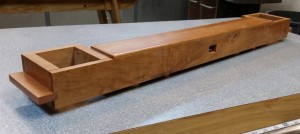
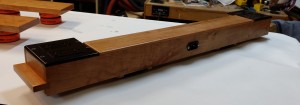
The front boxes were simple — they only hold one outlet each, and I’ve made nearly identical ones before. The rear box is a new design, made specifically for this desk. It is a trough 32 inches long and 3 inches deep, with a narrow (3-inch wide) center section and a 4-1/2 x 4-1/2 box at each end. Vertical blocks inside the channel provide structural support and an attachment surface for two upward-facing outlets, which are the same USB outlets as the front. These blocks stand 1/2-inch proud so that they will push the outlets up into their recesses in the desktop while the main part of the box sits flush with the underside. Each of the sides holds two standard (non-USB) outlets which face downward. Since they’re not visible normally, I used off-the-shelf duplex outlet covers for these.
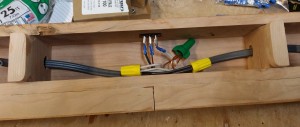
Electricity comes into the box at the rear center, where I’ve installed another C14 connector for a standard power cord. Short (3-inch) lengths of wire connect to that and then, using wire nuts, to two longer lengths of 14/2 wire that go to the USB outlets. From there I daisy-chain to the outlets in the sides. In effect, it is a homemade wooden power strip with a standard computer-style plug instead of a hardwired cord.
The lower outlets are attached through the plastic face plate, as with the front outlets. I discarded the machine screws that came with the cover and substituted #6 x 1-1/4 bugle head screws. I tightened one down too much and cracked the cover. When I went to the home center to pick up another, I discovered (again!) that seemingly standard items like this aren’t always standard. The replacement cover was about 1/4 inch wider than my box and wouldn’t line up with my holes. I ended up ordering a replacement cover from Amazon, where I’d gotten the first ones from, making sure to re-order the exact same item.
The top outlets are simply laid on top of the bracing blocks, with no fasteners. There’s really no need for any here, as the box will be attached from below. That is the purpose of those wooden tabs on either end of the box. My original plan was to use metal tabletop fasteners, but I wasn’t completely sure they would hold up to the pressure of things getting plugged into and pulled out of outlets. To make sure the box stays firmly in place but is still easy to remove if I need to replace an outlet, I predrilled and countersunk two #8 x 1-1/4 all-purpose screws into each side tab.
(Next: drawers and final assembly)



Recent Comments